Magento 2 Configurations, Product Reviews, and Images & Videos

When creating a Magento 2 productConfigurations, Product Reviews, and Images & Videos are the first three sections that contain more detailed information.

Configurations

From the Configurations section, you can see all the variations of a product that are created based on different colors, sizes, etc. You can also create new variations for later use with the Configurable Product type.

product-configurations

Product Reviews

The Product Reviews part shows the whole reviews that customers have submitted. Detailed information like product name, SKU, review status, date created, customer’s name, and so on are displayed in a grid when you expand the section. It is very important to note that this section only appears for an existing product, which has been available in your online store.

Magento-product-reviews

Images and Videos

The Images and Videos section allows you to do the very fundamental tasks related to product visual images and any audio files. You can upload more than just one image for each product, then set the order for them, and manage how each of them is used. For more complicated settings, you can open the image in detail view by clicking the “Base”/ ”Thumbnail” / ”Small” button and set to your preferences. The Magento default uses temporary images as placeholders until the permanent product images become available.

product-images-videos

To upload an image or video, do the following:

  1.  Open the product in the backend mode
  2.  Move downward and expand the Images and Videos section.
  3.  There are two methods to add a product image/ or video:
  • Select an image from your computer, then drop it on the camera symbol.
  • Tap the camera icon, then navigate to the image file on your computer. After that, select the image, and tap Open to upload it.
  1.   When you finish all the settings, tap Save to confirm all the changes.

In short, here are all the details about Magento 2 Configurations, Product Reviews, and Images & Videos we want to share with you. If you want to add or erase any item in this FAQ list, feel free to contact us. Don’t forget to Like, Share, and Subscribe to Magestandard for more informative Magento extension review articles.

How to Configure Checkout Totals Sort Order in Magento 2

In the Magento 2 Review & Payments stage of the Checkout process, the Totals Sort Order appears at the bottom of the Order Summary to show the total number that a customer has to pay. This number has been adjusted for all discounts, shipping fees, store credit, and tax payment.

storefront-checkout-totals

The order of each item which determines how the Totals Sort Order is calculated is set in the backend configuration. Each item (Subtotal, Discount, Shipping, etc) is assigned a number to justify the order of the calculation. For instance, the Subtotal, which is assigned a value of 10,  is then set to be the first item in the section. The Grand Total is assigned a value of 100 so that it’ll appear last. All of the other items in the totals section of the Order Summary are assigned a value between those values.

There are four steps to configure the Checkout Totals Sort Order in Magento 2 backend:

  1. Sign in with your admin account. On the Admin sidebar on the left, click Stores. Then choose Configuration under Settings.
  2. In the panel on the left, expand the Sales section. Choose Sales after that.
  3. Next, move to the Checkout Totals Sort Order section and expand it then do the followings:
  • Firstly, select the store view that the settings are applied. When complete, tap OK to continue.
  • There are two ways to set the Checkout Total order in the frontend. You can either accept the default value that is already filled in the boxes or enter a new one to each box. Clear the Use system value checkbox if you choose the second option.

config-sales-sales-checkout-totals-sort-order

  1. When finishing all the settings, click Save Config to confirm the changes.

That are 4 steps that help you to set the Checkout Total order in the frontend. Don’t forget to follow us to receive more useful blogs about Magento 2 platform.

How to Configure Checkout Options in Magento 2

Checkout Options Configuration

The checkout options  configuration is the action that set up the format of the checkout page in a Magento 2 store. The requirements to make a purchase, and/or the options that are displayed during the checkout process are all determined by the configuration in the backend.

Checkout options

As a Magento admin, you can define the options whether or not the shoppers must register for an account and/or agree to the terms and conditions of the sale before making a purchase. The checkout options include:

  • Guest Checkout: Shoppers are required to create an account before making a purchase. The default setting in Magento 2 allows non-registered customers to make purchases, with an option to register for an account after completing the checkout process.
  • ..: Customers have to agree to the terms and conditions of the sale so that they can finish their purchases if Terms and Conditions is enabled. The Terms and Conditions message appears just before the Place Order button and after the payment information is filled.
  • One Page Checkout: Enable the Onepage Checkout if you want the entire checkout process takes place on a single page. Each section of the checkout information can be expanded if necessary. As Magento’s Onepage Checkout is enabled by default, you need to disable it if you want to implement any custom integration or checkout extensions.

config-sales-checkout checkout options

To change the checkout options, do the followings:

  1. On the Admin sidebar, click Stores. After that, choose Configuration under Settings.
  2. In the panel on the left, expand the Sales section. Then choose Checkout.
  3. Next, open the Checkout Options section and set the options as your preference:
  • Enable Onepage Checkout
  • Allow Guest Checkout
  • Enable Terms and Conditions
  1. When finish, click Save Config to confirm all the changes you’ve made.

That are the instruction to configure Checkout Options for your Magento 2 store. Don’t forget to follow us to receive more informative blogs about Magento 2.

A Detailed Introduction of Actions Control in Magento 2

People use the actions control for the purpose of applying an operation to records in backend. In this article, we will give you a detailed introduction of Actions Control in Magento 2.

magento2 actions control

What is Actions Control?

When handling a number of records in the grid, you can make use of actions control to assign an operation to one or more records. The actions control shows all operations you can apply to the individual type of data. For instance, with product records, actions control can be utilized to alter the status from “Disabled” to “Enabled”, update the attributes of chosen products or remove records from the database.

In addition, you are able to change as much as you want and then update the records in just one step. It is more effective than adjusting the settings of each product independently. The choice of existing actions varies by list and supplementary options might appear based on the chosen action. For example, when changing the status of a selection of records, a Status box shows up next to the Actions control with three extra options: Delete, Enable, Disable

How to Use Actions Control

Step 1: Choose Records

  1. Put a tick on the checkbox of each record that is a target for the action or use one of the following choices to select a group of records:
  • Select All / Unselect All
  • Select All on This Page/ Deselect All on This Page
  1. If you need to display only the records that you want to include, configure the filters at the top of each column.

Step 2: Assign an Action to Chosen Records

  1. Select an Actions control you want to apply

For example: Change Status

  1. Click Submit to finish all steps

Provided above is the specific explanation of Actions Control in Magento 2. If you have any query about Magento 2 topics, please feel free to send us.

4 Simple Steps to Make FedEx Available for Magento 2 Stores

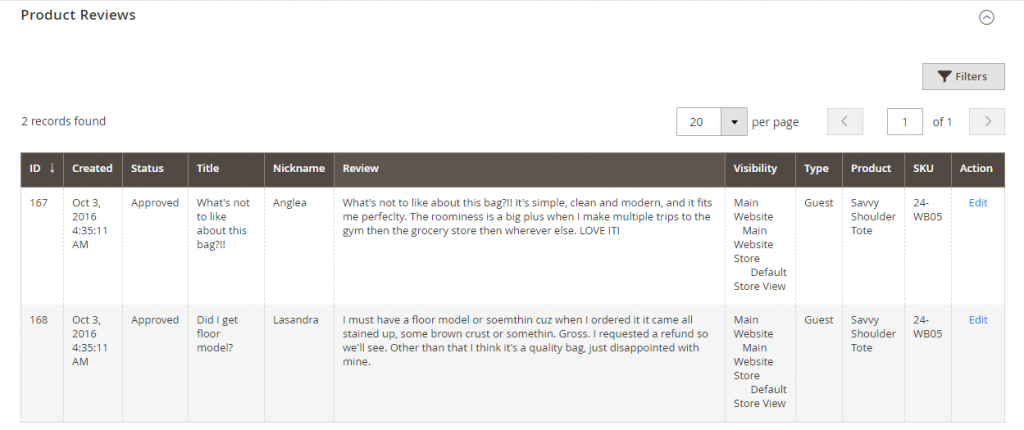
Federal Express (FedEx) was first released in 1973, since then it has developed continuously to become the industry’s global leader, offering domestic and international shipping services by land and air to more than 220 countries all over the world. FedEx has ranked the first in Top 50 largest Global Freight Carriers for years. Like UPS, dimensional weight is also used as one of FedEx’s shipping rate calculations. This article will provide you with a complete guide to make FedEx available for Magento 2 customers.

STEP 1: Open a FedEx Shipping Account

Firstly, admin must contact FedEx Express to open a FedEx Merchant Account and register for FedEx Web Services Production Access. Then, admin should take a look at the production account information page to understand more about FedEx and their services. After all, choose “Obtain Production Key” which is shown at the bottom of the page to get your key and complete.

Please remember your key by copying or noting it down. It is essential for you to make FedEx available in backend configuration.

STEP 2: Enable FedEx for Magento 2 Stores

  1. On the left-side bar of Admin Homepage, find and choose Stores. Then click Configuration in the Settings section.
  2. In the Sales section, click Shipping Methods, scroll down until you see FedEx.
  3. Expand this section and complete this step by following the below instructions:

a. Choose “Yes” at the Enabled for Checkout

b. In the Title box, enter the name of this shipping carrier which will appear on screen when customers checkout their cart.

c. Register your FedEx account in the corresponding fields: Account ID, Meter Number, Key, Password.

d. The Sandbox Mode filed is to determine whether you want to apply FedEx in the testing environment or as one of available shipping methods. Choose “Yes” to test FedEx or “No” to offer this shipping carrier to your customers.


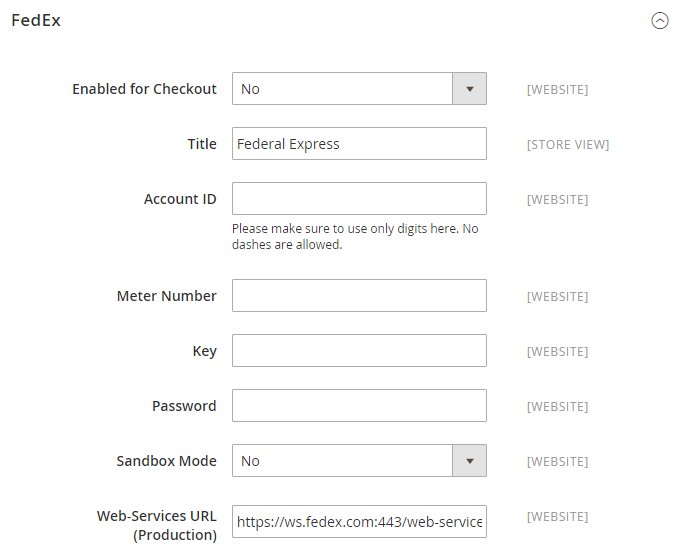
FedEx Account Settings

STEP 3: Complete the Package Description and Handle Fee

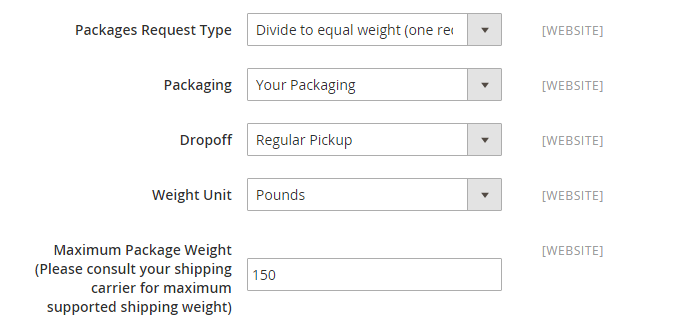
  1. The Packages Request Type field is used when one order must be split into multiple shipments. “Divide to equal weight” option means that each shipment has the same weight with each other, therefore admin can submit multiple packages in one request. If not, choose “Use Origin Weight” to submit separate requests for packages.
  2. In the Packaging field, admin choose their most regular type of packaging. There are 7 options for FedEx shipping: FedEx Envelope, FedEx Pak, FedEx Box, FedEx Tube, FedEx 10kg Box, FedEx 25kg Box, Your Packaging.
  3. Admin choose the pick-up method in Dropoff section. There are 5 options:
  • Regular Pickup: admin make arrangements for regular pickups. This method is effective for businesses that have a high volume of shipments.
  • Request Courier: admin have to request FedEx to pickup shipments.
  • Drop box: admin bring their shipments to nearby FedEx drop box.
  • Business Service Center: admin bring their shipments to local FedEx business service center.
  • Station: admin bring their shipments to local FedEx station.
  1. In the Weight Unit field, admin register the unit of measurement used in locale. Admin can choose “Pounds” or “Kilograms”.
  2. Enter the Maximum Package Weight for each FedEx shipments. The default is 150 lbs. However, in case you have another agreement with FedEx, you can ask them for more detail.

FedEx Package Settings

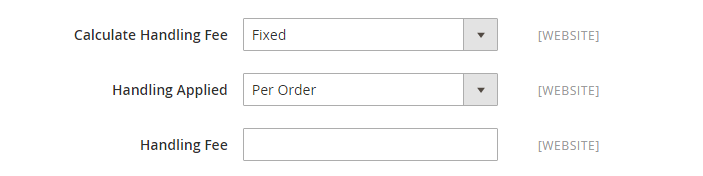
  1. Handling fee is an additional fee that can be charged by FedEx. This fee is not shown during checkout. In case admin want to charge a handling fee, follow the below instructions:
  2. In Calculate Handling Fee section, choose calculation method to control handling fee. There are two options:
  • Fixed Fee
  • Percentage

8. Admin can decide to apply handling fee for each order or for each package in the Handling Applied section.

9. In the Handling Fee, admin needs to register the rate to calculate handling fee based on chosen Calculate Handling Fee option. If admin choose “Percent, enter the number without “%” symbol. For instance: enter “0.01” for 1%. If admin choose “Fixed”, enter the amount of fee there.

fedex FedEx Handling Fee Settings

STEP 4: Allowed Methods and Applicable Countries

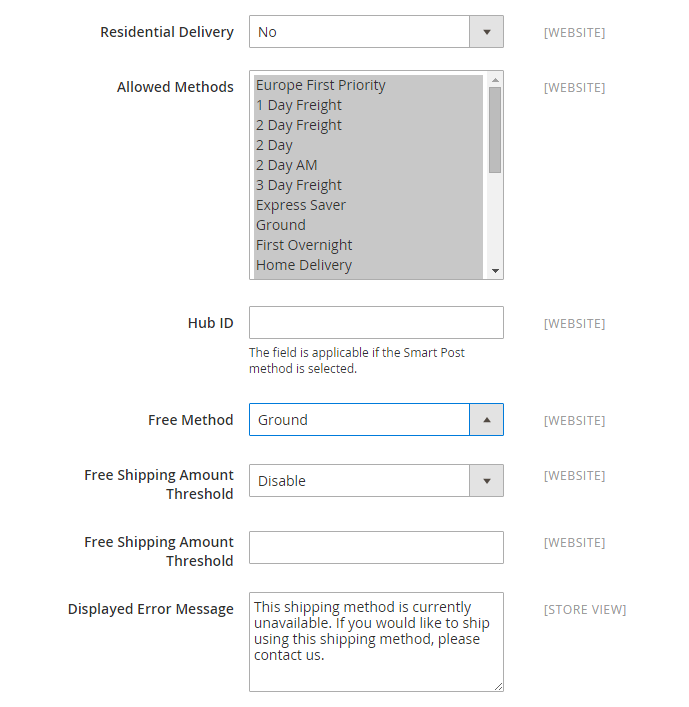
  1. Modify Residential Delivery section to your selection. Choose “Yes” to offer Business-to-Consumer (B2C) or “No to offer Business-to-Business (B2B).
  2. In the Allowed Methods section, there is a list of available shipment methods for admin to choose. Admin should consider carefully which methods are suitable for their business. Admin can choose one or multiple options by holding the Ctrl button. Please note that if admin want to offer Smart Post, admin must enter the Hub ID.
  3. In the Free Method list, admin chooses the method that he/she wants to use for free shipping. Then, do the following:

a. In the Free Shipping Amount Threshold section, choose “Disable” to not apply free shipping for any order via FedEx or “Enable” to offer free shipping.

b. If admin choose to offer free FedEx shipping, enter the minimum amount of free shipping order in the next Free Shipping Amount Threshold.

c. In the Displayed Error Message box, admins enter or paste a message that will be shown on screen in case FedEx is not available. Admin can also use the default message there.

fedex
FedEx Allowed Delivery Methods

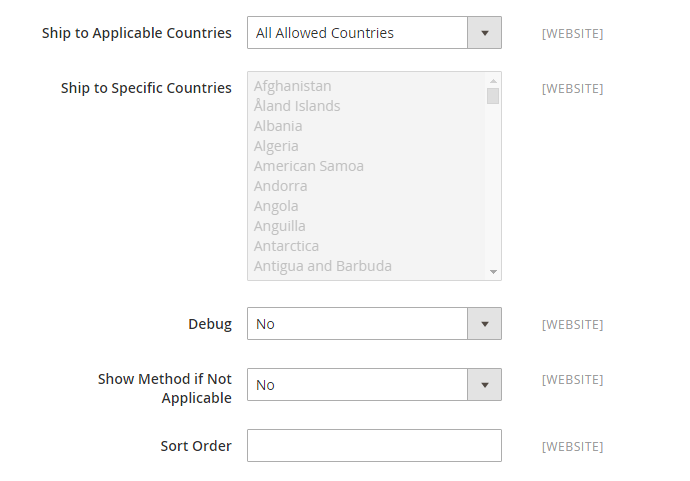
  1. In the Ship to Applicable Countries section, choose “Specific Countries” and select from the list each country where FedEx is available (hold the Ctrl button to select multiple options) or “All Allowed Countries” to offer worldwide shipping via FedEx.
  2. In case admin wants to have a log file that contains all FedEx orders’ information, set Debug to “Yes”.
  3. The Show Method if Not Applicable section is to determine to show FedEx shipping methods all the time (whether it is available or not) by tapping “Yes”. If not, choose “No” to show only when it can be used.
  4. In the Sort Order field, enter the number corresponding to FedEx’s position in the list of available shipping methods while checkout. For example: 0 for the first, 1 for the second, etc.
  5. Click Save Config to complete.

fedex
FedEx Applicable Countries