UPS, also known as United Parcel Service, was founded in 1907 as a messenger company located in the United States. In 2017, UPS is the second largest freight company worldwide with total revenue of more than 60 million dollars, just behind FedEx Corporation. 
 UPS has also applied dimensional weight as one of their shipping rate calculations in addition to other popular methods. By this article, readers will understand clearly how to make UPS available for Magento 2 stores.
Step 1: Open a UPS Shipping Account
Before going to the next steps, admin needs to already have a UPS shipping account with account number or user ID.
Step 2: Enable UPS for Magento 2 Stores
- Look for Stores on the left-side bar of Admin homepage, click Configuration below Settings.
- In Sales section, choose Shipping Methods, scroll down and find UPS.
- Expand this section and complete the fields as following:
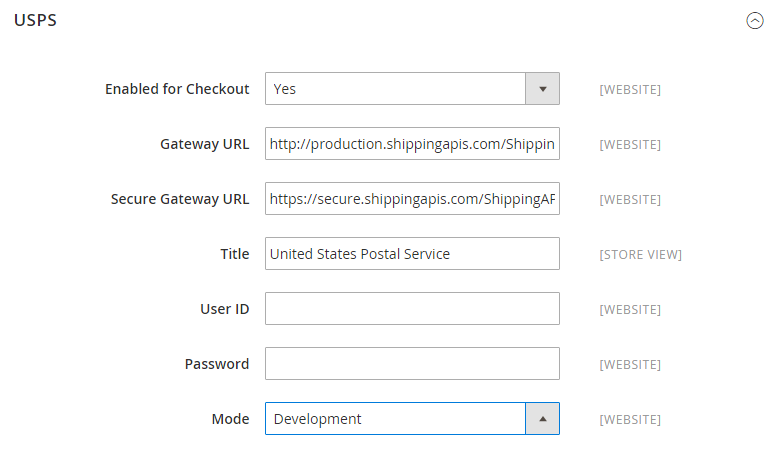
- Choose “Yes” at Enabled for Checkout.
- In UPS Type, if admin want to set up a standard UPS account, choose “United Parcel Service” and follow the below instructions:
a. In the Live Account section, choose “Yes” to run UPS in production mode and add UPS into your list of available shipping methods, or “No” to just run UPS in a test mode.
b. In the Gateway URL section, enter or paste a link that can be used to calculate shipping charges. This link is set by default and does not need to be changed while using.
6. If admin want to create a shipping label, choose “United Parcel XML” in the UPS Type section and follow the below instructions:
a. Choose “United Parcel Service XML” in the UPS Type.
b. Register your account credentials in the corresponding fields: User ID, Access License Number and Password.
c. Choose “Live” in the Mode section to use secure connection transferring data to UPS shipping system. Please note that “development” does not use secure connection.
d. Verify the Gateway XML URL that is needed to send requests by XML file.
e. In the Order of Shipment section, register your address where the shipment will be delivered from.
f. In case UPS offers you with a specific shipping rates, you can also apply that into configuration by choosing “Yes” at Enable Negotiated Rates section, and then enter the Shipping Number that UPS has assigned to you before. This number contains six digits.
7. Enter or paste the Title which will appear on screen to choose when checkout. In Magento 2, the default name of UPS is “United Parcel Service”.
Enable UPS
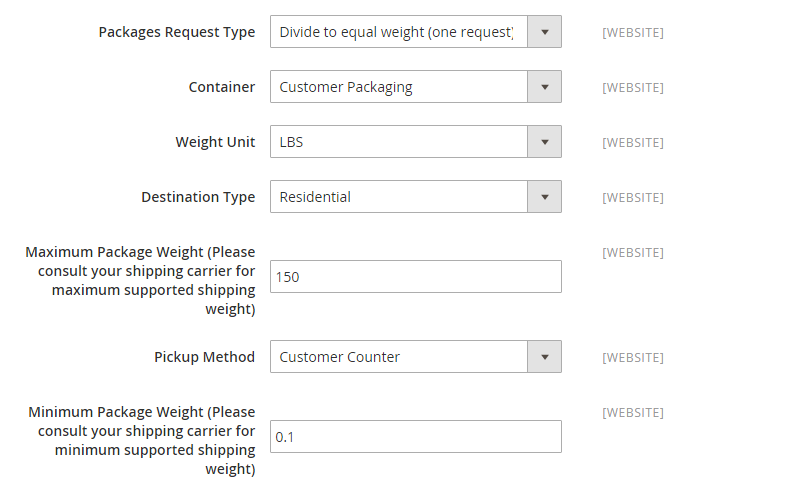
STEP 3: Complete the Container Description
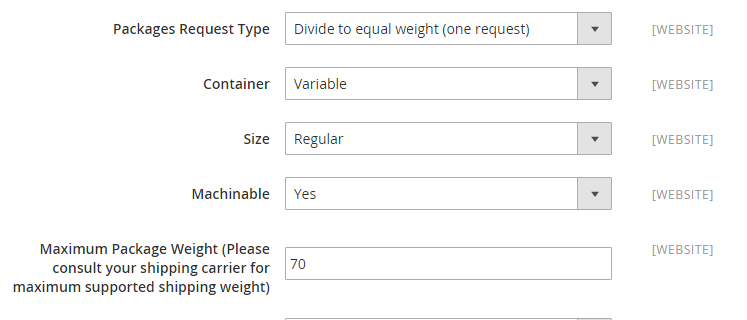
- In the Packages Request Type section, choose “Use origin weight” for few requests if using origin weight as the basis of calculating the shipping cost. Or admin can select “Divide to equal weight” for one request if the packages are divided by equal weight.
- In the Container section, admin needs to choose their packaging type. There are two options: LBS or KGS.
- In the Weight Unit section, choose your system to calculate product weight. Each system will be different, depending on each country. Don’t hesitate to ask UPS for help in case you do not sure which one is suitable for your Magento stores.
- In the Destination Type section, choose:
- “Residential” in case you offer B2C shipments mostly
- “Commercial” in case you offer B2C shipments mostly
- “Define Automatically” in case you want UPS to consider between residential and commercial mode and choose the more suitable one.
5. In the Maximum Package Weight section, enter the maximum number assigned by UPS.
6. In the Pickup Method section, choose
- Regular Daily Pickup
- On Call Air
- One Time Pickup
- Letter Center
- Customer Counter
7. In the Minimum Package Weight section, enter the minimum number assigned by UPS.
 Container Description
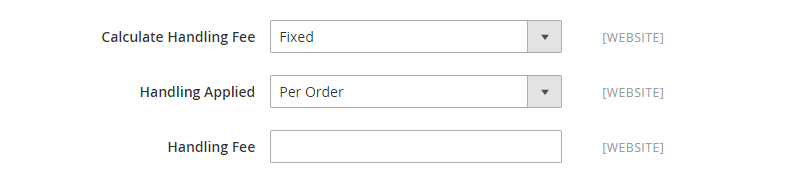
STEP 4: Set up Handling Fees
- The Calculate Handling Fee box is used to control your additional handling fee. There are 2 options to choose:
- Fixed
- Percent
2. The Handling Applied box is used to specify whether the handling fee is applied per order or per package, corresponding each option.
3. In the Handling Fee section, admin need to enter the rate based on the chosen Calculate Handling fee. If admin chooses “Percent”, enter the entire number without the “%” symbol such as “0.05” or “0.1”. If admin chooses “Fixed”, enter the amount of fee there.
 Handling Fee
STEP 5: Specify Particular Shipping Methods and Applicable Countries
- In the Allowed Methods section, there would be a list of UPS methods offered to your customers. Admin can select one or several methods by holding the Ctrl button. These methods will appear under UPS option while checkout.
- If you want to offer free shipping for packages delivered via UPS, set Free Shipping to the UPS. Then:
- Choose “Enable” in the Free Shipping with Minimum Order Amount, and then enter your minimum value for each free shipping order in the Minimum Order Amount for Free Shipping section.
- Or choose “Disable” in the Free Shipping with Minimum Order Amount in case you want to offer all order via UPS for free shipping.
3. Enter or paste the Displayed Error Message box to create a message box notifying customers in case UPS is not available.
 Allowed Methods
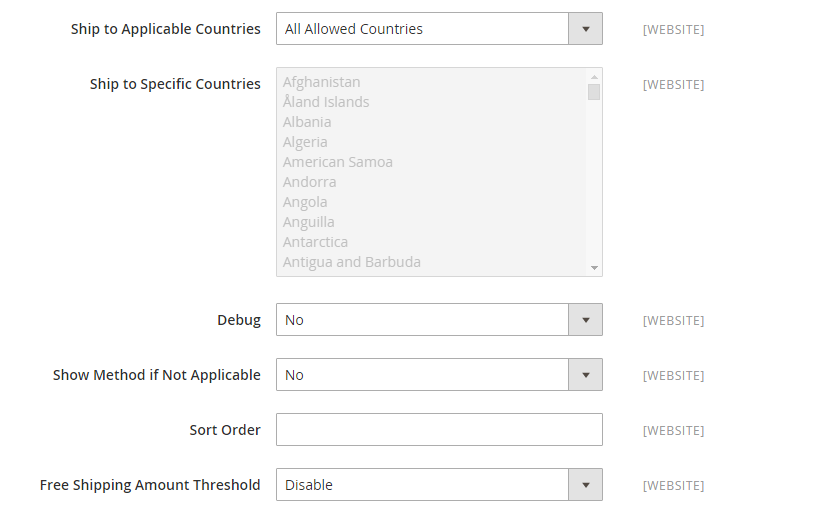
4. In the Ship to Applicable Countries box, choose “Specific Countries” and select each country that can apply UPS or click “All Countries” to allow customers from all countries in your store settings to be offered this shipping method.
5. In the Show Method if Not Applicable box, choose “Yes” to show UPS Shipping (whether it can be used or not) or “No” to hide when it is unavailable
 Applicable Countries
6. In case you want to have a log file that contains information about all your shipments via UPS, choose “Yes” in the Debug section.
7. In the Sort Order box, enter a number to arrange the order of UPS option in a list of methods. For example: 0 for the first, 1 for the second, etc.
Debug and Sort Order
8. Click Save Config to complete.