How to Configure Grid Layout in Magento 2

The data in admin pages is usually shown in a grid so that store owner can manage it more effectively. In this article, we will show you an easy guide to configure grid layout in Magento 2.

magento2-grid-layout

About Grid Layout

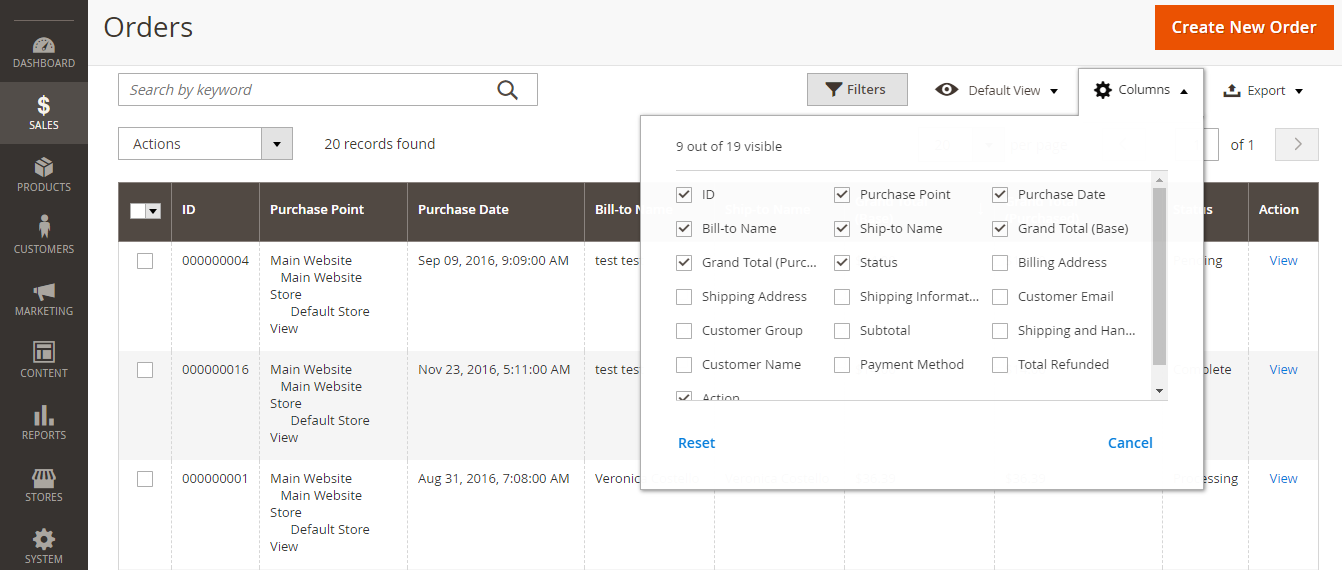
It can be clearly seen that admin pages that control data present collected records in a grid. According to your reference, you can select which columns appear, determine their order in the grid or save them as a “view”. A key point is that only nine of twenty existing columns are displayed in the grid by default.

To Alter the Choice of Columns

  1. Select the Columns control in the upper-right corner. Then, do this instruction:
    – If you want to insert more columns to the grid layout, put the tick in the checkbox of any option
    – In case you need to remove columns from the grid layout, clear the marked checkbox
  2. You should scroll down to ensure that you view all available columns

To Change the Position of a Column

  1. Click the header of the column and hold
  2. Move the column to the new position and release

To Save a Grid View

  1. Choose the View control -> Click Save Current View
  2. Type a name for the view. Then, tap the arrow icon to save all changes

To Modify the Grid View

Select the View control. Then, do one of these options:

  • Tap the name of the view if you want to utilize another view
  • Choose the Edit icon to alter the name of a view -> Update the name you want

Conclusion

Provided above is the guide to customize the grid layout in Magento 2. We hope that this article is useful for anyone who is interested in searching about Magento and related topics. Please feel free to contact us if you have any query.


Quickly Explore Shipping Carriers in Magento 2 Stores

For Magento 2 sellers, it is important to carefully select one or several shipping carriers and then open a commercial account with them. These carriers need to suit their businesses. If admin already has a commercial account with a supported carrier, admin allows customers to choose that carrier when they checkout their cart. An advantage of this action is that the shipping rates is downloaded automatically to admin’s configuration. Therefore, admin do not need to worry about whether the information is correct or not.

In order to provide customers with permissions to choose a shipping carriers in the list of available carriers, admin needs to register the point of origin for your store in the shipping settings section. This action is to calculate the shipping charge based on distances from your store to customers’ destinations. After that, complete the settings for your carriers in settings to make them available. This configuration will be different for each carrier. To complete these actions, admin needs to already have a shipping account with their targeted carriers before. Their account number or user ID and a gateway to carriers’ system will be needed to register in Store Configuration. In case of additional shipping services for your Magento Open Source installation, you can see Magento Connect for more detail.

These days, there are four big companies working in this field:

ups_logo shipping carriers

UPS

Founded in 1907 as a messenger company in the United States, United Parcel Service, also known as UPS, has developed themselves as one of the biggest freight companies worldwide. UPS offers domestic and international shipping services by both land and air to more than 220 countries. 

usps_logo shipping carriers

USPS

The United States Postal Service has existed for more than two centuries from 1775. USPS is an independent agency of the United States federal government responsible for providing postal service in the United States and worldwide.

fedex_logo shipping carriers

FedEx

FedEx Corporation is an American multinational courier delivery services company, headquartered in Memphis, Tennessee. Like UPS, FedEx also offers domestic and international shipping services within more than 220 countries.

dhl_logo shipping carriers

DHL

DHL Express is a division of the German logistics company. DHL provides international courier, parcel and express mail services. DHL is one of the world’s largest logistics companies operating around the world, particularly in sea and air mail.

In short, here are all the details about Shipping Carriers in Magento 2 Stores we want to share with you. Don’t forget to Like, Share, and Subscribe to Magestandard for more informative Magento extension review articles.

Try Dimensional Weight to Modify Shipping Charge Efficiently in E-commerce Stores

Shipping costs have always been a big concern of both suppliers and customers. This is simply because customers always want to cut down this charge as much as possible and they are willing to find other suppliers that offer cheaper shipping fee. Therefore, sellers need to consider carefully to choose the most suitable calculation method. This article will introduce dimensional weight – a common industry practice in transportation.

Firstly, we must know what exactly dimensional weight is. Dimensional weight, also known as volumetric weight or “dim”, is a calculation based on the length, width and height of a package instead of its physical weight like other methods. Normally, this calculation method is used when the cost of transporting a shipment can be affected largely by the amount of space that it occupies in the cargo area more than its “actual weight”. Hence, people usually use this method if the density of their products is small. In fact, sellers usually compare between the shipping fee calculated based on dimensional weight and other methods and choose the higher fee.

Dimensional weight method was first applied on 2015 by the two major carriers namely UPS and FedEx. Since then, it became more and more popular. These days, almost every carrier worldwide considers dimensional weight as one of their methods to specify shipping charge. Please note that the manner by which the shipping fee is calculated based on dimensional weight is different between two carriers. You can read for more information about this by clicking the following URL:

Before making any decision to choose a carrier with dimensional weight, it is extremely important for you to understanding clearly how they calculate the shipping charge. This will help prevent error occurring during business operation because a small mistake might lead to annual losses of thousands of dollars, especially for wholesales or big businesses. However, please remember that this calculation method is not supported in Magento’s native shipping configuration.

An Overview of Product Settings in Magento 2

Product settings are the completion of necessary information needed to create a new product for your Magento store. While the settings are different among six types of products in a Magento store, the structure of setting fields is the same for all of them. The most familiar product settings and attributes are located at the top of the page whereas other product settings lie at the bottom of the page, and they can be expanded or hidden from the page.

There also are advanced settings for the product price and its inventory status in the very first section. You can access these settings by clicking the Advanced link below the Price and Quantity fields. In the Advanced Pricing section, you can set a special price for your product with a specific time range, set the store view limitation, etc… For the Advanced Inventory, you can set the minimum or maximum number of product quantity allowed in a shopping cart and many other special settings.

Product settings

The additional settings are found at the bottom of the product settings page. These settings might appear when the product is saved for the first time. To uncover or hide the settings, you need to tap the expanded or collapsed button next to your intended section. Some of the settings are available for all types of products, and others are just available for a specific type of product. The general settings include Content; Product Reviews; Images and Videos; Search Engine Optimization; Related Product, Up-sells, Cross-sells; Products in Websites; Designs; Scheduled Design Updates; and Gift options. The specific settings for different types of a Magento product are Configurations; Customizable Options; Downloadable Information; Grouped Product; and Bundle Items.

product-settings-other

Provided above are general information about product settings for online stores using  Magento platform. You can learn more about advanced settings and other settings in our upcoming articles.

Checkout Process in Magento 2 Stores (Part1)

After shopping in a Magento store, customers need to go through the checkout process to finish their purchases. There are several ways for that customers can enter a checkout page. They can click the Cart symbol on the upper-right corner of the store and select “Go to checkout” or press the “Go to checkout” button right on the product page (this depends on the configuration setting in the Magento 2 backend).

Once the shoppers chooses to checkout, they are browsed to a secure, encrypted page called checkout page. A padlock symbol is then displayed in the address bar of the browser, and the URL also changes from “http” to “https”.

After that, the necessary fields are displayed to gather the information of customers to complete the transaction. Customers are then led through each step of the checkout process. It is less time-consuming if a customer has already logged into his/her account at first as most of the information is automatically filled in the fields. Guest shoppers, on the other hand, have to complete the checkout process by providing necessary information to required fields.

There are two steps in the checkout process in Magento 2 store.

Step 1: Shipping

This very first step requires the customer to complete the shipping address information such as email address, customer’s name, etc…, and to choose the shipping method.

checkout-step1-shipping

Step 2: Review & Payments

In the second step of the checkout process, a summary of the purchase like items purchased, total price, shipping address, etc… is shown for customers review. Buyers also need to choose the payment method and type the promotional codes (if available) to apply coupons to the purchase.

checkout process

That is some general information about Checkout process in a Magento 2 store. Please Like and Share this article to receive other informative blogs about two steps in Magento 2 checkout process from us.