A Quick Introduction of Global Search in Magento 2

Search is a tool that plays an important role in most of websites on the Internet. What is global search? How to use global search? In this article, we will give you an overall view of global search in Magento 2.

What Is Global Search?

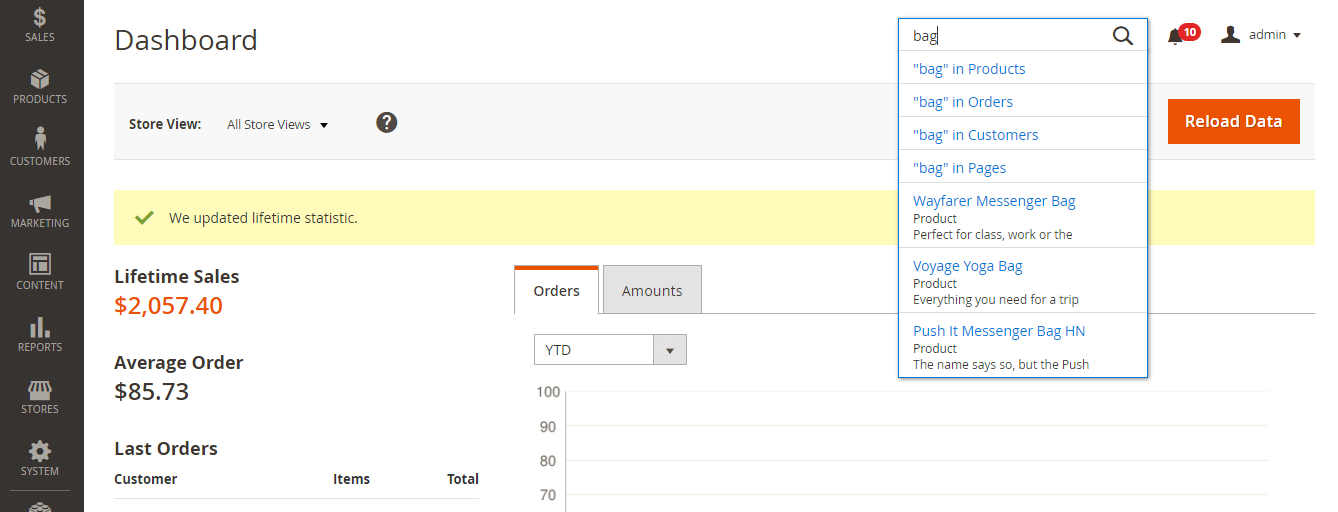
Any record in the database can be easily found by the magnifying glass (spy glass) in the header of the Admin. The results might consist of customers, products, orders or any related attribute. For instance, if you type a customer name in search area, you can acquire the results including the customer record as well as any orders related to the name.

For store owners, with the global search in Magento 2, finding necessary information and controlling the store become more convenient. After typing some keywords in search box, you will easily receive proper results matching with search terms in a few seconds. Then you can open records by choosing any item among search outcomes. Therefore, you are capable of conducting operating activities smoothly instead of wasting time seeking what you want in your own store.

magento2-global-search

Seek a Match

Follow this instruction to look for a match in backend

  1. To open the search box, click the magnifying glass in the header and do one of two options:
  • Insert the first few letters of what you want to search to get a close match
  • Type the word or multiple words that you need to look for to receive an exact match
  1. Tap any item to open the record in the search outcomes.

Conclusion

Provided above is the quick explanation about Magento 2 global search. We hope that you can get useful information and grasp the way to use global search in Magento 2. Please feel free to contact us if you have any question.

How to Configure Download Options in Magento 2

In the last article, we’ve given you instructions on how to create a downloadable product for Magento 2. As discussed, a downloadable product has a lot of options to be displayed and purchased from the product page. As an admin, it’s essential for you to know how these Download Options are managed in the backend of your Magento store. You’ll find out the answer after reading this article.

The downloadable configuration settings are to set the default values for downloadable products and to specify whether your guests can purchase the downloads.

To configure the download options in Magento 2, do the followings:

  1. Sign in with your admin account. On the Admin side bar, click Stores. Then select under the Settings section.
  2. Next, open the Catalog row in the panel on the left under, then choose Catalog.
  3. Now move to the Downloadable Product Options section, expand and fill in all the required fields:

config-catalog-downloadable-product-options

  • You can either enable the download in the “Invoice” stage of the order process or the “Pending” status by choosing the appropriate value in the Order Item Status to Enable Downloads field.
  • Default Maximum Number of Downloads: Enter a value to determine the maximum downloads that a single customer can buy.
  • Shareable: Set it to “Yes” if you want to allow customers to share the download link to others. Set “No” otherwise.
  • Default Sample Title: Write down the headings of the samples here. It is set to be the default title for the sample.

Download Options

  • Default Link Title: Enter the default titles for the download links.
  • Opens Links in New Window: If you want to keep the customers stay in your store, set this field to “Yes” so that another window will be opened whenever they click the download links. Set “No” otherwise.
  • Use Content Disposition: Select “Attachment” to deliver the download link via email as an attachment. Choose “Inline” if you want to deliver the download link as a link on a web page.
  • Disable Guest Checkout if Cart Contains Downloadable Items: Set it to “Yes” if you want to force the guests to sign in if the items in their shopping cart contain a downloadable product. Set it to “No” if you don’t.
  1. Afer finishing all the settings, tap Save Config to confirm the changes.

Now you are absolutely know how to configure the download options for the Magento downloadable products. Let’s go to your Magento store and practice yourself to be a master in this field.

All The Things About Advanced Pricing Data in Magento 2

With Advanced Pricing Data in Magento 2, you can quickly update pricing data for product groups and tier prices as well. This advanced import/export price information process is not different with any other import/export process for any entity type. In the sample CSV file, you can see that it contains tier and group prices for each product type supporting advanced pricing. Admin can make changes to Advanced Pricing Data freely because it does not impact the rest of the product record.

Advanced Pricing Data Attributes in Magento 2

SKU: it means the Stock-Keeping Unit. Each SKU is only one and alphanumeric identifier that they use it to track inventory. Lenght of SKU can be up to 64 characters.

  • tier_price_website: The website code specifies websites which contain tier pricing.
  • tier_price_customer: That determines the customers groups which include tier pricing.
  • For instance: ALL GROUP, NOT LOGGED IN, General, wholesale, Retailer.
  • tier_price_quantity: Tier price quantity is the type of quantity of the product  that must be ordered to receive the tier price discount.
  • tier_price: It is the discounted tier price of the product. As for bundle products, tier price is calculated as a percentage.
  • group_price_website: The website code of each website where group pricing is available. If specifying multiple websites, separate each with a comma and without a space.
  • group_price_customer_group: Identifies the customers groups where group pricing is available.
  • For instance: NOT LOGGED IN, General, Wholesale, Retailer
  • group_price: The discounted group price of the product. For bundle products, group price is calculated as a percentage.

Conclusion

In short, here is all the information about Advanced Pricing Data in Magento 2 we want to share you. Hope that after reading this article, you will have a deep insight of these things. If you find it helpful for you, please Like, Share and Subscribe to keep updating for more upcoming blogs!

How to Create A Downloadable Product in Magento 2

A downloadable product in a Magento 2 store is an electronic file that is allowed to be downloaded like an eBook, an album, video, software application, and so on. For the marketing purpose, you can provide the sample of a downloadable product so that your customer can test before buying it. The files can be either uploaded to your server or linked to from a different one via the Internet.

storefront-product-downloadable

This article gives you instructions to create a downloadable product through the backend of Magento 2.

Step 1: Choose the Product Type

Do the same as step 1 of creating a simple product. Remember to choose Downloadable Product instead of Simple Product.

Step 2: Choose the Attribute Set

To choose the attribute set that you can either enter the name of the attribute set in the search box or choose “Downloadable” from the list. The form is then updated to reflect the setting.

choose-attribute-set-downloadable

Step 3: Draw the general settings

  1. Set the Enable Product to “No” until all the information is filled.
  2. Type the Product Name.
  3. In the SKU field, you can use the default SKU which is based on the product name or enter another.
  4. Enter the product Price.
  5. Tax Class: Choose “None” if the tax is not imposed on the product. Select “Taxable Good” otherwise.
  6. Enter the Quantity of the product that is currently available. Then set the Stock Status to “In stock”.
  7. Categories: Do one of the followings:
  • In the list, choose the category that is to be assigned.
  • Create a new category: Enter the Category Name and choose the Parent Category to determine its position in the menu structure.
  1. Visibility: Choose “Catalog, Search.” to allow your product to be found in both catalog and the search results.
  2. Enter the time range to Set Product as New From

product-details-downloadable

Step 4: Complete the Downloadable Information

Move downwards to the Downloadable Information section. Then, mark the Is this downloadable product? checkbox.

The section has two parts. The former describes the downloadable product link, and the latter describes the samples.

downloadable product

  1. Links
  • Enter the Title that you want to use as a heading for the download links.
  • Mark the Links can be purchased separately checkbox if necessary.
  • Tap Add link, then fill in all the Title and Price of the download.
  • You can either upload files to the File and Sample fields by using URL or browsing to the intended file.
  • In the Shareable field, choose “No” if you want your customers to log in to access the download link. Select “Yes” to sends the link by email and “Use config” to use the method that is specified in the Downloadable Product Options configuration.
  • Type the maximum number of downloads per customer to the Max. Downloads field. Mark “Unlimited” if necessary.
  • To add another link, tap Add Link and repeat those steps.
  1. Samples

Do the same as above. You just need to enter the title and upload the samples of the main product.

Step 5: Complete the Product Information

Complete the information in the following sections as needed:

  • Content
  • Images and Videos
  • Search Engine Optimization
  • Related Products, Up-Sells, and Cross-Sells
  • Customizable Options
  • Products in Websites
  • Design
  • Gift Options

When finishing all the settings, set Enable Product to “Yes” to publish the new downloadable product.

In short, here are all the details and reviews of A Downloadable Product in Magento 2 we want to share with you. Don’t forget to Like, Share, and Subscribe to Magestandard for more informative Magento extension review articles.
4 Easy Steps to Set up Flat Rate Shipping Quickly

Flat Rate Shipping is a basic shipping solution in Magento 2, generally used when some carriers offer flat-rate packaging. When users choose Flat Rate, a standard rate of shipping charge is applied for per item or per shipment, regardless of its weight or size. This means that the shipping fee is estimated exactly at the beginning.

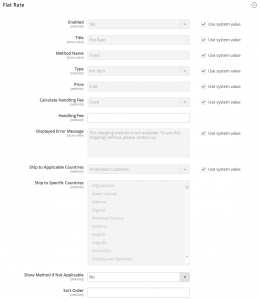
 flat rate shipping
Flat Rate

Let’s discover how to set up your flat rate shipping in Magento backend:

STEP 1: Look for Stores on the left-side bar of Admin homepage, click Configuration below.

STEP 2: In the Sales section, click Shipping Methods and flat rate shipping configuration will appear.

STEP 3Click  on the right side of screen to expand the setting. You need to follow the instruction below

  1. Choose “Yes” in Enabled This action will allow Flat Rate method for customer to choose in the Estimate Shipping and Tax section of shopping cart and Shipping section of checkout page.
  2. Name your Flat Rate method in Title For example: “Flat Rate”, “Flat Rate Shipping”, etc.
  3. In the Method Name¸ enter the name of method that will appear beside the calculated rate in the shopping cart. If admin tap “Use system value”, this will be “Fixed”. But he/she is able to use other name that is well-fitted such as “Plus Handling”.
  4. The Type box is to control the use of Flat Rate Shipping:
  • “None”: this option is to deactivate the payment type. If admin choose this, the shipping fee of Flat Rate method that appears on screen is zero.
  • “Per Order”: a fixed shipping charge will be applied for each order. This means that with a predefined fee, customers are able to place as many products within an order as they want.
  • “Per Item”: a fixed shipping charge will be applied for each item. This means that the shipping fee will be estimated base on the quantity of products in an order whether they are one type of products or not.
  1. In the Price box, register the fee that you want to apply.
  2. The Calculate Handling Fee box is used to control your additional handling fee. There are 2 options to choose:
  • Fixed
  • Percent
  1. In the Handling Fee, admin need to enter the rate based on the chosen Calculate Handling fee. If admin chooses “Percent”, enter the fraction without the “%” symbol” such as “0.05” or “0.1”. If admin chooses “Fixed”, enter the amount of fee there.
  2. Enter or paste the Displayed Error Message to create a message box notifying customers in case Flat Rate Shipping is not available.
  3. In the Ship to Applicable Countries box, choose “Specific Countries” and select each country that can apply Flat Rate Shipping or click “All Allowed Countries” to allow customers from all countries in your store settings to be offered this shipping method.
  4. In the Sort Order box, enter a number to arrange the order of Free Shipping option in a list of methods. For example: 0 for the first, 1 for the second, etc.

STEP 4: Click Save Config to complete.

In short, here are all the details about Flat Rate Shipping we want to share with you. Don’t forget to Like, Share, and Subscribe to Magestandard for more informative Magento extension review articles.