An Easy Way to Configure Customer Password Options in Magento 2

In Magento 2, when you request to reset password, there will be a email sent to you for your notification including the lifetime of the password recovery link. It requires your new password have to meets the compulsory level of security. And you know, all of them, email template, lifetime of the password revovery link and, level of security are able to configure in customer password options from the backend. Moreover, admin can give customers permission to change their own password or set to only store owners can do so.

To Configure Customer Password Options

  1. Open the Admin homepage, then choose Stores on the sidebar. Next, under Settings, tap Configuration.
  2. In the board on the left, choose Customer Configuration under Customers. Next, expend the Password Options sector.
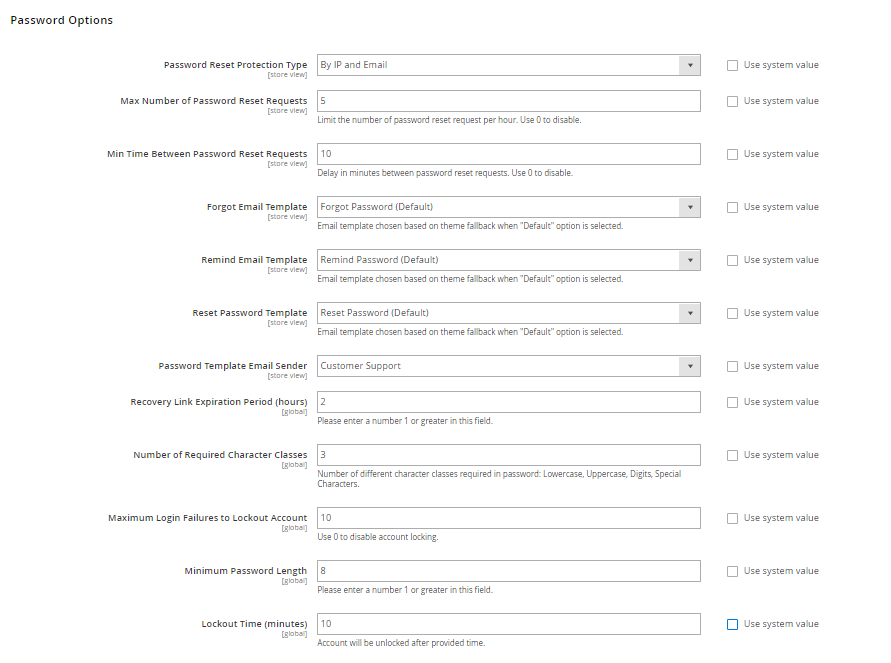
  3. Password Reset Protection Type field offers you 4 methods of managing password reset requests:
  • By IP and Email: The password can be reset online after receiving response about reset notification from Admin account.
  • By IP: The password can be rest online without any confirmation.
  • By Email: The password only can be reset after responding to an email notification sent form Admin account.
  • None: Only the admin can reset the password.
  1. In order to limit the number of reset password times per hour, do the following:

a. In Max Number of Password Reset Requests field, set the maximum number of password reset requests which is allowed to be sent per hour.

b. In Min Time Between Password Reset Requests field, set the minimum number of minutes which must transpire between requests.

  1. In order to configure the password reset email notification, do the following:

a. In Forgot Email Template, choose template used for the email sent to customers who have forgotten their passwords.

b. In Remind Email Template field, choose the template which is used when a password hint is sent to customers.

c. In Reset Password Template fieldchoose template used when customeres change their passwords.

d. In Password Template Email Sender field, set the store contact which appears as the sender of password-related notifications.

  1. To complete the password reset security options left

a. In Recovery Link Expiration Period (hours) field, set the number of hours for valid recovery link.

b. In Number of Required Charater Classes filed, set the number of differnet character types required for a password based on 4 character classes: Lowercase, Uppercase, Numeric, Special Characters.

c. In Maximum Login Failures to Lockout Account field, leave the number of failed login attempts until the Admin account is looked. If you want unlimited attempts, leave zero.

d. In Minimum Password Length field, leave the minimum number of characters which can be used in a password.

e. In Lockout Time (minutes) field, leave the number of minutes an Admin account is locked caused of too many failed attempts to log in.

  1. Tap Save Config to finish.

We have presented  a way to Configure Customer Password Options in Magento 2. We hope that this article can show you useful information to select the appropriate extension for your online shop. If you find it helpful for you, please Like, Share and Subscribe to keep updating for our next blogs!

How to Enable FedEx in Magento 2

FedEx in Magento 2 is known as a huge shipping service company in the US. FedEx specializes in transportation service, freight, ground shipping services or trade networks and so on with multiple level of priorities.

  • Step 1: FedEx Web Services Production Registration

A FedEx merchant account must be created and registered for FedEx Web Services Production Access. After that, take a quick look at the production account information page, at the bottom of the page click the Obtain Production Key link with a purpose of registering and containing a key.

  • Step 2: FedEx in Magento 2 is Enabled for Store

1. Tap Stores on the Admin sidebar. Select Configuration under Settings.

2. Select Shipping Methods on the left in the panel and under Sales.

3. Enlarge the FedEx section. Follow instructions:

a. Establish Enabled for checkout to “Yes”.

b. Write down a suitable Title to point out the FedEx shipping method in the checkout process

c. Fill in the following information from FedEx account:

+ Account ID

+ Meter Number

+ Key

+ Password

d. Set Sandbox Mode to “Yes” in case of a FedEx Sandbox is established and you plan to work in the testing environment.

fedex-magento-2
FedEx Account Settings
  • Step 3: Describe Package and Handle Fee

1.  In case of dividing an order into multiple shipments, choose the Packages Request Type for the best preference description.

+ Split to equal weight (one requirement)

+ Utilize origin weight (few requirements)

2. Choose the type of Packaging that is utilized to ship products from store. Options consist of:

+ FedEx Envelope

+ FedEx Pak

+ FedEx Box

+ FedEx Tube

+ FedEx 10kg Box

+ FedEx 25kg Box

+ Your Packaging

3. For delivery, establish Dropoff to the pick-up method. Options contain:

+ Regular Pickup: It can be cost effective to make arrangements with FedEx in Magento 2 in case of owning a high volume of shipments.

+ Request Courier: Call and require a FedEx courier for picking up shipments.

+ Drop Box: Nearby FedEx drop box, drop off shipments.

+ Business Service Center: At local FedEx business service center, drop off shipments.

+ Station: At local FedEx station, drop off shipments.

4. Establish suitable Weight Unit to the unit of measurement. Options consist of:

+ Pounds

+ Kilograms

5. Fill the Maximum Package Weight for FedEx shipments with the default FedEx maximum weight of 150 lbs. The default value is highly recommended, any changes will be conducted in case of having special arrangements with FedEx in Magento 2. For further information, ask shipping carrier.

fedex-magento-2
FedEx Package Settings

6. FedEx in Magento 2 is able to charge an optional handling fee but it is not visible in the checkout. Follow instructions if you intend to change a handling fee;

a. Establish Calculate Handling Fee as:

+ Fixed Fee

+ Percentage

b. Select one of those ways below to control handling fees in the Handling Applied list:

+ Per Order

+ Per Package

c. Based on the way of calculation, fill in the Handling Fee with a fixed amount or percentage.

7. Based on whether you sell B2B or B2C, establish Residential Delivery.

+ For B2C residential deliveries: Yes

+ For B2B residential deliveries: No

fedex-magento-2
FedEx Handling Fee Settings
  • Step 4: Permitted Methods and Applicable Countries

1. Residential Delivery

2. To different methods of shipment, establish Allowed Methods as demand. During this process, you should care about FedEx account, the frequency and size of your shipments even if international shipments are required. Many or few ways are welcomed. Options contain:

Europe First Priority

Ground International Priority

1 Day Freight

First Overnight

Intl Priority Freight

2 Day Freight Home Delivery

Priority Overnight

2 Day

International Economy Smart Post (enter Hub ID)

2 Day Am

Intl Economy Freight

Standard Overnight

3 Day Freight

International First

Freight

Express Saver International Ground

National Freight


3.
Select the suitable method for free shipping in the
Free Method list. Follow instructions:

a. Establish Free Shipping Amount Threshold as the following thing:

+ Enable: In case of requiring Free Shipping with Minimum Order, write down the Minimum Order Amount for Free Shipping.

+ Disable: Free FedEx shipping is impossible to any orders.

Customers are easy to know which methods are the best for their order because this is the same as Free Shipping method and exists in the FedEx section during checkout.

b. For free shipping, note the minimum amount for an order in the next Free Shipping Amount Threshold.

c. The Displayed Error Message text box is installed at first with a default message and you can change it as wish.


fedex-magento-2
FedEx Allowed Deliver Methods

d. Establish Ship to Applicable Countries as the following:

+ All Allowed Countries

+ Specific Countries

e. In case of being useful, set Ship to Specific Countries to each country based on customer’s allowance by FedEx in Magento 2. You can hold the Ctrl key down to choose options as much as possible.

f. Change Debug to “Yes” in case of you intend to store a log of all communication to match with your store and the FedEx system.

g. Establish Show Method if Not Applicable as the following:

+ Yes: Display all FedEx shipping ways to customers.

+ No: Display the shipping methods that are chosen based on the order.

h. During checkout, note a Sort Order numeric value to decide the sequence of FedEx with other shipping methods. The highest priority (0) is put at the top of the list.

4. Tap Save Config when finish.

We have presented about top 6 amazing Size Chart extensions for Magento 2. We hope that this article can show you useful information to select the appropriate extension for your online shop.

FedEx in Magento 2
FedEx Applicable Countries 

An Overview of Search Engine Optimization (SEO) in Magento 2

Search Engine Optimization (SEO) is one of Magento 2 product settings section. This part contains the URL Key and other Meta-data fields (Meta title, Meta Keywords, and Meta description) which are later used by search engines to identify a specific product. The URL key and Meta data should be identical for each product.

Despite being ignored by some search engines, meta keywords are still used by most of others crawlers. It is said that the SEO best implementation recently is to integrate focus keywords in the meta title with those in the meta description field.

Through configuration settings, you can set a default value for each meta-data field. As a result, these fields are filled with placeholders which then be replaced by actual values as your preferences.

product-search-engine-optimization

To accomplish the SEO settings, do the followings:

  1. Sign in with your admin account, then browse to the edit mode of the product.
  2. Move down to the Search Engine Optimization and expand it.
  3. The URL Key is currently filled with a default value, which is based on the product name as being set in the configuration. You can choose to use that default value or change it to your preference.
  4. Meta Title: This is the text that appears at the top of the browser bar and can be changed as needed. For the best application, you should enter an identical Meta Title to each page with the length less than 70 characters.
  5. Meta Keywords: The keywords in this box are most used by search engines, thus they should be the words that your customers might use to find products in your store.
  6. The Meta Description field gives a general view of the page in the search results. Although customers can not see this chain of text, it is included on the search results page of several search engines.

Those are all about the Search Engine Optimization (SEO) in Magento 2 product settings. Don’t forget to follow us to receive more useful blogs like this.

What are Related Products, Up-Sells, and Cross-Sells in Magento 2?

Related Products, Up-Sells, and Cross-Sells

Being listed down in the Magento 2 product settings, the Related Products, Up-sells, and Cross-sells is the section that helps Magento store owners to build up basic promotional blocks to attract customers. From this section, merchants can present extra products that are relevant to the current product. It will effectively draw the customer’s attraction, thus raising more sales for their online stores.

storefront-product-related-products

Related Products in details

Related products are items that are most likely to be purchased together with the product that the customer is considering. For example, on a product page for mobile phones, you might list additional items such as USB Car Charger, Mobile Phone Case, Mobile Phone Car Mount, and so on.

With proper settings in the Magento 2 backend, customers are allowed to add these items to their shopping carts by simply marking the checkbox in the Related Products block. The position of the Related Products block displayed in store’s frontend is different among different themes and page layouts. For instance, it can appear at the bottom of the Product View page like the image below. In the meanwhile, these blocks often appear in the right sidebar of a 2 column layout.

To set up Related products in Magento 2, do the following:

    1. Log in to the store’s backend, then open the product in edit mode.
    2. Next, Move to the Related Products, Up-Sells, and Cross-Sells section. After that, click the Add related products button on the right side.

product-related-up-sell-cross-sell3. Now, a product grid is displayed on your screen. Select the product(s) that you want to feature as a related product by marking checkbox in the very first column. You can use the filters if necessary.

products-related-add

4. When you finish the selection, tap Add selected product to confirm the action.

That is all about Related products in Magento 2. Later blogs about Up-sells and Cross-sells are soon be released. So, don’t forget to follow us now.

An Introduction of Store Information in Magento 2

What is Store Information? How to Enter Your Store Information? This article today will show you a quick introduction of Store Information in Magento 2.

store information

Store Information

Store details are the fundamental information consisting of the store name and address, telephone number and email address which show up on email messages, invoices and other communications sent to your customers. Store details section allows admin to define basic data about the online shop, which ensures that the store information is clear and the store is recognized.

Insert Your Store Details

Do the following to enter your store details in backend

  1. Choose Stores on the Admin Sidebar -> Tap Configuration under Settings.
  2. Select General under General section in the left panel.
  3. Widen the Store Information part and do this instruction:
  • Type the Store Name that you intend to use in all communications.
  • Enter the Store Phone Number and customize its form as you want to display.
  • Insert the hours your shop is open for business in the Store Hours of Operation section. (For instance: Mon – Fri, 9-5, Sat 9-noon PST).
  • Choose the Country where your store is placed.
  • Tap the Region/State with the country.
  • Enter data in Zip/Postal Code and City fields if necessary.
  • Type the Store Address. In case the address is long, continue the address on Store Address Line 2.
  • Insert the VAT Number of your store if applicable. Tap the Validate VAT Number button to check the number.
  1. Click Save Config to finish all the steps.

Conclusion

Provided above is the introduction of Store Information part in Magento 2. If you want to add or erase any item in this FAQ list, feel free to contact us. Don’t forget to Like, Share, and Subscribe to Magestandard for more informative Magento extension review articles.