What Are Types of Product in Magento 2?

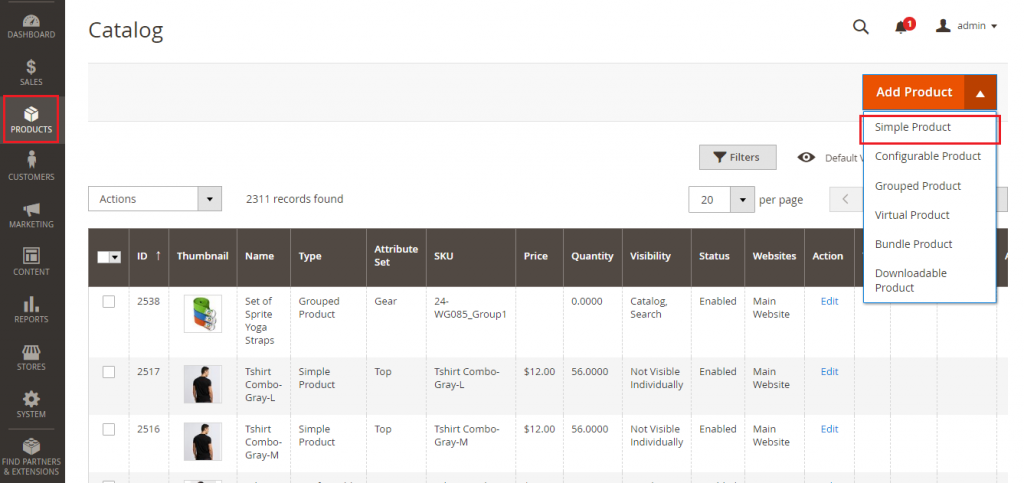
Types of Product can be defined as a group of goods or services that share some common specific characteristics. Different product types can be determined based on various basis such as the basis of purchase frequency (Convenience products, Shopping products, Specialty products,…) or the basis of offering (goods, services, ideas),… For Magento 2, it sets the Types of Product based on the basis of their features. There are six different types that Magento 2 users can set to their products. They are Simple Product, Configurable Product, Grouped Product, Virtual Product, Bundle Product, and Downloadable Product.

Simple Product

Simple-product

In Magento 2 platform, a simple product is a single physical good with a unique SKU. The price and other input information of a simple product can be configured through the backend of Magento 2, allowing store owners to sell variations of simple products with a single SKU. In addition, a simple product can be sold individually or combined with others to create a Group Product, a Bundle Product or Configurable Product with customized options.

Configurable Product

Configurable-product Types of Product

Like Simple product, Configurable product is also a single product. However, a configurable product has a number of options (such as size, weight, or color) to be selected before a customer can add it to card. Each option represents a separate simple product with a distinct SKU, which make it easier to control the inventory.

Grouped Product

Grouped-product Types of Product

As its name indicates, a grouped product includes a number of standalone products. A set of Yoga straps can be a good example of this Types of Product. Among a set of Yoga Straps that includes 3 straps with different length, a customer can select only one or all types of these straps for a purchase.

Virtual product

Virtual-product

Virtual products are intangible products like services, memberships, warranties, or subscriptions. In Magento 2, virtual products can be used to create grouped and bundle products.

Bundle Product

Bundle-product

Like Grouped Product, each item in a bundle product is a separate, standalone product. Nevertheless, items in a bundle aren’t just combined by fixed products like in a group but they are customized to buyer’s preferences. The bundle could be a gift basket, or computer components.

Downloadable Product

Types of Product

A downloadable product is a digital product such as a video or a pdf file . It includes files that directly reside on your server or being compressed to a URL link to download.

With these 6 Types of Product, you can confidently update products to your online store(s) and bring the best shopping experience to customers.

How to Activate Reorder in Magento 2

When discuss about supporting tools for Shopping Cart in online stores, it is Magento 2 that provides a lot of options for store owners to better manage their electronic sales. One of these is Reorder Option in Sales Configuration. If Reorder is enabled in the backend, registered buyers can edit their existing orders right in My dashboard section.reorder-in-frontend

To activate Reorder Option, follow the steps below:

  1. Log in the backend with an admin account. On the Admin sidebar, tap Stores.
  2. After that, click Configuration in the Settings section.
  3. On the left panel, expand the SALES row and select Sales then.
  4. Scroll down to the Reorder section. Set it to your preference:
  • “Yes”: Allow customers to reorder in My dashboard section.
  • “No”: Reorder is not allowed. Because Magento 2 set the field to “Yes” as default, you should clear the Use System Value checkbox before choosing this option.configure-reorder
  1. Lastly, tap Save Config on the upper-right corner to confirm your settings. You may need to reindex the data and refresh the cache by clicking the Cache Management link when the system note appears.refresh-cache-management

Once Reorder is enabled, it is not only buyers can edit their orders but also admins can do it from the backend. To reorder for an existing order in the backend, do the following:

  1. On the Admin sidebar, click Customers. Next, select All customer.
  2. You can either use the filter to search for a specific customer (search by name, or email, or tax code,…) or enter the keyword(s) to the search box on the upper left corner. You might need to refresh the filter to clear all the previous filters before adding a new one.
  3. After finding the customer, click edit in the Action column.
  4. On the left panel, tap Orders under Customer Information. Here you can see all the orders that the selected customer has placed. Click Reorder Option in the last column of the order that you want to edit.
  5. Next, edit the order to your preferences.reorder-in-backend Reorder Option
  6. Tap Submit Order to save the changes. 

That is all about Reorder Option in Magento 2. We hope you enjoy the information and don’t forget to follow us to receive more knowledge about Magento 2.

A Detailed Explanation of Message Inbox in Magento 2

When you log in the Admin account, you sometimes receives messages from Magento on a regular basis. In this article, you will have an introduction of Message Inbox in Magento 2.

message-inbox-magento

What is Message Inbox?

The bell icon in the header displays notifications of unread messages in your box. The content of messages includes patches, new releases, system update and forthcoming events.

Regarding messages of critical importance, they keep appearing in a pop-up window whenever you sign into your account. These notifications disappear only when you mark them as read or remove them.

With the notice grid lists, you can see all messages and carry out actions such as viewing detailed information, marking messages as read and deleting them from the inbox. Moreover, notifications are rated by severity and shown with the most recent at the top.

Message Inbox In Magento 2

Explore Incoming Messages

  1. Click the bell icon in the header then read the summing-up and do any of these options:
  • Tap the message to view full content if needed
  • Choose the delete icon on the right of the message to remove the messsage
  • Select See All to show the Notifications grid
  1. In terms of urgently important messages, do one of the following:
  • Tap Read Details
  • Click Close to remove the popup but keep the message active

See All Notifications

  1. Do one of two choices:
  • Click the Notification icon in the header -> Choose See All in the footer of the summary
  • Select System on the Admin Sidebar -> Tap Notifications under Other Settings
  1. Do one of the following in the Action column
  • Click Read Details to view more information (a new window including the linked page exists)
  • Choose Mark As Read to hold the message in your inbox
  • Use Remove tab to erase the message
  1.  If you want to apply an action to many message, choose one of two options:
  • Mark the checkbox of each message you need in the first column
  • Set the Mass Actions control to choose multiple messages
  1. To set the Actions control, do any of the following:
  • Mark as Read
  • Remove
  1.  Click Submit to finish the process

Configure Notices

  1. Choose Stores on the Admin Sidebar -> Select Configuration under Settings
  2. Tap System under Advanced in the left panel
  3. Widen the Notifications part and do these steps:
  • Apply Yes to Use HTTPS to Get Feed if your store Admin runs over a secure URL
  • Set Update Frequency to choose how often your inbox is updated and the interval can be from one to twenty-four hours
  1. Select Save Config to complete

We have presented about Message Inbox in Magento 2.  We hope that you have had the details about message inbox in Magento 2. If you need any help, please feel free to contact us.

5 Steps to Set Minimum Order Amount in Magento 2

There may be some times that you want to set a minimum amount to your customers subtotal. Magento 2 provides this setting in Minimum Order Amount in stores configuration, with the condition that all discounts are excluded from the total amount. Through this section, you can configure the time that checkout page becomes available to your buyers. You can also manage the content of the message shown to your customers when the requirement is not met.

To configure Minimum Order Amount in Magento 2, do the following:Minimum Order Amount

  1. First of all, sign in with your admin account. Next, On the Admin Sidebar, tap Stores.
  2. Select Configuration under Settings.
  3. Expand Sale row on the left panel, click Sales option after that.
  4. Move downward until you reach the Minimum Order Amount section. Then fill in the blanks:
  • Enable: Set it to “Yes” if you want the minimum amount to be applied immediately. Set “No” if you want to activate it later.
  • Minimum Amount: The smallest value of your customer’s subtotal. The subtotal should be calculated after all discounts.
  • Include Tax to Amount: Whether the tax is included in the required subtotal or not. “Yes” means tax is included. “No” means tax is excluded. You can use the default setting by marking the Use System Value checkbox.
  • Description Message: The notification shown to buyers when their subtotal is lower than the required amount. Leave it blank to use the default message.
  • Error to Show in Shopping Cart: enter the message to replace the default one.
  • Set Validate Each Address Separately in Multi-address Checkout to “Yes” if you want each of the multi-address order to meet the minimum amount. Set “No” otherwise.
  • Multi-address Description Message: Orders that are to be shipped to multiple addresses but not meet the requirement will see this. Leave this box blank if you prefer the default notification.
  • Multi-address Error to Show in Shopping Cart: This message will be shown in the Shopping Cart if the total amount of the cart is smaller than the required amount. Leave this box blank if you prefer the default notification.
  1. When you complete the settings, click Save Config to save the changes.

You may need to reindex and refresh the cache by clicking the Cache Management link on the system note.system-note Minimum Order Amount

In short, here are all the details to Set Minimum Order Amount in Magento 2 we want to share with you. Don’t forget to Like, Share, and Subscribe to Magestandard for more informative Magento extension review articles.

5 Steps to Add A Simple Product in Magento 2

In the previous article, we have discussed about different product types available in Magento 2 platform. Now we will go into more details with Simple product in Magento 2.Simple-Product

As its name indicates, a Simple Product is the most uncomplicated good or service provided to customers. In Magento 2, a Simple Product is a physical good, with a unique SKU. It can be sold individually or combined with others to create a Group Product. A Simple Product can also be included in a Bundle Product and Configurable Product with customized options.

From the backend, admin can create a simple product following the instructions below:

Step 1: Choose the product type: Simple product

  1. On the admin sidebar, choose Products. Then select Catalog under Inventory.
  2. Click on the drop-down arrow of the Add Product button (it’s on the upper-right corner). After that choose Simple Product.Add-simple-product

Step 2: Determine the attribute set

The form appears at first is for the default attribute set. Hence, you need to change the attribute set to your preference first.

In the Attribute Set field, you can either type the attribute set in the search box or choose one of the existing ones. Which attribute set you choose here will determine the form of product information you need to fill in.Select-attribute-set Simple Product

Step 3: Complete the basic settings

  1. Enable Product: Set it to “Yes” if you want to publish the new product. Set “No” otherwise.
  2. Product Name: Enter the name of the new product.
  3. SKU: You can either leave it as default (based on Product Name field) or clear it and type another one.
  4. Price: Enter the price for the product. You can also set it to more detailed by clicking on the Advance Pricing link.
  5. Tax Class: There are two options available:
  • None
  • Taxable Goods

6. Quantity: Type the current quantity of the product to the box. Like Price, the Quantity field can also be generated to more details by clicking the Advance Inventory link.

7. You can set the Stock Status to either In Stock or Out of Stock.

8. Weight: If the new product has weight to be shown, choose “This item has weight” option and enter the number to the box. Other otherwise, choose “This item has no weight” option.

9. Categories: There are two options here:

a. Choose an existing category: Click the “Select…” box and select the appropriate category for the new item. Or you can simply type the category name in the search box.

b. Create a new category:

  • Click New Category button.
  • There is a new tab open to fill the name for the new category. Choose the Parent Category after that.
  • Tap Create Category to confirm the settings.

10. Set Product as New From … To: Enter the time range that you want to set your product as new.

11. Country of Manufacture: Select the origin country for the product.Product-information Simple Product

Step 4: Complete the product information

Move downward and fill the information in the remaining fields.

Step 5: Save the new Simple Product 

When complete all the settings, tap Save & Close on the Save menu. On the upper-left corner, select the store view that you want to publish the product to.

Those are five steps to create a new simple product. It is important to remember that a simple product can be used in other product types and it can also be modified to sell many product variations from a single SKU.

In short, here are all the details about Adding A Simple Product in Magento 2 we want to share with you. Don’t forget to Like, Share, and Subscribe to Magestandard for more informative Magento extension review articles.