How to Configure Cart Thumbnails in Magento 2

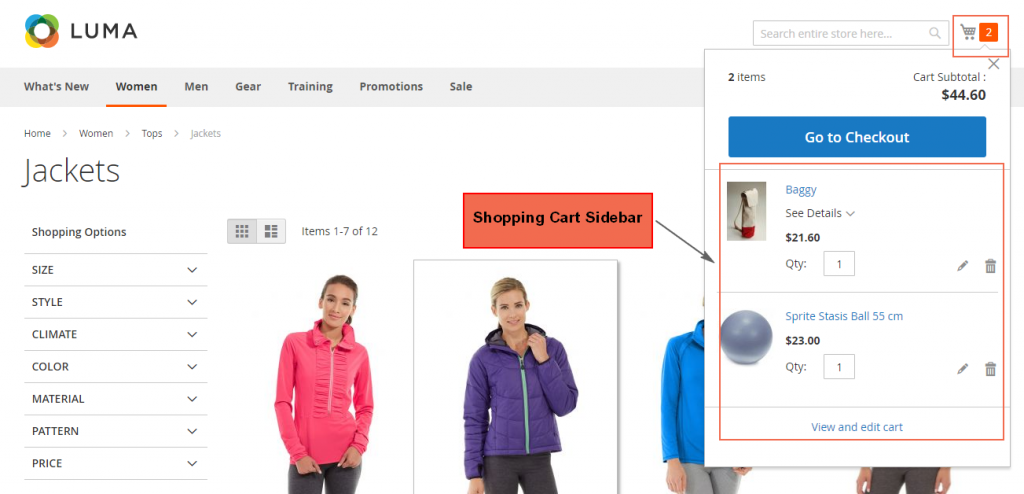
Cart Thumbnails are small images that appear in the cart when customers shopping online. These undersized pictures help to give online buyers an overview of the product they are about to spend money on. If a customer buys a simple product with specific color, then ideally, the Cart Thumbnails should match that product.
thumbnail-images

However, the thumbnails do not always show exactly what the product is (in terms of size, color, or length). In other words, it is impossible to display all the variations of a configurable or grouped product which have multiple options to choose. For these two types, Magento 2 allows admin to select the Cart Thumbnails images from either their “parent” products or from the product variation.

To configure Cart Thumbnails images for Configurable and Grouped products in the current store view, do the following:

  1. Firstly, sign in with your admin account. On the Admin sidebar, select Stores.
  2. Choose Configuration under Settings.
  3. Expand Sale on the left panel, then click Checkout.
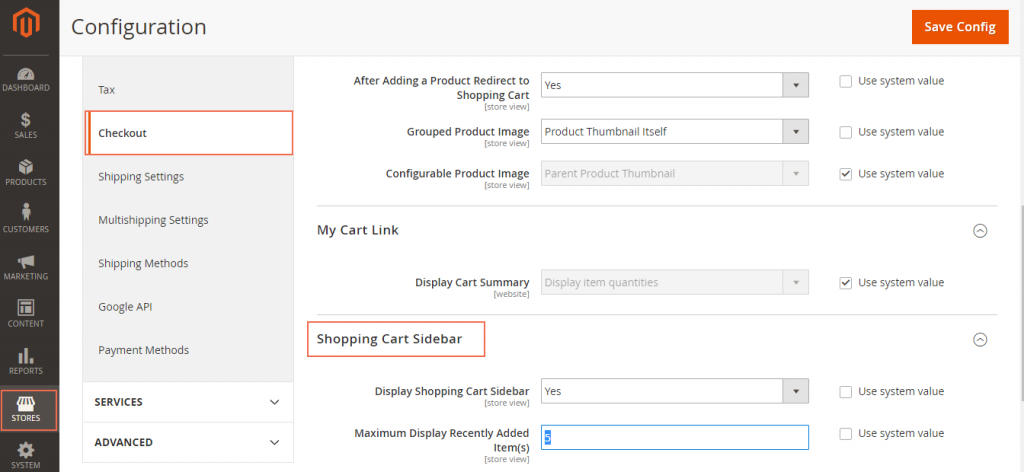
  4. Click the drop-down icon in the Shopping Cart section. Now you can do the settings:
  • Grouped Product Image: Set it to “Parent Product Thumbnail” if you want the thumbnail image for grouped products to be selected from parent product. Set it to “Product Thumbnail Itself” otherwise.
  • Configurable Product Image: Select the “Parent Product Thumbnail” option if you want the thumbnail image for configurable products to be selected from parent product. Otherwise, select the “Product Thumbnail Itself” option.Configure Cart Thumbnails
  1. When you finish the settings, tap Save Config (on the upper-right corner of your working screen) to save changes.

You may need to refresh the caches by clicking the Cache Management link when the system note appears.system-note Cart Thumbnails

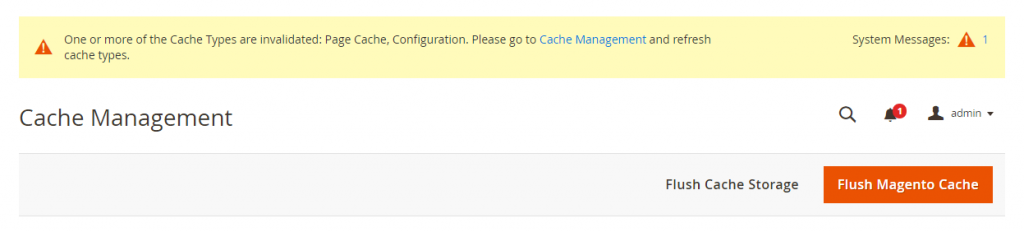
Now, go to your store’s backend and see what you can do with thumbnail images for your products to improve your customer’s shopping experience.

We have presented Cart Thumbnails in Magento 2. We hope that this article can show you useful information to select the appropriate extension for your online shop. Don’t forget to Like, Share, and Subscribe to Magestandard for more informative Magento extension review articles.


5 Steps to Set Minimum Order Amount in Magento 2

There may be some times that you want to set a minimum amount to your customers subtotal. Magento 2 provides this setting in Minimum Order Amount in stores configuration, with the condition that all discounts are excluded from the total amount. Through this section, you can configure the time that checkout page becomes available to your buyers. You can also manage the content of the message shown to your customers when the requirement is not met.

To configure Minimum Order Amount in Magento 2, do the following:Minimum Order Amount

  1. First of all, sign in with your admin account. Next, On the Admin Sidebar, tap Stores.
  2. Select Configuration under Settings.
  3. Expand Sale row on the left panel, click Sales option after that.
  4. Move downward until you reach the Minimum Order Amount section. Then fill in the blanks:
  • Enable: Set it to “Yes” if you want the minimum amount to be applied immediately. Set “No” if you want to activate it later.
  • Minimum Amount: The smallest value of your customer’s subtotal. The subtotal should be calculated after all discounts.
  • Include Tax to Amount: Whether the tax is included in the required subtotal or not. “Yes” means tax is included. “No” means tax is excluded. You can use the default setting by marking the Use System Value checkbox.
  • Description Message: The notification shown to buyers when their subtotal is lower than the required amount. Leave it blank to use the default message.
  • Error to Show in Shopping Cart: enter the message to replace the default one.
  • Set Validate Each Address Separately in Multi-address Checkout to “Yes” if you want each of the multi-address order to meet the minimum amount. Set “No” otherwise.
  • Multi-address Description Message: Orders that are to be shipped to multiple addresses but not meet the requirement will see this. Leave this box blank if you prefer the default notification.
  • Multi-address Error to Show in Shopping Cart: This message will be shown in the Shopping Cart if the total amount of the cart is smaller than the required amount. Leave this box blank if you prefer the default notification.
  1. When you complete the settings, click Save Config to save the changes.

You may need to reindex and refresh the cache by clicking the Cache Management link on the system note.system-note Minimum Order Amount

In short, here are all the details to Set Minimum Order Amount in Magento 2 we want to share with you. Don’t forget to Like, Share, and Subscribe to Magestandard for more informative Magento extension review articles.

Better Manage Cart Sidebar in Magento 2 – Better Care for Your Customers!

The cart is put at the last step of a purchase, and it has a comparative impact on your customer’ buying decision. Properly configuring shopping cart sidebar can significantly make your customers be consistent with their purchases. In this article, you will learn how to manage the Cart Sidebar and offer assistance to your customers.

As a customer, you can see Cart Sidebar, or “mini cart”, by clicking on the cart icon in the upper right of the screen. It indicates a summary of items that you have bought, including product’s thumbnail image, unit price, and other information. By looking at this, you can manage your buying activities. In addition, it is especially useful in keeping you away from emptying your wallet, thanks to Subtotal index provided.cart-sidebar

As an admin, you can configure Cart Sidebar to your preferences:

  • In the backend mode, select Stores on the left sidebar.
  • Next, choose Configuration below Settings.
  • Now you are in Cart configuration space. Expand Sales and pick up Check out to go to Cart Sidebar set up.
  • Rolling downward until you find Shopping Cart Sidebar. Here you have two tools to manage your Shopping Cart Sidebar:
  • Display Shopping Cart Sidebar: You can choose to display the “mini cart” to your customer view: unfill the Use system value box, then select Yes option. Or, you can hide the cart summary by tapping No option.
  • Maximum Display Recently Added: Allow the maximum amount of items that currently added by customers to be present. You can set this number as you like.
  1.  Click Save Configuration to save changes that you have made.Cart Sidebar Configuration

Now go to your online stores and show customers how thorough you care to them!

We have presented about Managing Cart Sidebar in Magento 2. We hope that this article can show you useful information to select the appropriate extension for your online shop. For the Magento developers, it’s our pleasure to receive your comment and recommendation on our FAQ extension list. If you want to add or erase any item in this FAQ list, feel free to contact us. Don’t forget to Like, Share, and Subscribe to Magestandard for more informative Magento extension review articles.

How to Manage Your Customers’ Shopping Cart through Cart Configuration in Magento 2?

Having customers to place orders on online products is always a huge success for any e-commerce businessman. But managing those worthy  orders requires a lot of efforts. Admin of online stores need to be professional in Cart Configuration so as to handle the job effectively. If you barely know about Cart Configuration and Cart Link, this article would be a cure for you.

Cart Configuration

Cart Configuration provides you many tools to efficaciously manage your shopping cart. It includes seven instruments, which are:

  • Card Link
  • Cart Sidebar
  • Redirect to Cart
  • Quote Lifetime
  • Minimum Order Amount
  • Reorder
  • Cart Thumbnails

You can find all of these tools in the backend of Magento platform, using an admin account: Stores -> Configuration -> Sales. Minimum Order Amount and Reorder options can be easily found by choosing Sales on the dropdown list. The other fives stay in Checkout option.

Cart Link

In frontend of Magento platform, Cart Link lies on the upper-right of the online store, as you can see in the picture below. It indicates the number of items/products a customer has ordered. If the Shopping Cart Sidebar is in “enable” status(this is set by the store admin), customers can have more detail information about their shopping activities by click on the cart icon. There, they can see all the items being purchased, cart subtotal price, and others.

Cart Link in Frontend Cart Configuration
Cart Link in Frontend

In the backend gate, admin can configure the cart link by the following five steps:

Step1: Choose backend gate, sign in with your admin account.

Step 2: Choose STORES, then under Settings click Configuration.

Step 3: On the navigation column on the left, expand Sales section.

Step 4: Pick up Check out choice

Open-Cart-Link

Step 5: Choose one of three options in My Cart Link sidebar:

  • Use system value
  • Display number of items in cart
  • Display items quantities

In order to select the last two ones, you need to check off the checkbox for Use system value option first.

My-Cart-Link

Click Save Configuration to confirm changes you have made.

Now you can easily manage your customers’ shopping Cart Configuration with the knowledge you’ve just study. For the Magento developers, it’s our pleasure to receive your comment and recommendation on our FAQ extension list. If you want to add or erase any item in this FAQ list, feel free to contact us. Don’t forget to Like, Share, and Subscribe to Magestandard for more informative  extension review articles.