How to Configure the Customer Name and Address Options in Magento 2

In Magento 2, Name and Address Options allows admin to set the values of prefix and suffix part of the customer name in the drop-down lists. Besides, admin can include additional fields such as Date of Birth, Tax/VAT Number and Gender as well.

How to Configure the Customer Name and Address Options in Magento 2

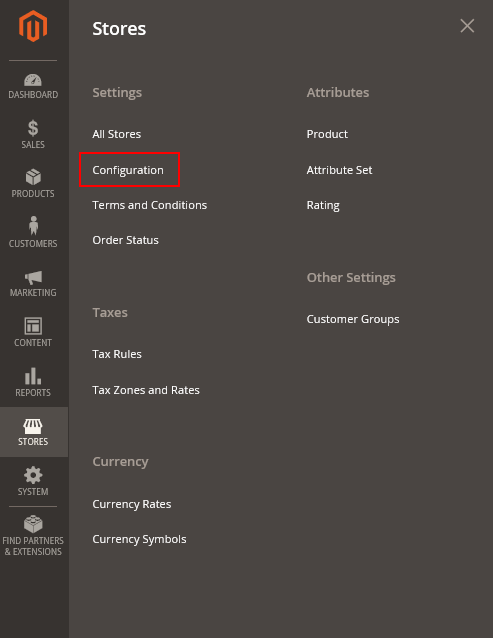
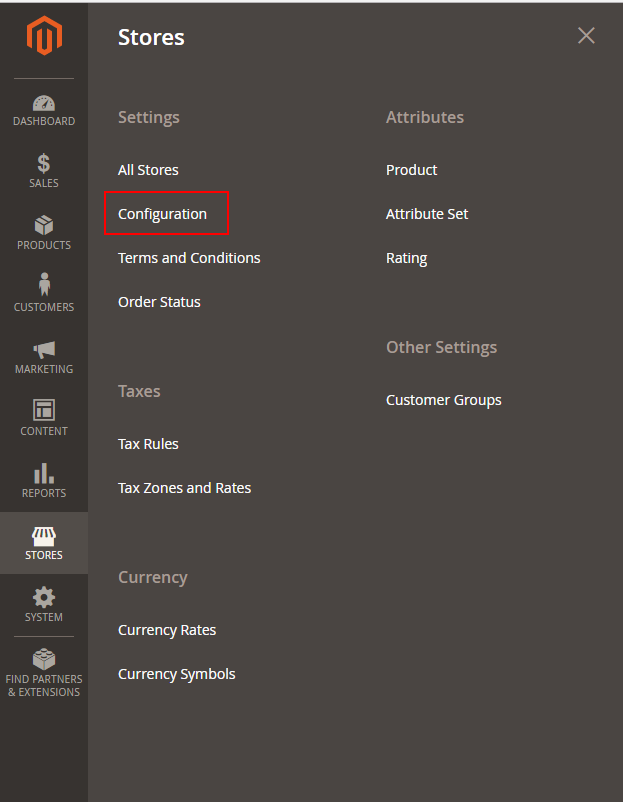
  1. Open the Admin Homepage. Then take a look at sidebar and click on Stores symbol. Next, on the Stores panel, choose Configuration under Settings.
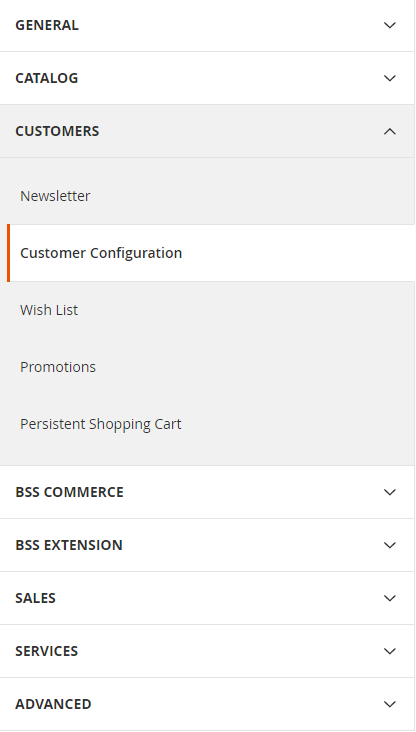
  2. In the board on the left, choose Customer Configuration under Customers.
  3. Next, expand the Name and Address Options sector.

a. Leave a number in Number of Lines in a Street Address. Valid range is from 1 to 4. If you let this field be empty, the number of line will be set to 2 by default.

b. Do the following to include a prefix that comes out before name such as Mr., Mrs., etc.

  • Select Optional or Required in Show Prefix
  • In the Prefix Dropdown Option field, enter prefix that you want to be include in the list, each prefix is separated by a semicolon. Put semicolon in the beginning for empty first option. Leave empty for open text field.

4. Do the following to include a suffix after the name such as Jr., Sr., etc.

a. Choose Optional or Required in Show Suffix field.

b. In the Suffix Dropdown Options field, enter various suffix that you want to be included in the list. Each suffix is separated by a semicolon. Put semicolon in the beginning for empty first option. Leave empty for open text field.

5. In addition, to include extra fields, do the following:

  • Set Yes to Show Date of Birth field.
  • Set Yes to Show Tax/VAT Number field.
  • Set Yes to Show Gender field.

6. When complete, tap Save Config button to finish.

If you find it helpful for you, please Like, Share and Subscribe to keep updating for more upcoming blogs!

A Quick Introduction of Grid Controls in Magento 2

Admin pages that control data show a list of records in a grid. In this article, we will focus on giving a quick introduction of managing the grid in Magento 2.

Admin will manage the data more effectively if he or she knows how to make use of grid controls in the backend page. Firstly, you can easily sort the data with the controls at the top of each column in the grid. The arrow in the column header indicates that the current sort order is either ascending or descending so that looking for data becomes more convenient. Secondly, you are capable of determining which columns display in the grid or changing different positions of them. Moreover, various column arrangements can be kept as views for the purpose of being used later. The Action column shows activities that can be applied to each record. Finally, the data from the current view can be conveyed to a CSV or Excel XML file.

Assort the list:

1. Choose any column header. The arrow shows the current order is ascending or descending.
2. To see other pages in the collection, utilize the pagination controls

Number the page:

1. Apply the Pagination control to the number of records that you want to view per page.
2. Click Next and Previous to page through the list, or enter a detailed Page Number

Filter the list:

1. Tap Filters icon
2. To define the record that you want to look for, fill in as many filters as necessary
3. Select Apply Filters to finish

We have shown you the brief overview of grid controls and how to manage the grid in Magento 2. We hope that this article is useful for the ones who are finding information about grid controls. If you need any help, please feel free to contact us.

An Introduction of Export Criteria in Magento 2

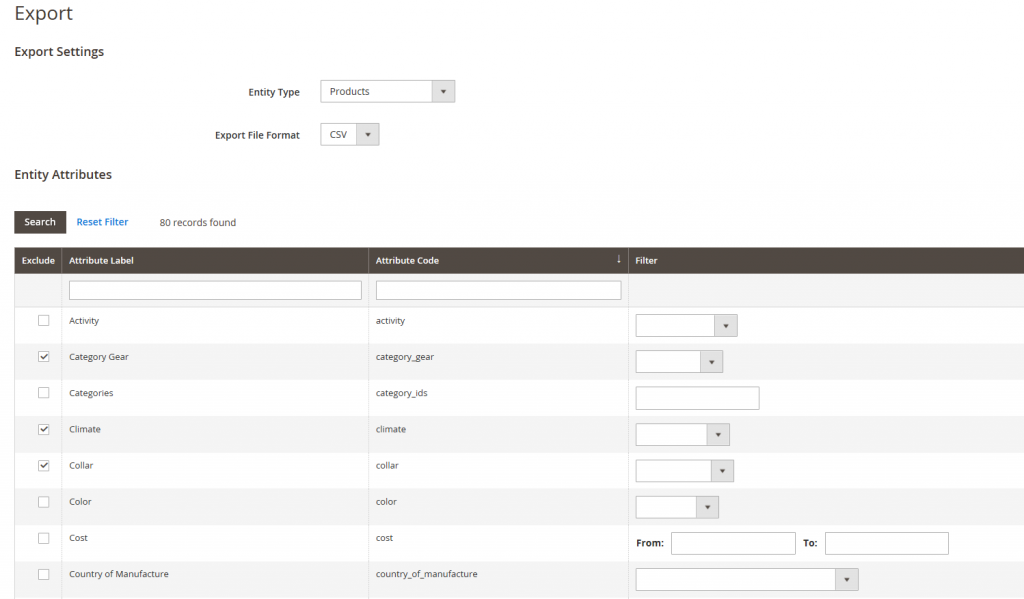
In Magneto 2, Export Criteria contains two factors, these are Export Filters and Export Attributes. In this article, we would like to give you an overview of these two. Let’s take attendance below to get more information about them.

Export

Export Filters

Export filters are used as a kind of tools which can help you determine the data they want in the export file based on attribute values. Furthermore, you can designate which attribute data you want to include or exclude from the export as wish. The types of filter complement with all types of database.

In order to choose exactly SKUs you aim to be included in the export file, filters will help you to determine. For instance, if you select Women in Gender filter, the exported CSV file will contain only products for women.

Date and time is also supported to be filtered in the export part. You just need to choose the date from the Calendar, then, all the information on that day will be exported with CSV file.

If you intend to include only database with a particular value, such as SKU, please enter the value into the Filter field. Besides, there are some fields such as Weight, Price, Dynamic SKU, VAT number, and Set Product as New have a form/to range of values.

Exclude Attributes

Let’s take a look at the the first column on the left, you can realize that the checkbox is used to exclude attributes from the export file. If you do not want an attribute to appear in exported files, you can choose that attribute in Exclude column by clicking.

In short, that is all the knowledge of Export Criteria in Magento 2 we want to share with you. If you find it helpful for you, please Like, Share and Subscribe to keep updating for more upcoming blogs!