An Overall View of Locale Options in Magento 2

This article today will help you answer questions relating to store locale in Magento 2: What is Locale Options? How to Set Locale Options in backend?

Locale Options

What is Locale Options?

Language, country, tax rate and other settings utilized throughout the store are shown in the locale section. The locale options allow admin to set the time zone and language used for each store. Moreover, you can also determine the days of the work week in your area including first day of week and weekend days.

How to Configure the Store Locale

You can follow this instruction to set your own store locale

  1. Choose Stores on the Admin Sidebar -> Select Configuration under Settings.
  2. Under General in the left panel, tap General.
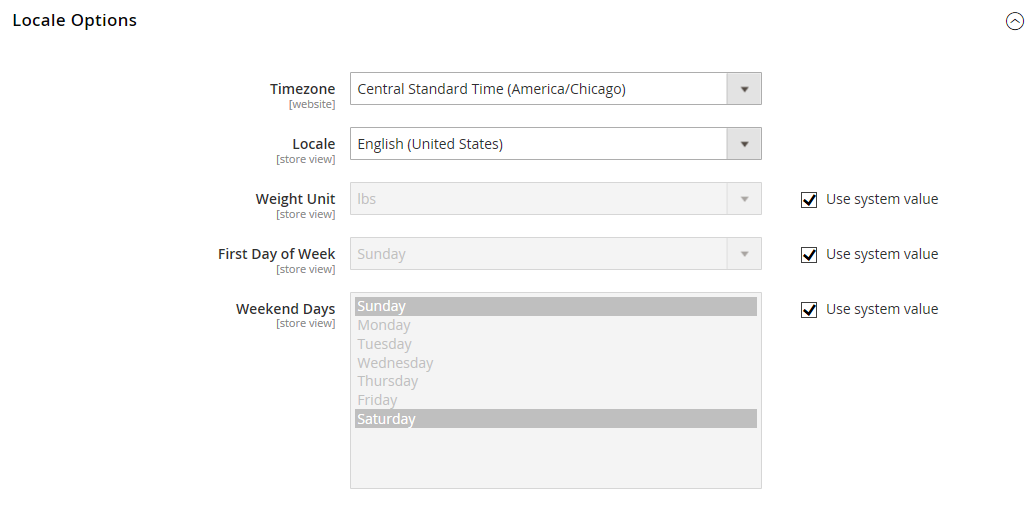
  3. Widen the Locale Options part.
  4. Choose your Timezone from the list and do the following:
  • Locale: Select the appropriate store language among existing choices.
  • Weight Unit: Set the unit of measurement that is commonly used for shipments from your locale. There are 2 options for you: pounds (lbs) or kilograms (kgs).
  • First Day of the Week:  Customize the day that is known as the first day of the week in your area.
  • Weekend Days: Choose the days which fall on a weekend in your locale. (To select many options, hold down the Ctrl (PC) or Command (Mac) key).
  1.  Click Save Config to finish all steps.

Conclusion

Provided above is the overall view and instruction about setting locale options in Magento 2. Please feel free to contact us if you have any query and don’t forget to follow other articles to receive more interesting details about Magento 2.

A Quick Introduction of Merchant Location in Magento 2

In the previous articles, we gave you some explanation about configuration in store details section of Magento 2. To continue providing other details about basic configuration, this article today will show you a quick introduction of merchant location in Magento 2.

What is Merchant Location?

Merchants are known as the wholesalers or retailers who may purchase goods from other sources for the purpose of resale to anyone to make profit. In Magento 2, configuring the merchant locale is the first step for setting payment methods. After that, you can customize payment methods as wish by expanding provided selections. If no value is entered into the merchant location part, the default country setting from general configuration is utilized.

merchant location

Configure the Merchant Locale

You can easily set the merchant position by following this instruction:

  1. Select Stores on the Admin sidebar -> Tap Configuration under Settings.
  2. Choose Sales in the left panel -> Scroll down and select Payment Methods section.
  3. Widen the Merchant Location area and then choose any country as your Merchant Country from the existing list.
  4. Click Save Config to finish all steps.

In Conclusion

Provided above is the quick introduction of merchant location in Magento 2. We hope that you can get useful information about the merchant locale section in this article. If you have any question about merchant location or any topics relating to Magento 2, please feel free to contact us. Lastly, don’t forget to share and follow our site to receive more interesting articles.

Things to Know About Magento Marketplace

Magento Marketplace is a kind of application store which is built-up by Magento platform founders. Magento Marketplace offers businessmen a fundamental selection of solutions from thousands Magento providers in the world as well as provides qualified developers the tools, platform and prime location to build a wealthy business.

To visit Magento Marketplace

Go to Magento Marketplace for visiting

To find Magento partners featured on Marketplace

In the Magento Marketplace Admin homepage, take a look at sidebar and click on Find Partners & Extensions. There will be lists of Magento partners. For more details of each partner, please click on Learn More button under its name and only in a jiffy, all the essential information of selected partner will be displayed on the screen clearly.
To learn more, see the Magento Marketplace User Guide. For extension installation instructions, see Component Manager in this guide, or the Marketplace Quick Tour.

To install extensions

Finding and choosing for a necessary extension for your Magento 2 store to install is not difficult at all when you are in Magento Marketplace. Magento Marketplace aggregates and provides you thousands outstanding Magento extensions from thousands prestigious Magento providers in all around the world. You just need to consider which is the best suitable one for your Magento 2 store and then Magento providers will help you complete the rest parts of installing extension progress.
In addition to these, installing an extension is a process with requiring three steps which should take place during your working hours. Before the extension is installed, the maintenance mode, checked for readiness and backed up are all on for your store getting ready. After the extension is installed, it must be the configuration time for your store following the developers’s instructions.
For more details of step-by-step installation instructions, see the Marketplace User Guide

How to Customize Country Options in Magento 2

In the previous articles, we gave you detailed information about locale options, state options and how to configure them in Magento 2. This article today will show you how to customize country options in Magento 2.

magento2-country-options

Introduction of Country Options

The country options determine the country where you locate your business and the countries from which you accept orders. With the country options section, you can set default country, allow countries that doesn’t require ZIP/Postal code, European Union countries and top destinations list.

To Configure the Country Options for your store

  1. Choose Stores on the Admin sidebar -> Tap Configuration under Settings.
  2. In the left panel, select General under General.
  3. Widen the Country Options and do the following:

a. Determine the Default Country where your business is located from the existing list.
b. In the Allow Countries list, decide each country from which you accept payment. All countries in the list are marked by default. You can hold down the Ctrl (PC) or Command (Mac) key to select many countries at a single time.
c. In the Zip/Postal Code is Optional for section, select each country where you do business that doesn’t need a ZIP or Postal code entered as a part of the street address.
d. In the European Union Countries part, choose each country from the EU countries list where your business is conducted. By default, all EU countries are selected.
e. In the Top Destinations field, you can target the primary countries for sales by choosing the adequate countries from the list.

  1. Click Save Config to finish all steps.

In Conclusion

Provided above is the instruction of configuring the country options in Magento 2. If you have any question, please feel free to ask us and keep following our site to receive other useful Magento 2 guides.

Intergration in Magento 2

This article guides you to create a new location of OAuth credentials and redirect URL for third-party integrations. Also, you are provided the knowledge of how to identify the available API resources which are necessary for the intergration as well.

null

Onboarding Workflow

  1. Give permission for intergration: Go to the system/integration screen, looking for the related integration and authorize.
  2. Verify and establish login: When getting the notification, accept the access requested. If you are redirected to a third-party, create a new account or log in to that system with your available account. After registration, please return to the integration page.
  3. Receive confirmation of authorized intergration: The system sends you the notification which the intergration has been successfully authorized. After that, you are no longer need to make calls to access or requests tokens.

To Add a New Intergration

  1. Open the Admin homepage. Then tap System on the sidebar. Next, under Extensions, choose intergration.
  2. Complete the following intergration Information

a. Fill in the Name of the intergration and the Email address.

b. In Call Back URL field, enter the address where OAuth registration information can be sent when using OAuth for token exchange. For recommendation, we think using https:// will be the most suitable one.

c. In Identity Link URL, enter the link used to redirect the users to a third party account with these Magento 2 intergration references.

intergration3. In the board on the left, choose API. Next, do the following:

a. In Resource Access field, choose one of the two options: All or Custom.

b.  Mark the checkbox of each custom access resource which is needed.

intergration

4. When complete, click on Save button to finish.

To Change The API Guest Access Security Setting

In Magento 2 default, an anonymous guest is not allowed to access to CMS, catalog and other store resources. In order to change the default setting, do the following:

  1. Open the Admin Homepage. Then, on the sidebar, click on Stores symbol. Next, under Settings, choose Configuration.
  2. In the board on the left under Services, click on Magento Web API.
  3. Expand the Web API Security Setting section.intergration
  4. In Allow Anonymous Guest Access, choose “Yes”.
  5. When complete, tap Save Config button to finish.

If you find it helpful for you, please Like, Share and Subscribe to keep updating for our next blogs!