Best Way To Configure Store URL In Magento 2

  1. What inside Store URL?

In default Magento installation, each website has a two base URLs. One is assigned to a storefront, and the other one is assigned to the admin. Standard base URLs start with HTTP, and secure base URLs start with HTTPS. To characterize internal links in connection to the base URL, Magento uses variables which allow store owners to move a store from one location to another without updating the links.

Base URL http://www.yourdomain.com/magento/
Secure Base URL https://www.yourdomain.com/magento/
URL with IP address http://###.###.###.###/magento/
https://###.###.###.###/magento/
  1. Use Secure Protocol

Normally in Magento installation, the base URLs of your store were set up in Web Configuration step. If a security certificate was available, store administrators could determine for secure URL to be used in storefront or admin or both. If multiple stores are included in Magento installation, or if store owners have to add more stores later, they can include the store code in the URL. Store owners can use all Magento resources and operations with a secure protocol.

Magento strongly recommends store administrators to transfer all pages of a production site, including content and product pages with a secure protocol.

Store owners can configure Magento installation to deliver all pages over HTTPS by default. By enabling HTTP Strict Transport Security (HSTS) and fix any insecure page request that is reported by the store, administrators can enhance security. With HSTS protocol, browsers will not render standard HTTP pages that are transmitted with unsecure protocol for the specified domain. When store administrators configured Magento to use secure URLs for both the storefront and Admin, two additional fields display that allow them to enable HSTS.

To configure the base URL, follow these steps:

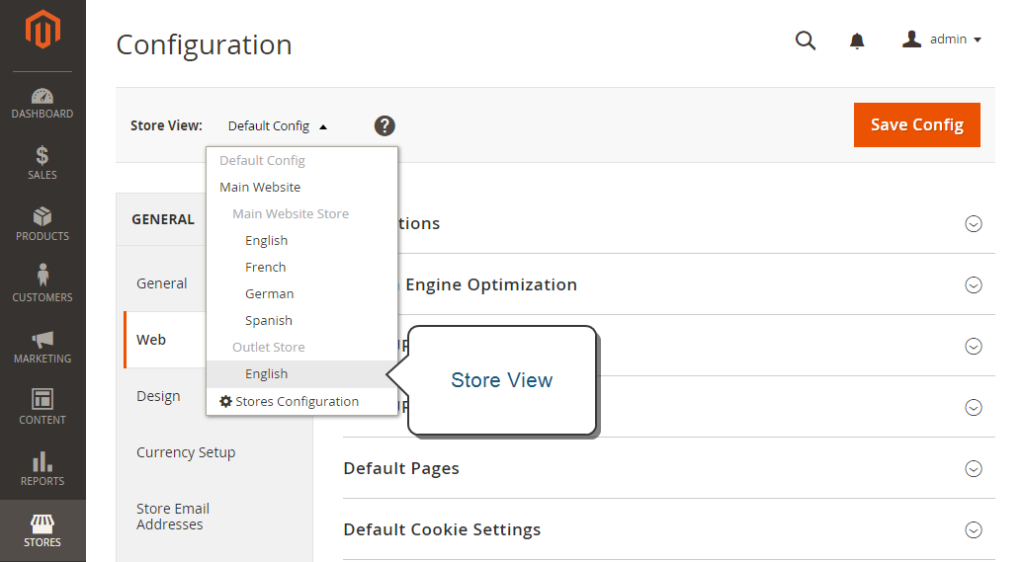
  • On admin sidebar click Stores. Under Settings, click Configuration.
  • Under General, click Web. Open the base URL tab and follow these steps:

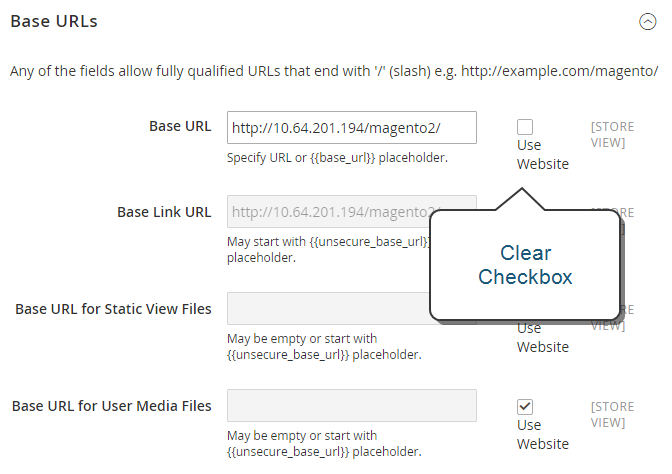
Input Base URL for your store, end with a forward slash so additional URL keys can extend the link from your store. For example:

http://yourdomain.com/

  • (Optional) To determine an exchange location for the Base URL for Static View Files, enter the path starting with the following placeholder: {{unsecure_base_url}}
  • (Optional) To determine an exchange location for the Base URL for User Media Files, enter the path starting with the following placeholder: {{unsecure_base_url}}
  • For a common installation, it is not necessary to update the paths for the static view files or media files because they are relative to the base URL.
Base URL Configure Store URL In Magento 2
Base URL

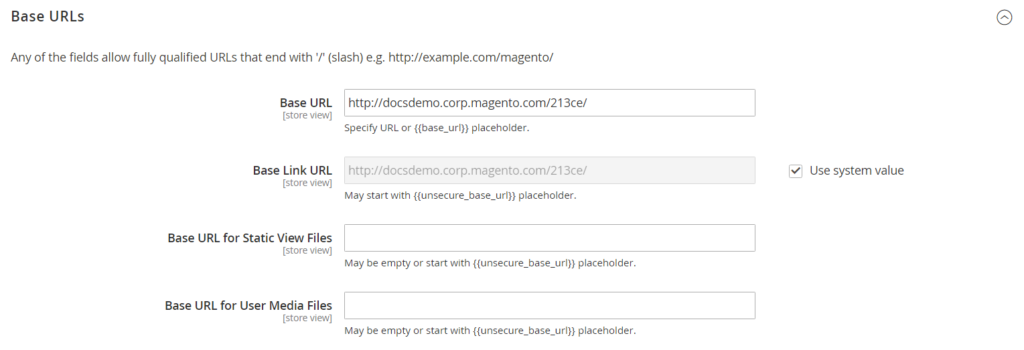
Placeholders enclosed in double braces are variables’ markup tags.

  • Save after completed.

Follow these steps to configure the secure base URL:

If security certificate is available in your domain, you can set the URLs of both the storefront and Admin to transfer data over a secure (HTTPS) channel. Your store cannot operate with secure (SSL/TLS) protocol if the security certificate is not available.

  • Open the Base URLs (Secure) tab, and follow these steps:

Input the full Secure Base URL, end with a forward slash. For example:

https://yourdomain.com/

The Secure Base Link URL field has nothing to change. It is used to generate relative links to the HTTPS base URL.

(Optional) To determine an exchange location for the Secure Base URL for Static View Files, input the path beginning with the following placeholder: {{secure_base_url}}

(Optional) To determine an exchange location for the Secure Base URL for User Media Files, enter the path starting with the following placeholder: {{secure_base_url}}

  • Set these two options to “Yes” to enhance security:

Use Secure URLs on Storefront

Use Secure URLs in Admin

When this fields display, set both options to “Yes” too:

Enhanced Security Settings Configure Store URL In Magento 2
Enhanced Security Settings
  • Click Save after completed

To include the store code in URL, follow these steps:

  • On the admin sidebar click Stores, under Settings click Configuration
  • On the left of the panel, under General, click Web.
  • Edit Add Store Code to your preference.

URL with store code

http://www.yourdomain.com/magento/[store-code]/index.php/url-identifier

URL without Store Code

http://www.yourdomain.com/magento/index.php/url-identifier

  • Click Save after completed
  • Refresh cache by clicking Cache Management at the top of the workspace

Troubleshooting

In case there are some pages to be served without HTTPS after configuration, follow these steps:

Change the HTTP base URL to the HTTPS URL.

On the server, edit the .htaccess file (or load balancer) so the unsecure URL is redirected to the secure URL.


A Complete Guideline of Adding Websites In Magento 2

In the same Magento installation, store administrators can set up many websites. The websites can be set up to share the same domain or use different domains. If you want to separate the checkout process of each store under its domain, you have to select a distinct IP and separate Security Certificate for each store. In this article, we will provide a tutorial on adding websites in Magento 2

Multiple Websites Adding websites in magento 2
Multiple Websites

There are two primary steps in adding websites in Magento 2: Create a New Website and Configure the Store URL

Step 1: Create a New Website

On the admin sidebar click Stores > All Stores > Create Website. Follow these steps

Website Information adding websites in magento 2
Website Information
  • Input the domain of new website into a Name text field
  • Input a Code text field that server will use it to point to the domain

The code must start with a lowercase letter(a-z), and can include any combination of letters (a-z), numbers (0-9), and the underscore (_) symbol.

  • Input a sort number to decide the sequence in which this site is listed with other sites. A zero will put the site to the top of the list (Optional)
  • Set Default Store for this website.

Step 2: Configure the Store URL

Read this article to know how to Configure the Store URL

Above is an article about the progress of adding websites in Magento 2 and tutorial on how to create a new website in admin controller. We hope that this article will provide useful information for Magento 2 store administrators to completely handle the basic configuration. In the next article, we will provide a guideline on Store URL and using a custom admin URL. Don’t forget to like and share if you think this article is useful, and subscribe Magestandard for weekly Magento 2 tutorial articles.

A Complete Guideline of Adding Stores In Magento 2

In Magento 2 installation, many stores that share the same Admin can be included in a single installation. Stores that are on the same website share the same domain, IP address, security certificate and a single checkout process.

Remember that the stores also share the same Magento code and admin backend. Store administrators can allow the store to share the same catalog or have a separate catalog. To have a different main menu for each store, each store can have a separate root category. Stores can have different branding, presentation, and content. You have to spend some time preparing a plan for your store hierarchy with future growth in mind because your plan will be used throughout the configuration.

Multiple Stores Adding Store in Magento 2
Multiple Stores

In these examples, URLs can be configured for multiple stores:

yourdomain.com/store1 Each store shares the same domain and has a different path
yourdomain.com/store2
store1.yourdomain.com Each store has a separate subdomain of the primary domain.
store2.yourdomain.com

Step 1: Select a Store Domain

  • Set up a subdomain of your primary domain.
  • Set up a different primary domain.

Step 2: Create a New Store:

  1. On the Admin Sidebar, click Stores. Under Settings, click All Stores.
  2. Click Create Store and follow these steps:
  • Select the Web Site that is to be the parent container of the new store.  If the installation has one web site, select the “Main Website” default mode.
  • Input the Name and Code for the new store. The name is for internal reference only, the Code has lowercase character.
  • Set Root Category that defines the category structure for the main menu of the new store. You can select a specific root category for the store or “Default Category”. Of course, you can come back and update the setting later.
store information adding store in magento 2
store information
  1. Click Save after completed.
new store adding store in magento 2
new store

Step 3: Create A Default Store View

  1. Click Create Store View
  • Change Store to the created store
  • Input Name and Code
  • Change Status to Enabled
  • In the Sort Order field, enter a number of the store’s place on the list of stores.
  1. Click Save Store View

This is the new default view of your store in Edit mode

new store with default view adding store in magento 2
new store with default view

Step 4: Configure the Store URL

  1. Click Store > Configuration. Under General click Web
  2. Set Store View to the created view for the new store. Click OK after confirmed scope switching.
choose the new store view adding store in magento 2
choose the new store view

Open the Base URLs tab, follow these steps:

  • Uncheck the Use Website checkbox.
  • Input the Base URL for the Store
base urls adding store in magento 2
base urls
  1. Open the Secure Base URLs tab, repeat the previous step to configure the store’s secure URL.
  2. Click Save Config after completed.

How To Translate Content Pages In Magento 2

When you have set the locale for each store view to a different language, and your store has multiple views in other languages, the result is a partially translated site. In the next step, you have to translate every page that is available from the specific store view. Each view that includes a translated version of the page displays in the Store View column of the Manage Pages list.  

In the progress of translate content pages in Magento 2, you have to create a new page that has the similar URL Key to the original one but is assigned to a specific store view. Then input translated text to the page for the specific view. In this article, we will show you how to translate content pages in Magento 2 admin control

Follow these steps to create a translated page for a view:

  1. On the Admin sidebar, click Content. Then under Elements, select Pages.
  2. In the grid, find the page to be translated, and open in edit mode.
  3. Copy/paste the URL Key to the clipboard. Then, click the Back button to return to the Pages grid.
  4. Click Add New Page. Then, follow these steps:
  • Enter the translated Page Title.
  • Copy and Paste the URL Key from the original page.
  • In the Store View box, select the store view that contains the page.
  • On the left of the admin panel, select Content. Then, complete the translated text for the page.
  • On the Design tab, set the column Layout of the page.
  • On the Meta Data tab, enter the translated text for the Keywords and Description.
  1. Click Save Page after completing. Then after all works above are done, flush caches by using admin control or git command.
  2. To confirm the translation was done, use the language selector to change the store view on the front page.

Remember that there are still some components on the page that require being translated, including the store footer links block, the welcome message, and product information.

How To Translate Products In Magento 2

Translating products in Magento 2 means translate the product name, description fields, and meta data. If your store has multiple views in different languages, in every store view the same products are available. The same necessary product information can be used, such as SKU, price, and inventory level, regardless of language. In this article, we will describe a tutorial on how to translate products in Magento 2.

Step 1: Translate Product Fields

  1. On the Admin sidebar, click Products. After that below Inventory, click Catalog.
  2. In the grid, open the product to be translated in edit mode.
  3. In the upper-left corner change Store View to the view for the translation. Click OK after confirmed.
  4. For each field to be edited, follow these steps:
  • Untick the Use Default Value checkbox to the right of the text field.
  • Either paste or type the translated text into the text field.

Remember to translate all text fields, including image caption, Alt text, Search Engine Optimization text fields and Custom Options information.

  1. Click Save after completed.

Step 2: Translate Field Labels

  1. On the Admin sidebar, click Stores. After that below Attributes, click Product.
  2. In the list, open the attribute to be translated in edit mode.
  3. Click Manage Labels in the panel on the left.
  4. In the Manage Titles section, input a translated label for each store view.
input label translate products in magento 2
Input Translated Labels
  1. When complete, click Save Attribute.

Step 3: Translate All Categories

  1. On the Admin sidebar, click Products. After that below Inventory, click Categories.
  2. In the upper-left corner change Store View to the view for the translation. Click OK after confirmed.
  3. In the tree, open the category to be translated in edit mode.
  4. On the General Information tab, translate these fields:
  • Name
  • Description
  • Page Title
  • Meta Keywords
  • Meta Description
  1. To translate the URL Key, follow these steps:
  • Untick the Use Default Value checkbox.
  • Input the translated text.
  • Remember to select the Create Permanent Redirect for old URL checkbox.
translate url key translate products in magento 2
Translate URL Key
  1. Click Save Category after complete.
  2. For all categories used in the store, repeat the process.