How To Translate Content Pages In Magento 2

When you have set the locale for each store view to a different language, and your store has multiple views in other languages, the result is a partially translated site. In the next step, you have to translate every page that is available from the specific store view. Each view that includes a translated version of the page displays in the Store View column of the Manage Pages list.  

In the progress of translate content pages in Magento 2, you have to create a new page that has the similar URL Key to the original one but is assigned to a specific store view. Then input translated text to the page for the specific view. In this article, we will show you how to translate content pages in Magento 2 admin control

Follow these steps to create a translated page for a view:

  1. On the Admin sidebar, click Content. Then under Elements, select Pages.
  2. In the grid, find the page to be translated, and open in edit mode.
  3. Copy/paste the URL Key to the clipboard. Then, click the Back button to return to the Pages grid.
  4. Click Add New Page. Then, follow these steps:
  • Enter the translated Page Title.
  • Copy and Paste the URL Key from the original page.
  • In the Store View box, select the store view that contains the page.
  • On the left of the admin panel, select Content. Then, complete the translated text for the page.
  • On the Design tab, set the column Layout of the page.
  • On the Meta Data tab, enter the translated text for the Keywords and Description.
  1. Click Save Page after completing. Then after all works above are done, flush caches by using admin control or git command.
  2. To confirm the translation was done, use the language selector to change the store view on the front page.

Remember that there are still some components on the page that require being translated, including the store footer links block, the welcome message, and product information.

How to Configure Store Demo Notice in Magento 2

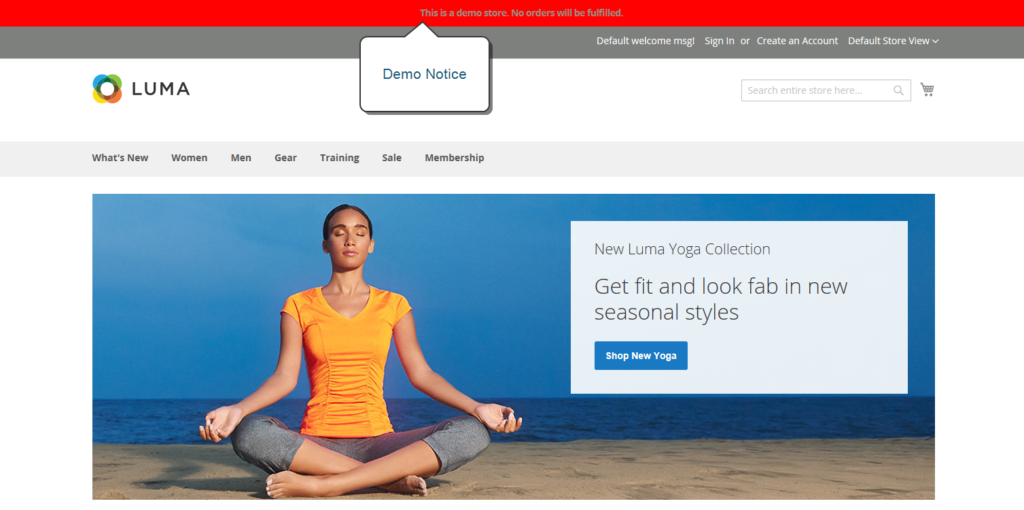
After installing successful Magento 2, the Store Demo Notice will display on the top header of your frontend store view. If your store is online, but still under maintenance, you can display a store demo notice at the top of the page to let people know that the store is not yet open for business, so purchase functions will be disable. When you are ready to “go live,” simply remove the message. It’s like flipping the sign hanging in the window from “Closed” to “Open.” An effective way to announce customers that the store can’t serve them now and they can come back later. The format of the demo notice is determined by the theme of your store. This article will show you how to configure Store Demo Notice in Magento 2

storefront-demo-notice_thumb_0_0
Store Demo Notice

To configure the store demo notice, you have to follow these steps:

  1. On the Admin sidebar, click Content. After that, under Design, select Configuration.
  2. In the grid, find the store view that you want to configure. After that, in the Action column, click Edit.
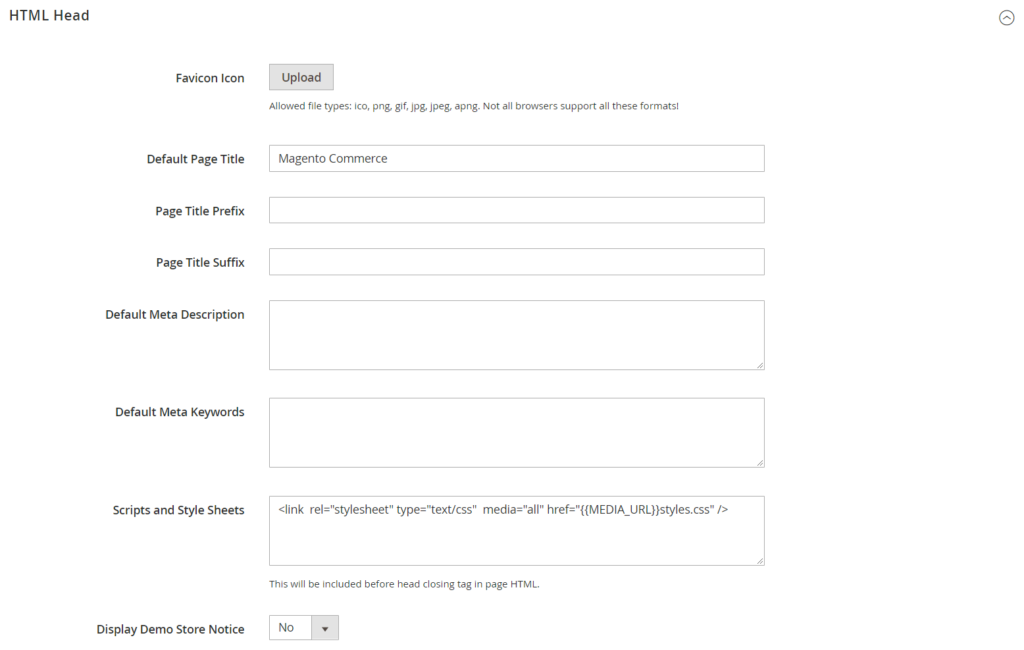
  3. Under Other Settings, expand the HTML Head section.
  4. Scroll down to the bottom, and change the Display Demo Store Notice to your preference.
design-configuration-html-head_thumb_0_0
HTML Head
  1. After complete, click Save Configuration.

Remember to clear the cache by Magento command or using Cache Management in Admin backend otherwise the old cache will prevent the command from Administrator and the store demo notice will not follow store owner wish. When the cache has cleared, press ctrl + f5 and look at the frontend store. Now the store demo notice should appear or hide as your command.

Above is the way to configure Store Demo Notice in Magento 2 web store, if you have any question, feel free to leave a comment or contact us through email.