An Overall View about Admin Workspace in Magento 2

Admin workspace plays an important role in managing store because it helps admin control all data and content to run the store effectively. In this article, we will show you an overall view about admin workspace in Magento 2.
magento2-admin-workspace

What is Admin Workspace?

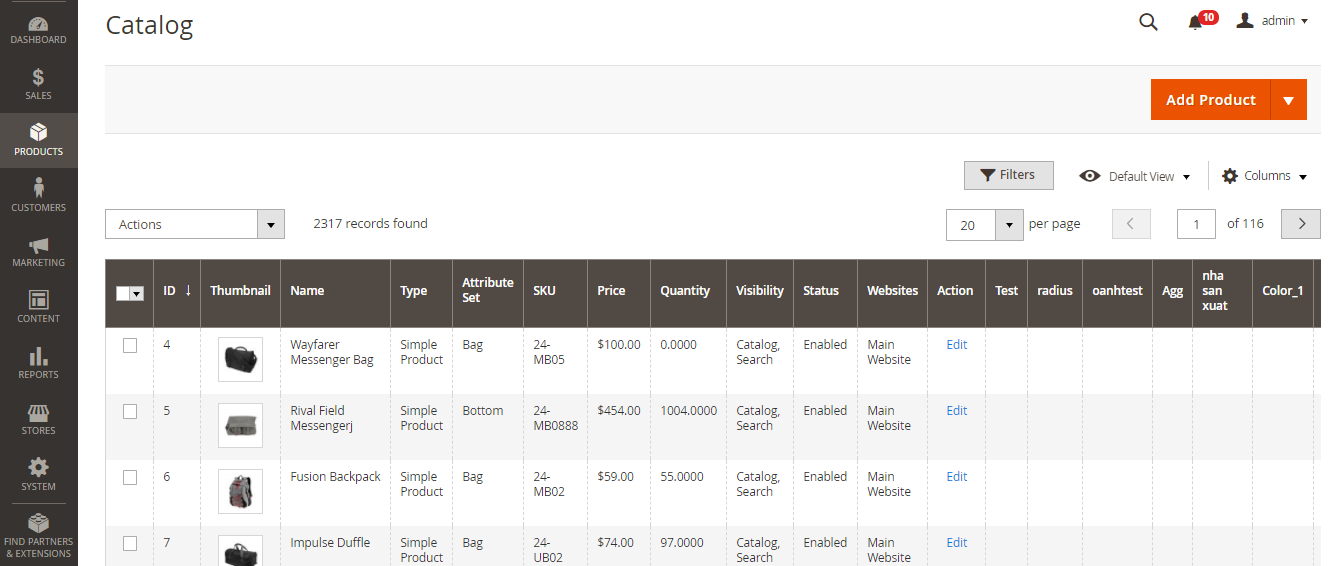
The Admin Workspace supplies you with connection to all the tools, data and content that are essential for managing your store. Many admin pages have a grid containing the data for the section with a selection of tools to search, sort, filter, select and apply as well. The configuration can be used to set up default startup page and it can be clearly seen that the dashboard is the startup page for the admin by default. However, you can change dashboard into any other page you want to appear when logging in. To see admin startup page, you can select Magento logo in the admin sidebar.

How to Customize Admin Startup Page

Follow this instruction if you want to change Admin startup page:

  1. Select Stores on the Admin sidebar -> Choose Configuration under Settings
  2. Tap Admin under Advanced on the left panel
  3. Widen the Startup Page part
  4. Change Startup Page into the page you want to display first when logging into the Admin
  5. Click on Save Config to finish all steps

Workspace Controls

Search: Used for the purpose of looking for any value in the database such as product, customer, and order records.
Sort: Located in the header of each column, used to sort the list in ascending or descending order.
Filters: Specifies a set of search parameters that determine the records displaying in the grid.
Default View: Decides the default column layout of the grid.
Columns: Determines which columns are selected and their order in the grid. The column layout can be customized and only some of the columns are displayed in the grid by default.
Paginate: Utilized to view the other result pages.
Actions: Assigns an activity to all selected records. Put the tick in the checkbox in the first column of each row to choose individual records or use the Select control.
Select: Used when choosing multiple records that are to be the action target. Options: Select All / Deselect All.

Conclusion

Provided above is the overall introduction of admin workspace in Magento 2. If you have any question about admin workspace, please feel free to contact us and we’re happy to help you.


5 Steps to Create A New Bundle Product in Magento 2

A bundle product in Magento 2 is a set of simple or virtual product without custom options. A good example for this is a Yoga Kit, which normally includes a ball, a brick, and a strap. These sub-items can be customized before being purchased by the customer.

product-bundle

There are 5 steps to create a new bundle product from the backend of Magento 2:

Step 1: Choose the product type: Bundle product

  • On the Admin sidebar, click Products. After that, select Catalog.
  • Tap the drop-down button next to Add Product. Select Bundle Product then.

product-add-bundle

Step 2: Choose the Attribute Set

The attribute set functions as a template for you to complete the product’s information. There are two ways to select the attribute set:

  • Enter the name of the Attribute Set to the Search box.
  • Choose one value from the attribute list.

product-create-choose-attribute-set

Step 3: Complete the Basic Settings

  • Type the name of the new bundle product to the Product Name box.
  • Set the Enable Product switch to “No” as it’s not ready to publish.
  • SKU, Price, Weight: As the products that are included in the bundle vary to each custom options, the SKU, Price, and Weight can be set to either a dynamic or fixed value.
  • A Dynamic value: This will automatically assign a dynamic SKU (or price/weight) that changes together with the selected options to each item in the new bundle.
  • A fixed value: Set the Dynamic option to “No” and enter a value to each field. These value of SKU/Price/Weight will not be affected by the custom options.
  1. Tap Save and continue. Then select the store view that you want your product to be displayed.
  2. Tax Class: If the price is set to be fixed, select one of the following value to the whole bundle:
  • None
  • Taxable Goods

In case the price is set to Dynamic, do the same instructions for each item in the bundle.

  1. Quantity: As this kind of product contains a set of items, its quantity cannot be determined in advance.
  2. The Stock Status is set by default to “In Stock.”
  3. Visibility: Set it to “Catalog, Search.” so that the product will be found in both Catalog and Search results.
  4. Categories: You can either choose an existing category or create a new one. For the second choice, remember to choose the Parent Category to determine the new category position in the menu structure.
  5. Select the Country of Manufacture.

product-bundle-details

Step 4: Add the Bundle Items

  • Move to the Bundle Items section. Then, set Ship Bundle Items to either Separately or Together.
  • Next, tap Add Option.
  • Type an Option Title to the field.
  • Input Type: There are four options to set the input type:
  • Drop-down
  • Radio buttons
  • Checkbox
  • Multiple Select
  1. Mark the Required checkbox of any field to your preference.
  2. Tap Add Products to option then mark the checkbox of each item that you want to include in this option. You can use the Filter or the Search box to find the intended item. After that, press Add Selected Product button. A list of chosen product is then displayed on the working space.
  3.  Choose the items to add to a bundle. For each item, enter a value to the Default Quantity To allow customers to change the quantity of a bundle item, select User Defined. For instance, if the Default Quantity of the ball in a Yoga Kit is 2, and the customer orders 4 of that bundle option, the total number of total balls purchased is 8.
  4. To erase any item from the bundle, tap the Delete icon.

add-products-to-option

Step 5: Complete the remaining sections and publish the product

  • Content
  • Images and Videos
  • Search Engine Optimization
  • Related Products, Up-Sells, and Cross-Sells
  • Customizable Options
  • Products in Websites
  • Design
  • Gift Options

When finish all the settings, set Enable Product to “Yes” to publish the new bundle product.

Those are 6 steps to build a total new bundle product. Now, practice yourself in the Magento 2 backend to diversify the products on your store and attract more customers.

How to Create a Configurable Product in Magento 2

A configurable product in Magento 2 is an item with multiple options for each attribute. Each option is indeed a single simple product with a unique SKU. This makes it possible to track inventory for each product variation.

configurable-product

Before creating a configurable product in Magento 2, you should prepare an attribute set that includes at least a dropdown or visual swatch for each product variation. The variation attributes should meet the following requirements:

  • Global scope
  • Dropdown or Visual Swatch type of catalog
  • Required values

To create a configurable product in Magento 2, we need to complete 2 big stages:

Stage 1: Create a configurable product

Step 1: Choose the Product Type and the Attribute Set

Follow the first 2 step of creating a simple product written in our previous blog. Remember to select Configurable Product instead of Simple Product when you choose the product type.add-configurable-product

Step 2: Complete the Product Information Settings

  • Enable product: Set it to “No”
  1. Enter the Product Name.
  2. SKU: You can either accept the default SKU or type another one.
  3. Set the Price for the new product.
  4. Tax class: Choose “None” if the product is free from tax. Select “Taxable Good” otherwise.
  5. The Quantity is determined by the product variations, so you can leave it blank temporary.
  6. The Stock Status of a configurable product is determined by each associated configuration. If you let the Quantity box blank, the Stock Status is then set to “Out of Stock.”
  7. Enter the product’s weight.
  8. Set  “Catalog, Search.” for the Visibility field.
  9. Set Product as New From … to…: Set the time range for the new product.
  10. Choose a Country of Manufacture from the list.product-details

Step 3: Save and Continue

In the upper-right corner, tap Save and Continue. Now go to the second stage.

Stage 2: Set up the configurations

In this section, we will guide you how to add configurations for three colors and three sizes. Scroll down to the Configurations section. Tap Create Configuration button then do the followings:

Step 1: Select Attributes

Select the attributes in the listed in the grid. You can add a new one by clicking the Create New Attribute button and do as suggested. For this example, we choose color and size.

In the upper right corner, tap Next to continue.

Step 2: Complete the attributes values

  • Mark the checkbox of the values that you want to apply to the product.
  • To rearrange the attributes, grab the Change Order icon and move it to a new position. This will determine the position of the drop-down lists on the product page.
  • Tap Next to continue.Complete-the-attributes-values

Step 3: Configure the Images, Price, and Quantity

In this step, you will set the images, prices and quantities for each configuration. The options are the same for each, and you can choose only one:

  • Apply a value to all SKUs
  • Apply a unique value to each SKU
  • Skip the step temporary

When complete, tap Next.

Step 4:  Summary

A list of products with intended configurations is displayed on the screen for your review. You can either go to the next step or go back to make any changes. After you click Next, a temporary product variations will appear at the bottom of the Configuration section.

summary

Step 5: Add Product Image

Expand the Images and Videos section. Browse to the image that you want to represent for the configurable product and upload it.

Step 6: Complete the Product Information

Fill in the remaining sections as needed:

  • Contents
  • Search Engine Optimization
  • Related products, Up-sells, and Cross-sells.
  • Customizable Options
  • Products in Websites
  • Design
  • Gift Options

Step 7: Publish the Product

  1. When everything is done, set the Enable Product switch to the “Yes” to publish the new product.
  2. Tap Save to confirm the new creation. You can preview the product by choosing Customer View on the Admin menu.

Above are all steps to create a new configurable product via Magento 2 backend. There are some important notes that you should pay attention to: The attribute(s) that contain the values used for product variation must be included in the parent attribute. Besides, the thumbnail image in the shopping cart can be set to display the image from the configurable product record, or from the product variation. It’s time to log in your Magento 2 backend mode and discover the new thing.

A Detail of Product Attribute Reference in Magento 2

In this article, we would like to provide you a detail of Product Attribute about its definition, sort order of each product attribute as well as the description of them.

An Introduction of Product Attribute in Magento 2

In Magento 2, there are a lots types of product attribute which contribute and represent for particular product. Each product attribute is shown in the CSV file as a column, and product records are shown by rows. Columns which contain an underscore at the beginning include service data such as properties or option values for complex data. Specifically, complex data is the data which is linked to various product options. The product types which uses complex data are configurable product, grouped product and bundle product.  

The construction of the installation which is used to export this data include the sample data installed, two websites and several store views. Among a lots columns included in the exported list, there is only SKU specified as a required value. If you want to import data, you totally can select only the columns which have changes. In addition, the SKU is so crucial so it should be placed in the first column. However, the sort order of the rest of the attributes is not a big deal. Hence, you can put them anywhere you want in the CSV file for managing.

Detail of Particular Product Attribute From a Typical Product Export in Magento 2

All those screenshot below shows you the detail of each product attribute in Magento 2

Simple Product CSV File Structure

Service Data For Product Variations

How to Configure the Customer Name and Address Options in Magento 2

In Magento 2, Name and Address Options allows admin to set the values of prefix and suffix part of the customer name in the drop-down lists. Besides, admin can include additional fields such as Date of Birth, Tax/VAT Number and Gender as well.

How to Configure the Customer Name and Address Options in Magento 2

  1. Open the Admin Homepage. Then take a look at sidebar and click on Stores symbol. Next, on the Stores panel, choose Configuration under Settings.
  2. In the board on the left, choose Customer Configuration under Customers.
  3. Next, expand the Name and Address Options sector.

a. Leave a number in Number of Lines in a Street Address. Valid range is from 1 to 4. If you let this field be empty, the number of line will be set to 2 by default.

b. Do the following to include a prefix that comes out before name such as Mr., Mrs., etc.

  • Select Optional or Required in Show Prefix
  • In the Prefix Dropdown Option field, enter prefix that you want to be include in the list, each prefix is separated by a semicolon. Put semicolon in the beginning for empty first option. Leave empty for open text field.

4. Do the following to include a suffix after the name such as Jr., Sr., etc.

a. Choose Optional or Required in Show Suffix field.

b. In the Suffix Dropdown Options field, enter various suffix that you want to be included in the list. Each suffix is separated by a semicolon. Put semicolon in the beginning for empty first option. Leave empty for open text field.

5. In addition, to include extra fields, do the following:

  • Set Yes to Show Date of Birth field.
  • Set Yes to Show Tax/VAT Number field.
  • Set Yes to Show Gender field.

6. When complete, tap Save Config button to finish.

If you find it helpful for you, please Like, Share and Subscribe to keep updating for more upcoming blogs!