How to Configure the Customer Name and Address Options in Magento 2

In Magento 2, Name and Address Options allows admin to set the values of prefix and suffix part of the customer name in the drop-down lists. Besides, admin can include additional fields such as Date of Birth, Tax/VAT Number and Gender as well.

How to Configure the Customer Name and Address Options in Magento 2

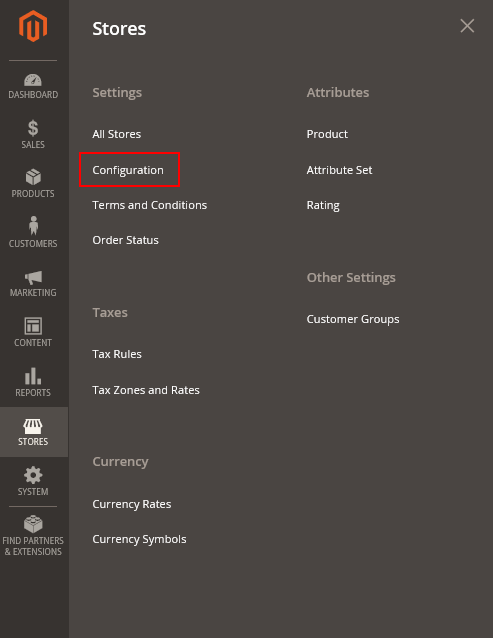
  1. Open the Admin Homepage. Then take a look at sidebar and click on Stores symbol. Next, on the Stores panel, choose Configuration under Settings.
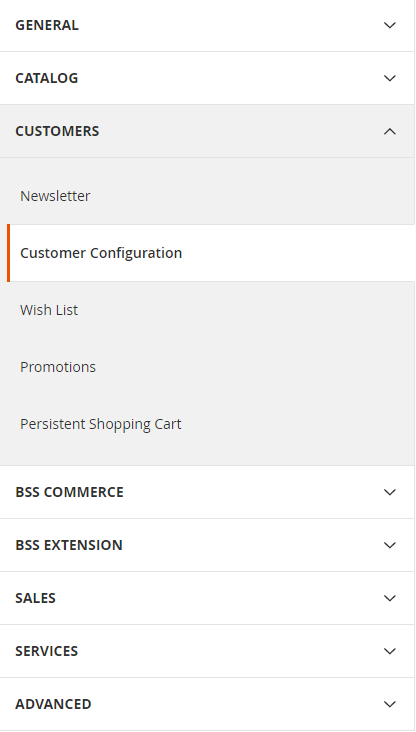
  2. In the board on the left, choose Customer Configuration under Customers.
  3. Next, expand the Name and Address Options sector.

a. Leave a number in Number of Lines in a Street Address. Valid range is from 1 to 4. If you let this field be empty, the number of line will be set to 2 by default.

b. Do the following to include a prefix that comes out before name such as Mr., Mrs., etc.

  • Select Optional or Required in Show Prefix
  • In the Prefix Dropdown Option field, enter prefix that you want to be include in the list, each prefix is separated by a semicolon. Put semicolon in the beginning for empty first option. Leave empty for open text field.

4. Do the following to include a suffix after the name such as Jr., Sr., etc.

a. Choose Optional or Required in Show Suffix field.

b. In the Suffix Dropdown Options field, enter various suffix that you want to be included in the list. Each suffix is separated by a semicolon. Put semicolon in the beginning for empty first option. Leave empty for open text field.

5. In addition, to include extra fields, do the following:

  • Set Yes to Show Date of Birth field.
  • Set Yes to Show Tax/VAT Number field.
  • Set Yes to Show Gender field.

6. When complete, tap Save Config button to finish.

If you find it helpful for you, please Like, Share and Subscribe to keep updating for more upcoming blogs!

How to Create A Virtual Product in Magento 2

Virtual products in Magento 2 stores are intangible items that are sold to customers. They are much like simple products, but has no weight or other physical statistics. Some examples of virtual products are memberships, services, warranties, or subscriptions. In a Magento 2 store, virtual products can either be sold one by one, or included as part Grouped Product or Bundle Product.

product-virtual-membership

To create a virtual product for a Magento 2 store, follow the 6 steps below:

Step 1: Choose the Product Type: Virtual Product

Follow the instructions to create a simple product in our previous blog. Choose Virtual Product instead of Simple Product

Step 2: Choose the Attribute Set

Follow Step 2 in the blog “5 Steps to Add A Simple Product in Magento 2” to determine the most appropriate attribute for the new virtual product.

Step 3: Complete the Required Settings

  • Enable Product: Set it to “No” until all settings are completed.
  • Product Name: Type the new product name here.
  • SKU: You can either accept the default SKU or enter a new one.
  • Price: Enter a value here to set as primary price for your new product.
  • Click Save to save changes. Select the appropriate store view for the new item.

choose-store-view

Step 4: Complete the Basic Settings

  • Tax Class: It can be set to None (no tax applied) or Taxable Goods.
  • Quantity: Enter the number of the products that are available to sell.
  • Stock Status: Set it to “In Stock”.
  • Notice that the Weight field is not available because the new product is a virtual one.
  • Categories: You can either choose an existing category from the list provided or create a new one. You need to enter the Category Name and select the Parent Category for the second choice.
  • Visibility: Choose “Catalog & Search” so that the new item can be seen in both catalog and search results.
  • Set Product as New From … to … : Enter the time range for the new product.

Step 5: Complete the Product Information

Complete the remaining fields as needed:

  • Contents
  • Images and Videos
  • Search Engine Optimization
  • Related products, Up-sells, and Cross-sells.
  • Customizable Options
  • Products in Websites
  • Design
  • Gift Options

Step 6: Publish the Product

  • Set the Enable Product to “Yes”
  • Click Save button on the upper-right corner.
  • You can preview the new item on your store by selecting the Customer View on the Admin menu.

Those are 6 steps to create a virtual product for your Magento 2 store. There is an important note for you when it comes to virtual product in Magento 2: Shipping options is not appear during checkout unless there is a tangible product in the cart. Now, let’s go to your store and try out the knowledge that you have acquired.

A Quick Introduction of Grid Controls in Magento 2

Admin pages that control data show a list of records in a grid. In this article, we will focus on giving a quick introduction of managing the grid in Magento 2.

Admin will manage the data more effectively if he or she knows how to make use of grid controls in the backend page. Firstly, you can easily sort the data with the controls at the top of each column in the grid. The arrow in the column header indicates that the current sort order is either ascending or descending so that looking for data becomes more convenient. Secondly, you are capable of determining which columns display in the grid or changing different positions of them. Moreover, various column arrangements can be kept as views for the purpose of being used later. The Action column shows activities that can be applied to each record. Finally, the data from the current view can be conveyed to a CSV or Excel XML file.

Assort the list:

1. Choose any column header. The arrow shows the current order is ascending or descending.
2. To see other pages in the collection, utilize the pagination controls

Number the page:

1. Apply the Pagination control to the number of records that you want to view per page.
2. Click Next and Previous to page through the list, or enter a detailed Page Number

Filter the list:

1. Tap Filters icon
2. To define the record that you want to look for, fill in as many filters as necessary
3. Select Apply Filters to finish

We have shown you the brief overview of grid controls and how to manage the grid in Magento 2. We hope that this article is useful for the ones who are finding information about grid controls. If you need any help, please feel free to contact us.