How to Customize Country Options in Magento 2

In the previous articles, we gave you detailed information about locale options, state options and how to configure them in Magento 2. This article today will show you how to customize country options in Magento 2.

magento2-country-options

Introduction of Country Options

The country options determine the country where you locate your business and the countries from which you accept orders. With the country options section, you can set default country, allow countries that doesn’t require ZIP/Postal code, European Union countries and top destinations list.

To Configure the Country Options for your store

  1. Choose Stores on the Admin sidebar -> Tap Configuration under Settings.
  2. In the left panel, select General under General.
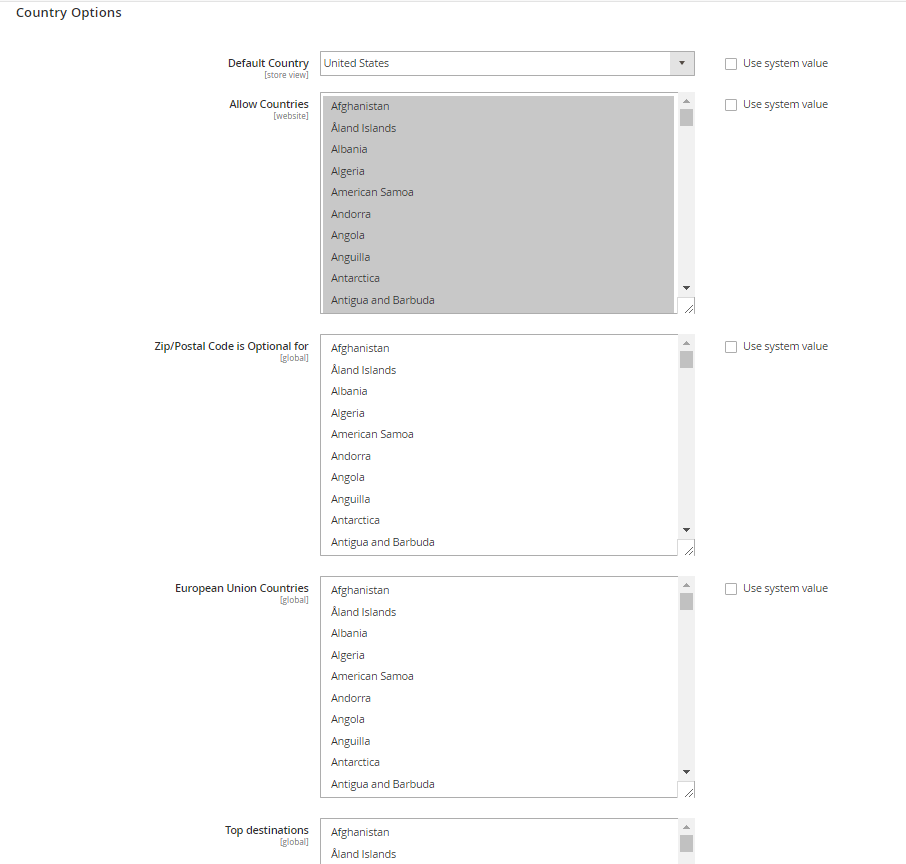
  3. Widen the Country Options and do the following:

a. Determine the Default Country where your business is located from the existing list.
b. In the Allow Countries list, decide each country from which you accept payment. All countries in the list are marked by default. You can hold down the Ctrl (PC) or Command (Mac) key to select many countries at a single time.
c. In the Zip/Postal Code is Optional for section, select each country where you do business that doesn’t need a ZIP or Postal code entered as a part of the street address.
d. In the European Union Countries part, choose each country from the EU countries list where your business is conducted. By default, all EU countries are selected.
e. In the Top Destinations field, you can target the primary countries for sales by choosing the adequate countries from the list.

  1. Click Save Config to finish all steps.

In Conclusion

Provided above is the instruction of configuring the country options in Magento 2. If you have any question, please feel free to ask us and keep following our site to receive other useful Magento 2 guides.

Intergration in Magento 2

This article guides you to create a new location of OAuth credentials and redirect URL for third-party integrations. Also, you are provided the knowledge of how to identify the available API resources which are necessary for the intergration as well.

null

Onboarding Workflow

  1. Give permission for intergration: Go to the system/integration screen, looking for the related integration and authorize.
  2. Verify and establish login: When getting the notification, accept the access requested. If you are redirected to a third-party, create a new account or log in to that system with your available account. After registration, please return to the integration page.
  3. Receive confirmation of authorized intergration: The system sends you the notification which the intergration has been successfully authorized. After that, you are no longer need to make calls to access or requests tokens.

To Add a New Intergration

  1. Open the Admin homepage. Then tap System on the sidebar. Next, under Extensions, choose intergration.
  2. Complete the following intergration Information

a. Fill in the Name of the intergration and the Email address.

b. In Call Back URL field, enter the address where OAuth registration information can be sent when using OAuth for token exchange. For recommendation, we think using https:// will be the most suitable one.

c. In Identity Link URL, enter the link used to redirect the users to a third party account with these Magento 2 intergration references.

intergration3. In the board on the left, choose API. Next, do the following:

a. In Resource Access field, choose one of the two options: All or Custom.

b.  Mark the checkbox of each custom access resource which is needed.

intergration

4. When complete, click on Save button to finish.

To Change The API Guest Access Security Setting

In Magento 2 default, an anonymous guest is not allowed to access to CMS, catalog and other store resources. In order to change the default setting, do the following:

  1. Open the Admin Homepage. Then, on the sidebar, click on Stores symbol. Next, under Settings, choose Configuration.
  2. In the board on the left under Services, click on Magento Web API.
  3. Expand the Web API Security Setting section.intergration
  4. In Allow Anonymous Guest Access, choose “Yes”.
  5. When complete, tap Save Config button to finish.

If you find it helpful for you, please Like, Share and Subscribe to keep updating for our next blogs!

All The Things About Customer Groups in Magento 2

In Magento 2, there are three default customer groups including General, Not Logged In and Wholesale. Generally, customer groups are set to specific discounts and tax class. Then, in this article, we would like to guide you to create customer group, edit customer group, assign a customer to a different group and delete a customer group. Let’s take your attendance below!

To Create Customer Groups

  1. Open the Admin homepage, then choose Stores on the sidebar. Next, under Other Settings, click on Customer Groups.
  2. Click on Add New Customer Group button. Then, do the following:

a. In Group Name field, enter a unique name with less than 32 characters to define the group.

b. In Tax Class field, select one which is applied to the group.

c. Tap Save Customer Group button to finish.

To Edit Customer Groups

  1. Open the Admin homepage. Then, on the sidebar, choose Stores. Next, choose Customer Groups under Other Settings.
  2. Open the record with edit mode.
  3. Make change if it is necessary.
  4. When complete, tap Save Customer Group button to finish.

To Assign a Customer to a Different Group

  1. Open the Admin homepage. Next, choose Customers on the sidebar. Then, choose All Customers.
  2. Find the customer you want in the grid of list and mark the checkbox in the first column. Next, do the following:
  1. Choose Assign a Customer Group for Actions control.
  2. Set Group control for the new group.
  3. When ready to confirm, tap Ok.

To Delete Customer Groups

  1. Open the Admin Homepage. Then, choose Stores on the Admin sidebar. Next, under Other Settings, choose Customer Groups.
  2. Open the document in edit mode.
  3. In the button bar, choose Delete Customer Group.
  4. To confirm, tap OK.
  5. When complete, tap Save Customer Group button to finish.

In short, here are all the details about Customer Groups in Magento 2 we want to share with you. If you find it helpful for you, please Like, Share and Subscribe to keep updating for our next blogs!

An Easy Way to Configure Customer Password Options in Magento 2

In Magento 2, when you request to reset password, there will be a email sent to you for your notification including the lifetime of the password recovery link. It requires your new password have to meets the compulsory level of security. And you know, all of them, email template, lifetime of the password revovery link and, level of security are able to configure in customer password options from the backend. Moreover, admin can give customers permission to change their own password or set to only store owners can do so.

To Configure Customer Password Options

  1. Open the Admin homepage, then choose Stores on the sidebar. Next, under Settings, tap Configuration.
  2. In the board on the left, choose Customer Configuration under Customers. Next, expend the Password Options sector.
  3. Password Reset Protection Type field offers you 4 methods of managing password reset requests:
  • By IP and Email: The password can be reset online after receiving response about reset notification from Admin account.
  • By IP: The password can be rest online without any confirmation.
  • By Email: The password only can be reset after responding to an email notification sent form Admin account.
  • None: Only the admin can reset the password.
  1. In order to limit the number of reset password times per hour, do the following:

a. In Max Number of Password Reset Requests field, set the maximum number of password reset requests which is allowed to be sent per hour.

b. In Min Time Between Password Reset Requests field, set the minimum number of minutes which must transpire between requests.

  1. In order to configure the password reset email notification, do the following:

a. In Forgot Email Template, choose template used for the email sent to customers who have forgotten their passwords.

b. In Remind Email Template field, choose the template which is used when a password hint is sent to customers.

c. In Reset Password Template fieldchoose template used when customeres change their passwords.

d. In Password Template Email Sender field, set the store contact which appears as the sender of password-related notifications.

  1. To complete the password reset security options left

a. In Recovery Link Expiration Period (hours) field, set the number of hours for valid recovery link.

b. In Number of Required Charater Classes filed, set the number of differnet character types required for a password based on 4 character classes: Lowercase, Uppercase, Numeric, Special Characters.

c. In Maximum Login Failures to Lockout Account field, leave the number of failed login attempts until the Admin account is looked. If you want unlimited attempts, leave zero.

d. In Minimum Password Length field, leave the minimum number of characters which can be used in a password.

e. In Lockout Time (minutes) field, leave the number of minutes an Admin account is locked caused of too many failed attempts to log in.

  1. Tap Save Config to finish.

We have presented  a way to Configure Customer Password Options in Magento 2. We hope that this article can show you useful information to select the appropriate extension for your online shop. If you find it helpful for you, please Like, Share and Subscribe to keep updating for our next blogs!

An Introduction of Store Information in Magento 2

What is Store Information? How to Enter Your Store Information? This article today will show you a quick introduction of Store Information in Magento 2.

store information

Store Information

Store details are the fundamental information consisting of the store name and address, telephone number and email address which show up on email messages, invoices and other communications sent to your customers. Store details section allows admin to define basic data about the online shop, which ensures that the store information is clear and the store is recognized.

Insert Your Store Details

Do the following to enter your store details in backend

  1. Choose Stores on the Admin Sidebar -> Tap Configuration under Settings.
  2. Select General under General section in the left panel.
  3. Widen the Store Information part and do this instruction:
  • Type the Store Name that you intend to use in all communications.
  • Enter the Store Phone Number and customize its form as you want to display.
  • Insert the hours your shop is open for business in the Store Hours of Operation section. (For instance: Mon – Fri, 9-5, Sat 9-noon PST).
  • Choose the Country where your store is placed.
  • Tap the Region/State with the country.
  • Enter data in Zip/Postal Code and City fields if necessary.
  • Type the Store Address. In case the address is long, continue the address on Store Address Line 2.
  • Insert the VAT Number of your store if applicable. Tap the Validate VAT Number button to check the number.
  1. Click Save Config to finish all the steps.

Conclusion

Provided above is the introduction of Store Information part in Magento 2. If you want to add or erase any item in this FAQ list, feel free to contact us. Don’t forget to Like, Share, and Subscribe to Magestandard for more informative Magento extension review articles.