How to Manage Your Customers’ Shopping Cart through Cart Configuration in Magento 2?

Having customers to place orders on online products is always a huge success for any e-commerce businessman. But managing those worthy  orders requires a lot of efforts. Admin of online stores need to be professional in Cart Configuration so as to handle the job effectively. If you barely know about Cart Configuration and Cart Link, this article would be a cure for you.

Cart Configuration

Cart Configuration provides you many tools to efficaciously manage your shopping cart. It includes seven instruments, which are:

  • Card Link
  • Cart Sidebar
  • Redirect to Cart
  • Quote Lifetime
  • Minimum Order Amount
  • Reorder
  • Cart Thumbnails

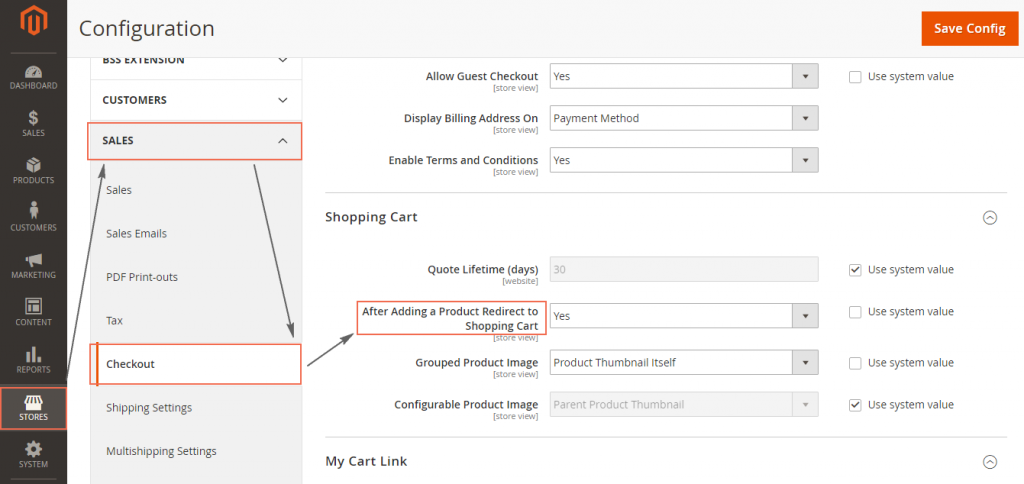
You can find all of these tools in the backend of Magento platform, using an admin account: Stores -> Configuration -> Sales. Minimum Order Amount and Reorder options can be easily found by choosing Sales on the dropdown list. The other fives stay in Checkout option.

Cart Link

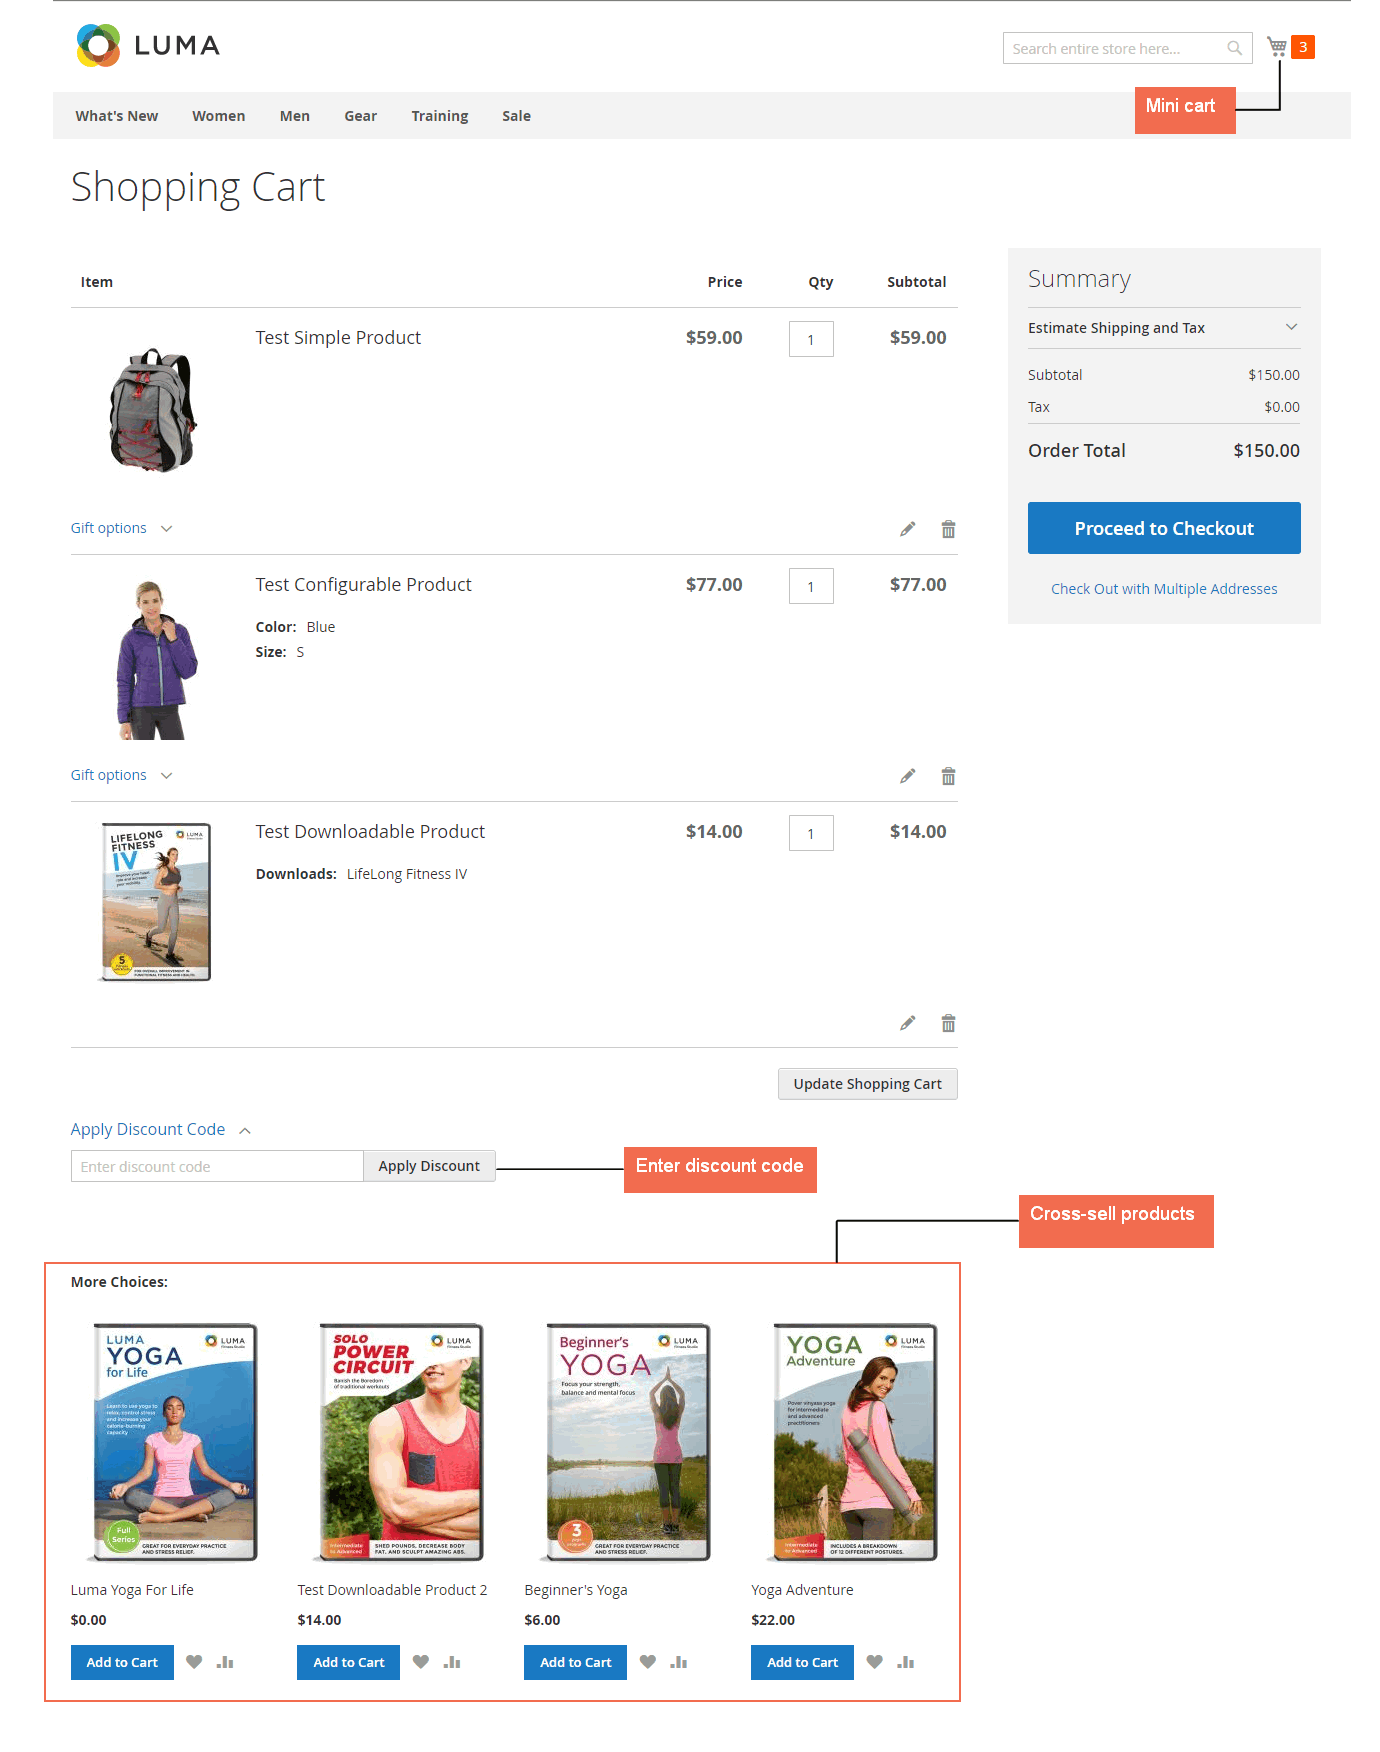
In frontend of Magento platform, Cart Link lies on the upper-right of the online store, as you can see in the picture below. It indicates the number of items/products a customer has ordered. If the Shopping Cart Sidebar is in “enable” status(this is set by the store admin), customers can have more detail information about their shopping activities by click on the cart icon. There, they can see all the items being purchased, cart subtotal price, and others.

Cart Link in Frontend Cart Configuration
Cart Link in Frontend

In the backend gate, admin can configure the cart link by the following five steps:

Step1: Choose backend gate, sign in with your admin account.

Step 2: Choose STORES, then under Settings click Configuration.

Step 3: On the navigation column on the left, expand Sales section.

Step 4: Pick up Check out choice

Open-Cart-Link

Step 5: Choose one of three options in My Cart Link sidebar:

  • Use system value
  • Display number of items in cart
  • Display items quantities

In order to select the last two ones, you need to check off the checkbox for Use system value option first.

My-Cart-Link

Click Save Configuration to confirm changes you have made.

Now you can easily manage your customers’ shopping Cart Configuration with the knowledge you’ve just study. For the Magento developers, it’s our pleasure to receive your comment and recommendation on our FAQ extension list. If you want to add or erase any item in this FAQ list, feel free to contact us. Don’t forget to Like, Share, and Subscribe to Magestandard for more informative  extension review articles.

What Is The Link between Redirect to Cart in Magento 2 and Conversion Rate?

A high conversion rate (the percentage of visitors converted into buyers) is always an important goal of every store owner. But how to improve the number is not easy at all. Fortunately, Magento 2 provide you a tool to deal with this tough task called Redirect to Cart. You can manage when the shopping cart appears: automatically after each time your customer adds an item or only when buyers want to check out. The decision will have a significant effect on your store’s conversion rate.

To configure Redirect to Cart, you need to go to backend mode first. After that, take the following steps:

  1. On the left sidebar, tap Stores.
  2. Drop down Sales to see its full elements. Then select Checkout.
  3. Expand the Shopping Cart factor,
  4. Here you will see After Adding a Product Redirect to Shopping Cart. You have three options to choose:
  • Use system value: The cart will follow the system set automatically.
  • Yes option: The Shopping Cart page will appear right after an items is added. This might discourage customers from continuing their shopping which results in negative impact on conversion rate.
  • No option: No redirect action is performed once this option is set. In other words, the Shopping Cart page will be shown only when customers click on Go to Checkout button.

Configure Redirect to Cart

  1. Click Save Configuration to save your setting.

We have presented about The Link between Redirect to Cart in Magento 2 and Conversion Rate. We hope that this article can show you useful information to select the appropriate extension for your online shop. For the Magento developers, it’s our pleasure to receive your comment and recommendation on our FAQ extension list. If you want to add or erase any item in this FAQ list, feel free to contact us. Don’t forget to Like, Share, and Subscribe to Magestandard for more informative  extension review articles.

How Much Do You Know about Magento 2 Shopping Cart Page?

As mentioned in the previous blog, the shopping cart page and checkout page are both utterly important in the purchasing process of any Ecommerce site. This article will give you a deeper analysis of the shopping cart in Magento 2.

Magento 2 Shopping Cart Pane and the Shopping process

The conventional shopping process carries out in this order: Customers search for product on search engine and found your site. They read product details, check price and compare the product price in other website, then they make the purchasing decision at your store and add that product to cart

At this point, you have only won half the shopping process because customers can still change their mind and abandon the shopping cart. This is the crucial phase that reveals if customers proceed to checkout.

Basic Components of a Shopping Cart Page

Here is the basic presentation of Magento 2 shopping cart page.

magento 2 shopping cart page

On the top of the page is the mini cart with brief information of the shopping cart and the Proceed to Checkout button to lead customer to Magento 2 checkout quickly.

The Magento 2 Shopping Cart Page mainly composed of two major parts: the product section and the summary section. The product section displays all products that customers have added to cart successfully with short information such as price, quantity and subtotal. Customers can edit the product section like change quantity or color, size…and update the shopping cart.

The summary section provides order subtotal, tax and most importantly the Proceed to Checkout button. Besides, customers can enter coupon code to enjoy discount on their total order.

Just like any grocery stores that display small things such as chewing gum, candy…at the checkout counter, the Magento 2 Shopping Cart Page also has a cross-sell section that display products to encourage impulsive buying of customers. You can make use of this chance to increase sale of each customer order by setting products that they might be interested and buy more.

In short, here are all the details about Magento 2 Shopping Cart Page we want to share with you. If you find the article helpful for you, please Like, Share and Subscribe to keep updating for other upcoming blogs.


An Introduction on Sales Menu in Magento 2

The Sales menu of Magento 2 provides a workflow of how a customer order is operated. The Sales menu includes six parts: Orders, Invoices, Shipments, Credit Memos, Billing Agreements, and Transactions. This blog will provide a brief introduction on each part of the Sales menu.

To find the Sales menu, please navigate to AdminSidebarSales.

magento-2-sales-menu
Here are the six options of Sales menu:

1. Orders

magento-2-sales-orders

When customers place orders in the frontend, the sales order will be created on the Orders grid. This is regarded as a record of the transaction that the customer makes. The order status is pending and the order can still be canceled because no payment is made yet.

2. Invoices

magento-2-sales-invoices
The invoice shows the receipt of payment for the order. Admin can generate multiple invoices for an order, depending on the product that admin specify.

3. Shipments

magento-2-sales-shipmentsWhen products of the order have been shipped to customer, shipment document is generated. Just like invoice, admin can also create multiple shipments responding to the products of that order.

4. Credit Memos

magento-2-sales-credit-memos
If customers receive a refund for the order, the credit memo will be created. Therefore, in general, the credit memo understood as is the amount owed to customer. Admin can generate the credit memo for an order or multiple orders.

5. Billing Agreements

Billing agreement allows customers to sign an agreement with the payment system so that whenever they check out, they don’t have to fill in the payment information again. On checkout process, customers can choose the billing agreement as the payment method, and then customer’s account will be charged by the payment system.

6. Transactions

Transaction provides the list of all payment activities between the store and the payment systems. Admin can check detailed information of any transaction here.
We have presented about 6 Options of Sales Menu for Magento 2. We hope that this article can show you useful information to select the appropriate extension for your online shop. If you find it helpful for you, please Like, Share and Subscribe to keep updating for more upcoming blogs!

A Complete User Guide of Customers Menu in Magento 2

Customers play a vital role in business, especially in e-commerce in general and in Magento 2 in specific. Refer to customers in Magento 2 admin panel, we often talk about Customer Account and Customer Groups. However, before discussing 2 these areas, we need to understand about another definition: Customers Menu.

magento-2-customers

Customers Menu in Magento 2

Customers Menu, as its name, is a menu which contains access to management tools of customers accounts as well as allows you to know who is online currently on your Magento 2 store.

Magento 2 Customers Menu consists of 2 parts: All Customers and Online Customers. Hence, if you click Customer Menu on the left side, you have to select among 2 options mentioned above.

All Customers on Customers Menu in Magento 2

When access to All Customers page, there will be a list of all customers who have registered for an account in your store or were created by admin. When you access to All Customers from the admin panel, you can manage or edit information of those customers depending on your purpose.

For more details, keep updating the upcoming article about All Customers.

Online Customers on Customers Menu in Magento 2

Now Online options show lists of all visitors and customers who are online currently in your Magento store. The length of online session can be configured and determines how long the activity of customers is visible in the backend. Besides, the default length of online session lasts 15 mins.
Please check the next coming blog for more information of Magento 2 Online Customers of Customers Menu .

If you find it helpful for you, please Like, Share and Subscribe to keep updating for more upcoming blogs!