What is Alternate Media Storage In Magento 2?

In the previous articles, we described everything about controlling the administrators’ management system, including how to add users, unlock users and creating user roles in Magento 2 admin panel. This article will describe the alternate media storage method in Magento 2.

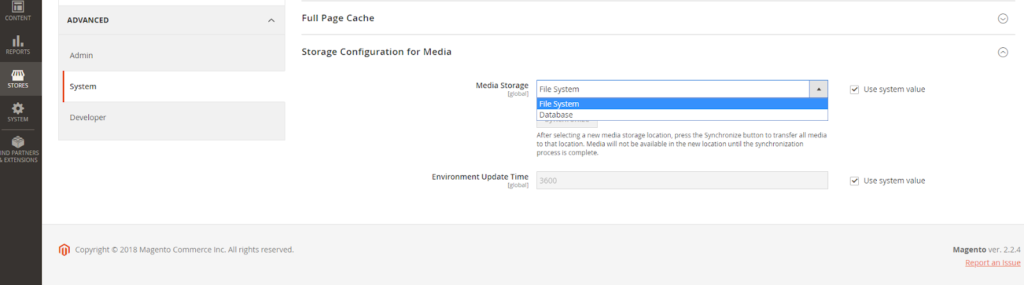
In Magento 2 default installation, you have two primary option to save media files:

The first method is you can store media files in a database on a database server, or the second method is you can store the media files on a Content Delivery Network (CDN) instead of saving media files on the file system of the web server. The advantage of saving media files in a database on the alternate media storage such as a database server or Content Delivery Network limits the effort required to sync media when multiple instances of the system that are deployed on other servers that need access to the same images, CSS files, and other media files. The advantage of store media files on the database server is the selection of auto-sync and reserve-sync between the web server file system and the database.

Media Storage Configuration

Each one of these alternate media storages has a specific workflow and also have a specific way to configure. You can do a configuration for both two alternate media storages in Magento 2 admin panel, and we will provide more detail tutorial for these alternate media storages in the next two articles, so you will not confuse in configuring alternate media storage.

Above is an article on two alternate media storages in the default installation of Magento 2 Open Source. We hope that you will know the critical detail of media storage, and prepare a basic knowledge on configuring database and CDN. On the next two articles, we will describe information on using the database for media storage and using a Content Delivery Network. See you in the next blog post.

How To Add Users In Magento 2 Admin Panel

In the default installation of Magento 2, an Admin account is created that gives you full administrative access. First, you have to create another user account with full Administrator access, so you can use one account for your everyday Administrative activities, and reserve the other as a “Super Admin” account in case you lost access to your main account.

For a team of administrators, you can create a separate account for each, and set restrict access based on their business. To do that, you have to create a role with limited scope and access only to the necessary resources and assign the role to an admin account. After assigned to a restricted role, admin users can see and change data only for websites or stores that are associated with the role, but cannot make changes to any global settings or data.

Example Admin Users
Example Admin Users

Step 1: Create a New User

On the admin sidebar click System > All Users > Add New User. Follow these steps:

New User Account Information

Enter all required information and set “This account is” as Active, enter your password under Current User Identity Verification.

Step 2: Define the Role

On the left of the panel, click User Role. In the Assigned column, tick the Administrators selection and click Save User.

Add New User Role
Add New User Role

Admin Password Requirements

FIELD DESCRIPTION
Password Length of the password must be seven or more characters long, include both letters and numbers. For further information, please read this article: How To Configure Admin Security In Magento 2 Admin Panel.

Above is a tutorial on adding users in Magento 2 admin panel. We hope that you can manage the Administrators function in Magento 2 installation, and run your online store smoothly. In the next article, we will describe one of the most security function of Magento 2 platform: Lock Admin Account. Keep tracking Magestandard by subscribing to our site to read more Magento 2 tutorial blog post. See you in the next article.

A Complete Guideline On Attribute Sets In Magento 2 Store

The attribute set decides the fields that are available during data entry and the values that display to the customer. When creating a product, one of the first steps is to choose the attribute set that is used as a product record template.

A group of the attributes that decide their display place in the product record. Your store comes with a default attribute set which includes a set of commonly-used attributes. If you’d like to add a small number of attributes, you can add them to the default attribute set. However, if you sell products that need specific types of information, you have to create a dedicated attribute set that includes the particular attributes that are necessary to describe the product.

Attribute Sets
Attribute Sets

Follow these steps to create an attribute set:

On the admin sidebar click Stores, under Attributes click Attribute Set. Click Add New Set and follow these steps:

Edit Set Name
Edit Set Name
  • Input the Name and set the Based On to an existing attribute set to be used as a template then click Save.

The next page displays the following:

  • The left column is the name of the attribute set. The name is for internal reference and can be changed.
  • The center of the page is the current selection of attribute groups.
  • The right column is the attributes that are not assigned to the attribute set.

Move the attribute from the Unassigned Attributes list to the appropriate folder in the Groups column to add a new attribute to the set.

You cannot delete system attributes which are marked with a dot from the Groups list. You can only drag them to another Group in the attribute set.

Click Save after completed.

Edit Attribute Set
Edit Attribute Set

Follow these steps to create a new attribute group:

In the Group column, click Add New, input Name and click OK. Do one of these steps:

  • Move Unassigned Attributes to the new group.
  • Move attributes from any other group to the new group.

The new group becomes a section of attributes in any product that is based on the attribute set.

How To Create Product Attributes In Magento 2 Admin Panel

Store administrators can create attributes while working on a product, or from the Product Attributes page. In this article, we describe a tutorial on how to create attributes from the Stores menu.

New Attribute Properties

Step 1: Describe the Basic Properties

On the admin sidebar click Stores. Under Attributes click Product.

Click Add New Attribute

Attribute Properties

Input an Attribute Label to identify the attribute.

Set Catalog Input Type for Store Owner to the type in input control to be used for data entry.

For the Dropdown and Multiple Select input types, do these steps:

  • Under Manage Options, click Add Option.
  • Input the first value that you want to display first. You can enter one value for the admin, and a translation for each store view
  • For each option that you want to add to the list, repeat the previous step.
  • Select Is Default to use the option as the default value.

To force the customer to select an option before the product can be purchased, set Values Required to “Yes.”

Manage Options
Manage Options

Step 2: Describe the Advanced Properties (if needed)

Input Attribute Code in lowercase, no spaces.

Advanced Attribute Properties

Set Scope to select the place in your store hierarchy that the attribute can be used.

To avoid duplicate value, set Unique Value to “Yes”.

Set Input Validation for Store Owner to the data type that the field should contain to run a validity test of data. The test can validate any type of these information below:

  • Decimal Number
  • Integer Number
  • Email
  • URL
  • Letters
  • Letters (a-z, A-Z) or Numbers (0-9)
Input Validation
Input Validation

Set these options to “Yes” to add this attribute to the product grid,

Add to Column Options Includes the attribute as a column in the Products grid.
Use in Filter Options Adds a filter control to the column header in the Products grid.

Step 3: Enter the Field Label

Open the Manage titles tab, input the Title to be used as a label for the field.

Manage Titles
Manage Titles

Step 4: Describe the Storefront Properties

On the left of the panel, click Storefront Properties.

Set Use in Search to “Yes” if the attribute is to be available for search

Set Comparable on Storefront to “Yes” to include the attribute in Product Compare

Do these steps for the dropdown, multiple select and the price fields:

  • Set Use in Layered Navigation to “Yes” to use the attribute as a filter in layered navigation.
  • Set Use in Search Results Layered Navigation to “Yes” to use the attribute in layered navigation on the search results pages.
  • Enter a number in the Position field to indicate the relative position of the attribute in the layered navigation block.

Set Use for Promo Rule Conditions to “Yes” to use the attribute in price rules.

Set Allow HTML Tags on Frontend to “Yes” to allow the text to be formatted with HTML. This setting will enable the WYSIWYG for the field.

Set Visible on Catalog Pages on Storefront to “Yes” to include the attribute in catalog page listings

If your theme is supported, do these settings:

Set Visible on Catalog Pages on Storefront to “Yes” to include the attribute on the product detail page

Set Used in Product Listing to “Yes” to include the attribute in product listings

Set Used for Sorting in Product Listing to “Yes” to use the attribute as a sort parameter for product listings.

Click Save Attribute after completed.

Storefront Properties

Attributes for Configurable Products

Any attribute that is used as a drop-down options list for a configurable product must have the following properties:

PROPERTY VALUE
Catalog Input Type for Store Owner Dropdown
Scope Global