7 Steps to Create A Grouped Product in Magento 2

A grouped product in Magento 2 store is a collection of non-custom simple associated products. Although it is called grouped product, each purchased item will appear individually in the shopping cart, rather than as part of the group.

This article will provide information about How to create a grouped product from scratch via Magento 2 backend.

grouped-product-in-magento-2

Step 1: Choose product type: Grouped Product

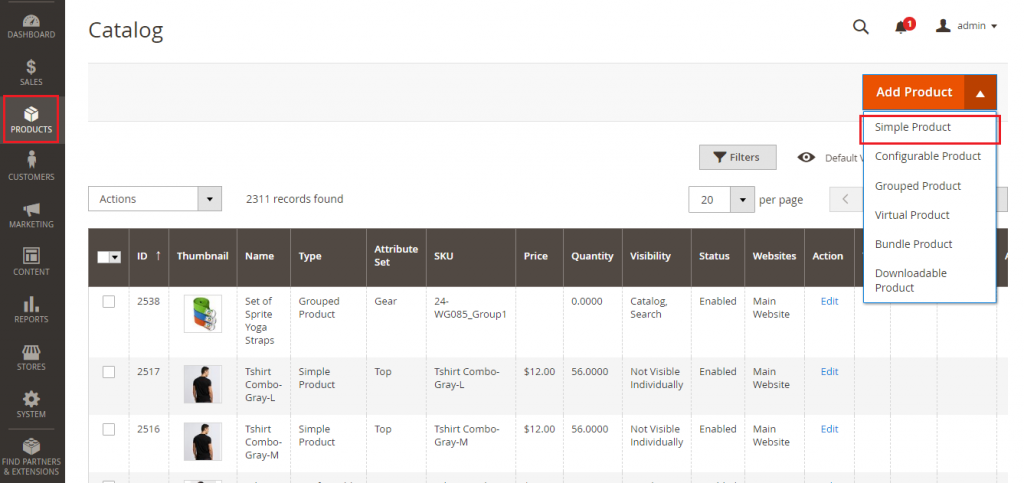
  1. On the Admin sidebar, select Products. Then under Inventory choose Catalog.
  2. Next, click the dropdown button next to Add Product on the upper right corner and select Grouped Product.

Step 2: Choose the Attribute Set

As  the attribute set is used as a template for the product, we need to set it first before completing other fields. There are two options for you:

  • In the Search box, simply type the name a the attribute set. This option  is useful if you already know the name of the attribute set.
  • If you don’t, select the value in the attribute list.

The form of the new product is then updated to show the selection.

product-template

Step 3: Complete the Required Settings

  1. Enable Product: Set it to “No” as it is temporarily not ready to publish.
  2. Product Name: Enter the name of the new product to the box.
  3. SKU: You can either accept the default SKU which is based on product’s name or type a new one.
  4. It is important to note that the Quantity field is not available because the value of this field depends on individual items that compose the grouped product.
  5. When finish all the compulsory parts, click Save. Now you’ll see the Store View picker appears on the upper-right corner. Set the store view to wherever the new product is to be exposed.

Step 4: Complete the Basic Settings

  • Stock status: Set it to “In stock”.
  • Categories: You can either select an existing category from the list or create a new one.

If you choose the second choice, click the New Category button next to selection box. On the new tab, type the new Category Name and choose its Parent category. Tap Create Category to save the settings.

  • Visibility: Select the appropriate place where you want your product to be found. It can be set to be visible on Catalog, Search, Catalog & Search, or Not Visible Individually.
  • Set Product as New From … to … : Choose the time range for the new product.
  • Complete others fields for the new product: Country of Manufacture, Material, …

grouped-product-details

Step 5: Add Products to the Group

  • Expand the Grouped Products section then tap Add products Group. A new tap containing available products is opened for you to choose which items to add.
  • Mark the checkbox of items that you want to included in the group. You can use the Filters if necessary.
  • Next, click Add Selected products. The chosen items are then displayed under the Group section for your review. You can organize the order of those items by clicking and holding the Change Order button then move it to wherever you want.
  • Enter a value to the Default Quantity of each product.
  • To dislocate unwanted items, click Remove link in the Actions column.

Step 6: Complete the Product Information

Complete the remaining information fields of the product:

  • Contents
  • Images and Videos
  • Search Engine Optimization
  • Related products, Up-sells, and Cross-sells.
  • Customizable Options
  • Products in Websites
  • Design
  • Gift Options

Step 7: Publish the Product

  • When you finish 6 steps above, you can set Enable product to “Yes” to publish the product.
  • Tap Save to save the new product. You can take a preview of the new product by choosing Customer view in the admin dropdown list.

Those are seven steps to create a new grouped product for your Magento 2 store. Before inventing a new grouped product, don’t forget that simple and virtual products that are part of a grouped product cannot have custom options.

An Overview of Persistent Cart in Magento 2

A Persistent Cart is a tool provided by Magento 2, which is one of the most popular platforms used by e-commerce businesses. Once this tool is enabled by admin in the backend, it will keep tracks of items that are added to cart but have not been purchased by customers. The information saved will be shown up in the next time that customer shopping on your store. In other words, a “remembered” customer can have their previous buying activities stored and be available for the next visit.

From a store owner point of view, a Persistent Cart can help to bring better shopping experiences to your customers, improve your brand image and gain more loyal customers to your store. Moreover, a persistent shopping cart can minimize the number of empty carts, which results in an increase in sales.

When the Persistent Cart is activated, registered customers are required to log in with their own accounts before going through checkout. For guest shoppers, they need to sign up with new account if they want to recover information from their last shopping.

In order to use the Persistent Cart, customers have to enable two cookies for their browsers. During the operation, these following two cookies are required:

  • Session Cookie: Is a short-term cookie. Its duration is only a single customer visit to your site. In other words, the cookies starts when a customer logs in and expires when that customer leaves.
  • Persistent Cookie: Is a long-term cookie. Unlike Session Cookie, Persistent Cookie remains functioning even when customers leave the store. This cookie also allow to record the contents of customers’ shopping activities for future reference. Persistent Cookie duration can be set to a period of time depending on your preference, but the maximum is 31,536,000 seconds (this number is equal to one year) set by default Magento 2.

Up to now, you may have a clear overview of Persistent Cart used in Magento 2. Don’t forget to Like, Share, and Subscribe to Magestandard for more informative Magento extension review articles.

What Are Types of Product in Magento 2?

Types of Product can be defined as a group of goods or services that share some common specific characteristics. Different product types can be determined based on various basis such as the basis of purchase frequency (Convenience products, Shopping products, Specialty products,…) or the basis of offering (goods, services, ideas),… For Magento 2, it sets the Types of Product based on the basis of their features. There are six different types that Magento 2 users can set to their products. They are Simple Product, Configurable Product, Grouped Product, Virtual Product, Bundle Product, and Downloadable Product.

Simple Product

Simple-product

In Magento 2 platform, a simple product is a single physical good with a unique SKU. The price and other input information of a simple product can be configured through the backend of Magento 2, allowing store owners to sell variations of simple products with a single SKU. In addition, a simple product can be sold individually or combined with others to create a Group Product, a Bundle Product or Configurable Product with customized options.

Configurable Product

Configurable-product Types of Product

Like Simple product, Configurable product is also a single product. However, a configurable product has a number of options (such as size, weight, or color) to be selected before a customer can add it to card. Each option represents a separate simple product with a distinct SKU, which make it easier to control the inventory.

Grouped Product

Grouped-product Types of Product

As its name indicates, a grouped product includes a number of standalone products. A set of Yoga straps can be a good example of this Types of Product. Among a set of Yoga Straps that includes 3 straps with different length, a customer can select only one or all types of these straps for a purchase.

Virtual product

Virtual-product

Virtual products are intangible products like services, memberships, warranties, or subscriptions. In Magento 2, virtual products can be used to create grouped and bundle products.

Bundle Product

Bundle-product

Like Grouped Product, each item in a bundle product is a separate, standalone product. Nevertheless, items in a bundle aren’t just combined by fixed products like in a group but they are customized to buyer’s preferences. The bundle could be a gift basket, or computer components.

Downloadable Product

Types of Product

A downloadable product is a digital product such as a video or a pdf file . It includes files that directly reside on your server or being compressed to a URL link to download.

With these 6 Types of Product, you can confidently update products to your online store(s) and bring the best shopping experience to customers.

5 Steps to Add A Simple Product in Magento 2

In the previous article, we have discussed about different product types available in Magento 2 platform. Now we will go into more details with Simple product in Magento 2.Simple-Product

As its name indicates, a Simple Product is the most uncomplicated good or service provided to customers. In Magento 2, a Simple Product is a physical good, with a unique SKU. It can be sold individually or combined with others to create a Group Product. A Simple Product can also be included in a Bundle Product and Configurable Product with customized options.

From the backend, admin can create a simple product following the instructions below:

Step 1: Choose the product type: Simple product

  1. On the admin sidebar, choose Products. Then select Catalog under Inventory.
  2. Click on the drop-down arrow of the Add Product button (it’s on the upper-right corner). After that choose Simple Product.Add-simple-product

Step 2: Determine the attribute set

The form appears at first is for the default attribute set. Hence, you need to change the attribute set to your preference first.

In the Attribute Set field, you can either type the attribute set in the search box or choose one of the existing ones. Which attribute set you choose here will determine the form of product information you need to fill in.Select-attribute-set Simple Product

Step 3: Complete the basic settings

  1. Enable Product: Set it to “Yes” if you want to publish the new product. Set “No” otherwise.
  2. Product Name: Enter the name of the new product.
  3. SKU: You can either leave it as default (based on Product Name field) or clear it and type another one.
  4. Price: Enter the price for the product. You can also set it to more detailed by clicking on the Advance Pricing link.
  5. Tax Class: There are two options available:
  • None
  • Taxable Goods

6. Quantity: Type the current quantity of the product to the box. Like Price, the Quantity field can also be generated to more details by clicking the Advance Inventory link.

7. You can set the Stock Status to either In Stock or Out of Stock.

8. Weight: If the new product has weight to be shown, choose “This item has weight” option and enter the number to the box. Other otherwise, choose “This item has no weight” option.

9. Categories: There are two options here:

a. Choose an existing category: Click the “Select…” box and select the appropriate category for the new item. Or you can simply type the category name in the search box.

b. Create a new category:

  • Click New Category button.
  • There is a new tab open to fill the name for the new category. Choose the Parent Category after that.
  • Tap Create Category to confirm the settings.

10. Set Product as New From … To: Enter the time range that you want to set your product as new.

11. Country of Manufacture: Select the origin country for the product.Product-information Simple Product

Step 4: Complete the product information

Move downward and fill the information in the remaining fields.

Step 5: Save the new Simple Product 

When complete all the settings, tap Save & Close on the Save menu. On the upper-left corner, select the store view that you want to publish the product to.

Those are five steps to create a new simple product. It is important to remember that a simple product can be used in other product types and it can also be modified to sell many product variations from a single SKU.

In short, here are all the details about Adding A Simple Product in Magento 2 we want to share with you. Don’t forget to Like, Share, and Subscribe to Magestandard for more informative Magento extension review articles.

How to Configure Default Field Values in Magento 2

When creating new products for stores using Magento 2 platform, Product Workspace allows you to save time by providing a number of default field values. These values are referenced from some other fields such as product name, or product description. Magento 2 set the following fields automatically to default values:

  • SKU: Based on Product Name field.
  • Meta Title: Based on Product Name field.
  • Meta Keywords: Based on Product Name field.
  • Meta Description: Based on both Product Name and Product Description fields.

The text that is put in double-curly braces are placeholders and it refers to the value of the base field(s) (Product Name, for example). Any attribute code included in the product attribute set can also be used as a placeholder.

Admin can edit the value of placeholders by the following steps:

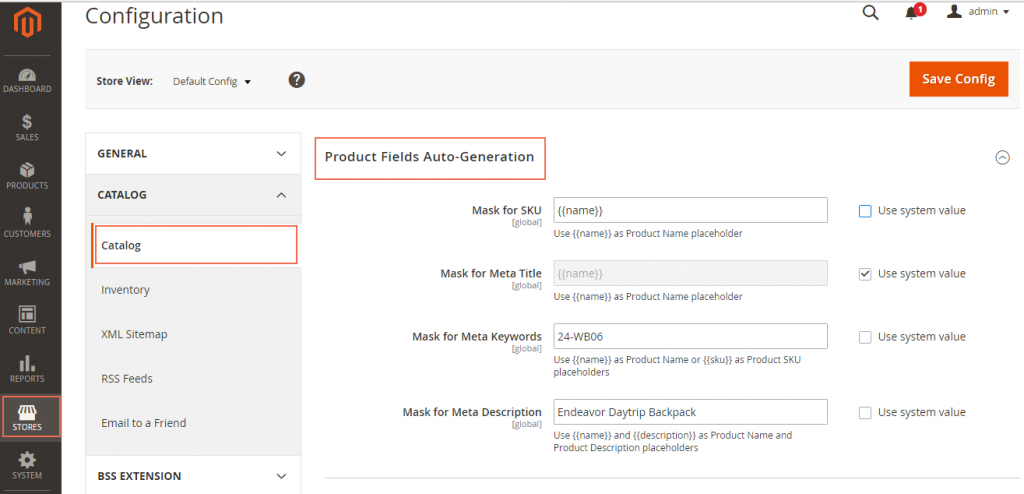
Step 1: In the backend mode, go to Admin Sidebar and click Stores.

Step 2: Next, select Configuration under Settings.

Step 3: Expand Catalog on the left panel then choose Catalog.

Step 4: Drop down the Product Fields Auto-Generation section. After that, enter the text that you want to replace the placeholder values. Remember to unmark the Use System Value checkboxes before filling the blanks.Default Field Values

For instance, you want to enclose the word “Magento 2” to the meta descriptions of all products, you just need to enter “Magento 2” in the Mask for Meta Description field. By doing this, the phrase “Magento 2” will be shown up to all of the descriptions.

Step 5: Click Save config on the upper-right corner to confirm your settings.

Below is a list of common placeholders used by many admin:

{{color}}

{{country_of_manufacture}}

{{description}}

{{gender}}

{{material}}

{{name}}

{{short_description}}

{{size}}

{{sku}}

Now you can log in the backend mode and try out setting new values for some placeholders.

In short, here are all the details about Configuring Default Field Values in Magento 2 we want to share with you. For the Magento developers, it’s our pleasure to receive your comment and recommendation on our FAQ extension list. If you want to add or erase any item in this FAQ list, feel free to contact us. Don’t forget to Like, Share, and Subscribe to Magestandard for more informative Magento extension review articles.