A Guideline On Fixed Product Tax In Magento 2

In some tax jurisdictions, a fixed tax that must be added to certain types of products. Store administrators can set up a fix product tax (FPT) for tax calculations of their store. For example, in some countries, Waste Electrical and Electronic Equipment Directive (WEEE) tax or “ecological tax” or “eco-tax,” which is collected from types of electronics to counterbalance the cost of reusing can be set up using FPT. This tax is a fixed sum, rather than a percentage of the product price.

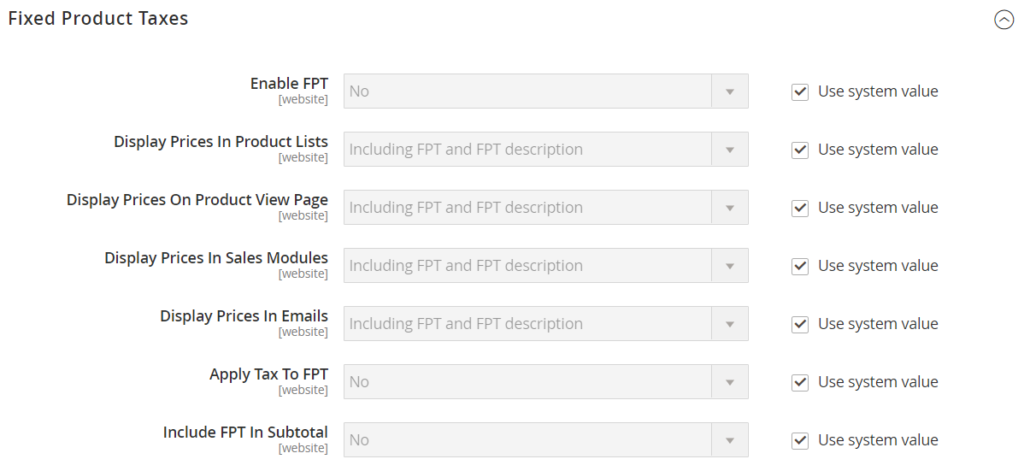
FPT apply at the item level, based on the product. In some jurisdictions, this tax is subject to an additional % tax calculation. Your tax jurisdiction might also have rules that decide how the product price displays to customers, either with or without tax. You have to understand the rules and set your FPT display options accordingly.

Exercise caution is recommended in quoting FPT prices in the email because the difference in price can affect customer confidence in their orders. For example, if you display Order Review prices without showing FPT, customers who buy items with associated FPT will see a total that includes the FPT tax amount, but without an itemized breakdown. The difference in price might cause customers to leave their carts because the total differs from the amount expected.

FPT Display Prices

FPT DISPLAY SETTING AND CALCULATION
Not Taxed
Excluding FPT FPT displays as an isolated row in the cart, and the value is used in appropriate tax calculations.
Including FPT FPT is included in the base price of an item but is not included in tax-rule-based calculations.
Excluding FPT, FPT Description, Final Price Prices displays without FPT amount or description. FPT is not included in tax-rule-based calculations.
Taxed
Excluding FPT FPT displays as an isolated row in the cart, and the value is used in proper tax calculations.
Including FPT FPT is added in the price of an item, and change to tax calculations is not required.
Excluding FPT, FPT Description, Final Price Prices display without the FPT amount or description. However, FPT is included in tax-rule-based calculations.

In the next article, we will describe tutorial on configuring FPT in Magento 2. Keep tracking Magestandard to read the following Magento 2 article.


A Complete Tutorial On Configuring FPT On Magento 2

On the previous article, we described what is Fixed Product Tax (FPT) in Magento 2. In this article, we will explain a tutorial on Configuring FPT On Magento 2 admin panel.

The tutorial on how to set up a fixed product tax for your store, using “eco-tax” as an example. After setting the tax scope and the countries and states, the input fields can change according to the local requirements and depend on the options you choose. Read an article about Creating Attributes to learn more.

Step 1: Enable Fixed Product Tax

On the Admin sidebar, click Store. Under Settings, click Configuration. On the left of the panel under Sales, click Tax. Open the Fixed Product Taxes tab and follow these steps:

  1. Set Enable FPT to “Yes.”
  2. Select the FPT setting for each of the following price display locations to decide how fixed product taxes are used in store prices. (The selections are the same for each location.)
  • Product View Page
  • Sales Modules
  • Emails
OPTIONS
Including FPT Only

Including FPT and FPT description

Excluding FPT. Including FPT description and final price

Excluding FPT

  1. Set Apply Tax to FPT as needed.
  2. Set Include FPT in Subtotal as needed.
Fixed Product Taxes configuring FPT in Magento 2
Fixed Product Taxes

Click Save after completed.

Step 2: Create an FPT Attribute

On the Admin Sidebar click Stores. Under Attributes click Product. In the upper-right corner, click Add New Attribute and follow these steps:

  1. To identify an attribute, input Default Label
  2. Set Catalog Input for Store Owner to “Fixed Product Tax.”

Open the Advanced Attribute Properties and follow these steps:

  1. In the Attribute Code field, input a unique identifier in lowercase, spaces or special characters are not allowed. The maximum length is 30 characters. You can leave the area blank to the text from the Default Label field.
  2. Set Add to Column Options to “Yes” if you want the FPT field to appear in the Inventory grid.
  3. Set Use in Filter Options to “Yes” if you want to filter products in the grid based on the FPT field’s value.
Advanced Attribute Properties configuring FPT in magento 2
Advanced Attribute Properties
  1. On the left of the panel, select Manage Labels. Then, input a label to use instead of the default label for each store view. (Optional)
Manage Labels configuring FPT in magento 2
Manage Labels
  1. Click Save Attribute after completed and clear the cache.

Step 3: Add the FPT Attribute to an Attribute Set

On the Admin Sidebar, click Stores. Under Attribute, click Attribute Set. Click the attribute set on the list to open the record in edit mode.

Move the FPT attribute from the Unassigned Attributes list to the Groups list. Each group folder compares to a section of product information. You can place the attribute wherever you want it to display when the product is open in edit mode.

Edit Attribute Set configuring FPT in magento 2
Edit Attribute Set

Click Save after completed.

For each attribute set that needs to include fixed product tax, do this step again.

Step 4: Apply FPT to Specific Products

On the Admin Sidebar click Products, Under Inventory, click Catalog. Open the product that needs a fixed product tax in edit mode. Find the FPT section of fields that you added to the attribute set. Click Add Tag and follow these steps:

Fixed Product Tax for Belgium configuring FPT in magento 2
Fixed Product Tax for Belgium
  1. If your Magento installation has multiple websites, select the Website that you want to apply settings and base currency. In this example, the field is set by default to “All Websites [USD],”
  2. Set Country/State to the region where the fixed product tax applies.
  3. Enter the fixed product tax as a decimal amount in the Tax field.
  4. Click Add Tag and do the process again if you want to add more fixed product taxes

Save after completed

How to Configure The Default Tax Destination In Magento 2

On the previous article, we provided information about Tax Classes insight And How To Configure Tax Classes In Magento 2 admin panel. In this article, we will describe the detail of Default Tax Destination and a tutorial on how to configure Default Tax Destination in Magento 2 admin panel for tax calculations.


  1. What is the Default Tax Destination in Magento 2?


Default Tax Destination is the settings that decide the country, state, and ZIP or postal code that is used as the basis of tax calculations.

Default Tax Destination Calculation in Magento 2
Default Tax Destination Calculation
  1. Tutorial on configuring the Default Tax Destination in Magento 2


To configure the Default Tax Destination for tax calculations, you have to follow these steps:

On admin sidebar, click Stores. Under Settings, click Configure. On the left of the panel under Sales, click Tax. Open the Default Tax Destination Calculation, uncheck the Use system value checkboxes and edit these options as needed:

  • Default Country: the country where tax calculations are based.
  • Default State: the state that is used as the basis of tax calculations.
  • Default Post Code: the postal code or ZIP code which is used as the premise of local tax calculations.

Click Save after completed.

Above is an insight about the Default Tax Destination and tutorial on how to configure the Default Tax Destination in Magento 2 admin panel for tax calculations. We hope that you can find useful information and know how to handle the tax calculations for your web store. If you have other ways to configure or have any question, feel free to leave a comment or contact us directly. In the next article, we will provide pieces of information about EU Place of Supply for Digital Goods. Keep following Magestandard to read more Magento 2 article.

An Insight Into Tax Classes And How To Configure Tax Classes In Magento 2

Store administrators can assign Tax Classes to customers, products, and shipping. As I said in the previous article, the shopping cart of each customer would be analyzed and calculated the appropriate tax according to the class of the customer, the class of the products in the cart, and the region. When the tax rule is defined, new tax classes can be created.

Store administrators can create as many customer tax classes as they need, and assign them to customer groups. For example, in some locales, wholesale transactions are not taxed, but retail sales are. You can assign members of the Wholesale Customer group with the Wholesale tax class.

Store manager use Product classes in calculations to decide the correct tax rate is applied in the shopping cart. Each created product will be assigned to a specific tax class. For example, food might not be taxed, or be taxed at a different rate.

Store administrators have to designate a specific product tax class for shipping if their stores charge an additional shipping tax. Then in the configuration, specify it as the shipping tax class.

In Sales Configuration, store owners can set the shipping tax class, and the default tax classes for products and customers.

Tax Classes in Magento 2
Tax Classes

Follow these steps to configure tax classes:

On the admin sidebar, click Stores. Under Settings, click Configuration. On the left of the panel under Sales, click Tax. Open Tax Classes tab, then select the tax class for each of the following:

  • Set Tax Class for Shipping
  • Default Tax Class for Product
  • Default Tax Class for Customer

Click Save after completed.

Above is an article on tax classes and how to configure tax classes in Magento 2. We hope that you can find useful information about tax classes in this article. If you have any question, feel free to leave a comment. Keep tracking Magestandard for more useful Magento 2 article.


An Insight Into Taxes And Tax Rules In Magento 2

In this section of this guideline, we will provide a tutorial on how to set up taxes following the locale requirements. Store administrators can set tax classes for products and customer groups, and generate tax rules that combine product and customer classes, tax zones, and rates. Furthermore, there are some advanced topics such as setting up fixed product taxes, compound taxes, and how to display consistent prices across regions, collect a value-added tax.

To define taxes, Magento provides a variety of selections. Tax classes define tax rules, and tax rules are a blend of a Product Class, a Customer Class, a Tax Zone and Rate. Magento also supports the VAT calculation, for b2b transactions in the EU.

Each customer is assigned to a customer class, and each product is assigned to a product class. The shopping cart of each customer will be analyzed, Magento calculates the appropriate tax according to the customer and product classes, and the region.

taxes and tax rules in magento 2
Tax Rules

Step 1: Input the Tax Rule form

On the admin sidebar click Stores. Under Taxes, click Tax Rules. In the upper-right, click Add New Tax Rule. In Tax Rule information, enter a Name and choose the Tax Rate that applies to the rule.

Follow these steps if you need to edit an existing tax rate:

  • Hover to the tax rate, click the Pencil icon
  • Edit the form as you wished and click Save
Taxes and tax rules in magento 2
Tax Rule Information

To enter tax rates, follow one of these methods:

Method 1: Enter Tax Rates Manually

Click Add New Tax Rate, fill the form and click Save

taxes and tax rules in magento 2
New Tax Rate

Method 2: Complete the Additional Settings

Click the Additional Settings and follow these steps:

  1. Select the Customer Tax Class to which the rule applies.
  • To edit a customer tax class, click the Pencil icon to edit the form, then Save it.
  • To generate a new tax class, click Add New Tax Class, fill the form and Save it.
  1. Select the Product Tax Class to which the rule applies.
  • To edit a product tax class, click the Pencil icon to edit the form and click Save.
  • To create a new tax class, click Add New Tax Class, fill the form and click Save.
  1. When more than one tax applies, enter a number into the Priority field to indicate the priority of this tax.
  2. Check the Calculate off Subtotal Only checkbox, if you want taxes to be based on the order subtotal.
  3. Enter a number into the Sort Order field to indicate the order of this tax rule when listed with others.
taxes and tax rules in magento 2
Additional Settings

Click Save Rule after completed