Many countries operate the charging of Value Added Tax (VAT) on goods and services. VAT rates can be different depending on which stage you as a merchant is at in distribution or the manufacture of the products, materials, or services that you sell to your customers. Sometimes more than one VAT rate is applied in your store for tax calculation purposes.
If both the supplier and customer are located in the same EU country, Magento can be set up to charge a value-added tax. If they are located in different EU countries, no VAT is charged.
Follow these steps: Customers > All Customers > Edit
Account Information
Tax/VAT Number
If applicable, the tax number or VAT number that is assigned to the customer.
Addresses
VAT Number
If applicable, the VAT number that is related to a specific billing or shipping address of the customer. The amount of the VAT is based on shipping destination for the sale of digital goods within the EU.
Follow these step: Configure > Customers > Customer Configuration
Create New Account Options
Show VAT Number on Storefront
Decides if the customer VAT Number field is added to the Address Book that is available in the customer account.
Default Value for Disable Automatic Group Changes Based on VAT ID
VAT ID is an internal identifier for the VAT Number of the customer when used in VAT Validation. In progress of VAT Validation, Magento confirms that the number matches the European Commission database. Customers can be assigned to one of the four default customer groups automatically based on the validation results.
If your business is conducted in several places and ship a large quantity of product, downloading tax rates by ZIP code is more effective than enter the rates manually. Store administrators can import the rate into Magento. In this article, we will describe a tutorial on how to import a set of tax rates.
Step 1: Export the Magento Tax Rate Data
On the admin sidebar click System. Under Data Transfer click Import/Export Tax Rates. Click Export Tax Rates. The download file stays in the lower-left corner of the browser.
Save the file and open it in a spreadsheet. The exported Magento tax rate data includes these columns:
Code
Country
State
Zip/Post Code
Rate
Range From
Range To
A column for each store view
Export Tax Rate Data
Open the new tax rate data in a second instance of the spreadsheet, so you can see both, side by side. In the new tax rate data, observe any additional tax rate data that you might need to set up in your store before the data is imported. For example, the tax rate data import file includes:
TaxRegionName
CombinedRate
StateRate
CountyRate
CityRate
SpecialRate
If you need to import additional tax zones and rates, you must first determine them from the admin panel and update the tax rules. After that, export the data and open the file so it can be used for reference.
Step 2: Prepare the Import Data
Now you have 2 spreadsheets side by side. One with the Magento export file structure, and the other with the new tax rate data that you want to import.
To create a workplace in the spreadsheet with the new data, insert several blank columns at the far left. Then, use cut/paste function to rearrange the columns so they match the order of the Magento export data.
Rename the column headers to match the Magento export data.
Delete any null columns. Otherwise, the import file’s structure should similar to the original Magento export data.
Remember that the tax rate columns contain only numeric data. Any text found in a tax rate column will prevent the data from being imported.
Save the prepared data in a .CSV format. After saved, verify that a comma is used a Field delimiter, and double quotes as the Text delimiter. Then, click OK.
Step 3: Import the Tax Rates
On the admin sidebar click System. Under Data Transfer click Import/Export Tax Rates. Click Browse and select the .CSV file that you prepared to import. Click Import Tax Rates. When the process is complete, the notification “The tax rate has been imported” displays. If you receive an error message, resolve the problem in the data and try again.
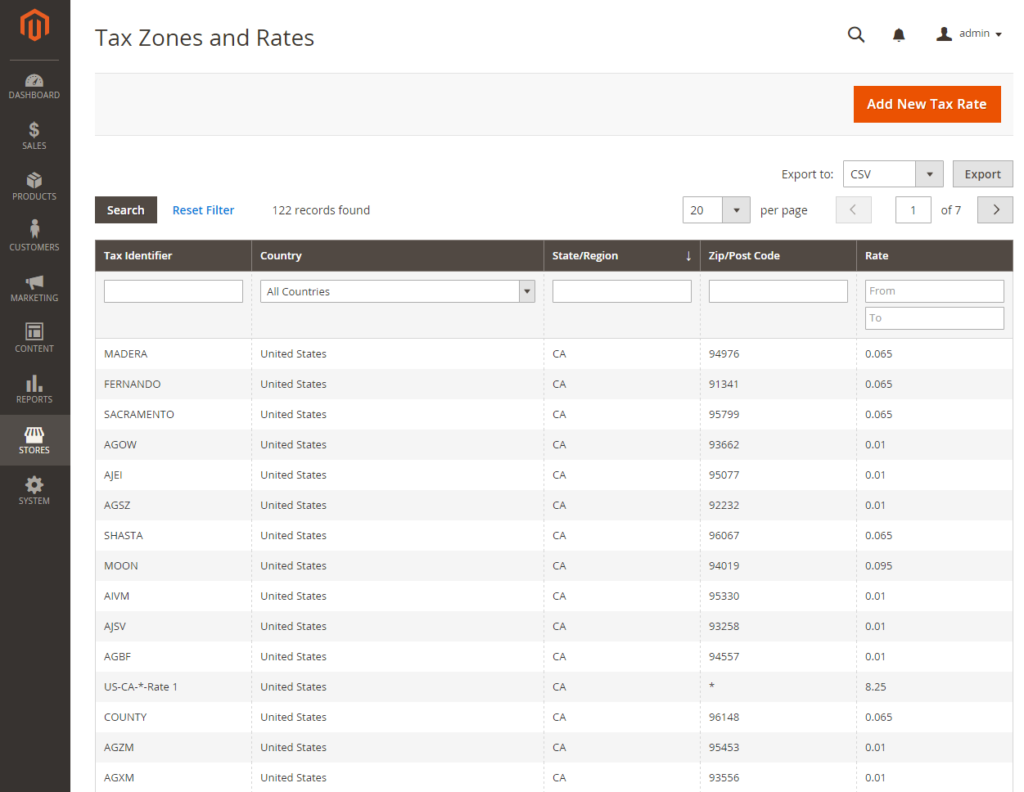
On the admin sidebar click Stores. Under Taxes click Tax Zones and Rates. The imported rates display in the list. Use the page controls to view the new tax rates.
Imported Tax Rates
To ensure that the new tax rates work correctly, make some test transactions in your store with customers from different ZIP codes.
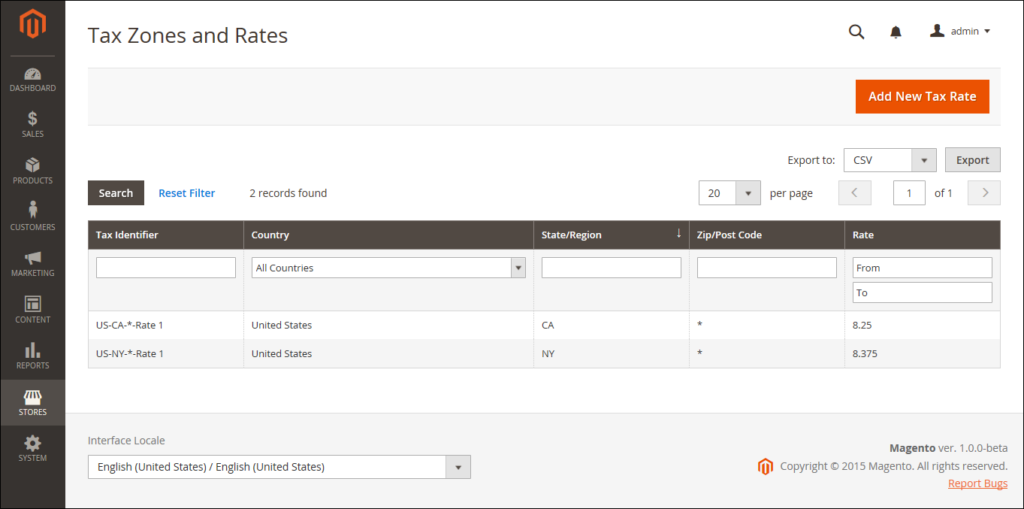
Tax Zones and Rates tools in Magento 2 backend allows store administrators to indicate the tax rate for each geographical area from which they collect and transfer taxes. Because every tax zone and rate has a unique identifier, store administrators can have multiple tax rates for several specific places (such as places that do not tax food or emergency medicine, but do tax other items). In this article, we will describe a tutorial on how to use the Tax Zones and Rates tool in Magento 2 admin panel.
Tax Zones and Rates
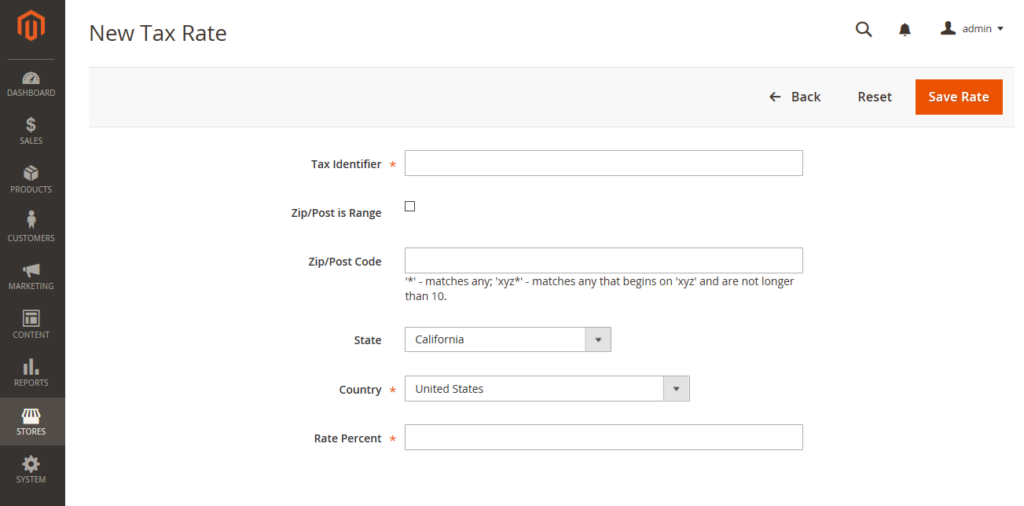
To define a new tax rate, you can follow these steps:
On the admin sidebar click Stores. Under Taxes click Tax Zones and Rates. In the upper-right corner, click Add New Tax Rate and input the Tax Identifier.
Input the code in the Zip/Post Code field to apply the tax rate to a single ZIP or postal code.
The asterisk wildcard (*) can be used to match up to ten characters in the code. For example, 90* represents all ZIP codes from 90000 through 90999.
To apply the tax rate to a range of ZIP or postal codes, follow these steps:
Tick the checkbox next to the Zip/Post is Range. Then in the Range From and Range To fields, input the first and last ZIP or postal code to determine the range.
ZIP/Post is Range
Choose the State and Country where the tax applies.
Input the Rate Percent that is used for the tax rate calculation.
Click Save Rate after completed.
New Tax Rate
To edit an existing tax rate, follow these steps:
On the admin sidebar click Stores. Under Taxes click Tax Zones and Rates.
Find the tax rate in the Tax Zones and Rates grid, and open the record in edit mode. If there are many rates on the list, find the rate you need using the filter controls.
Make any changes to the Tax Rate Information and update the Tax Titles as needed.
Click Save Rate after completed.
Above is an article on how to use tax zones and rates tool in Magento 2 backend. We hope that you can define or edit tax rate using information from this article. In the next article, we will describe Import/Export Tax Rates in Magento 2. Like, share and subscribe Magestandard for more Magento 2 tutorial article
The price display settings allow store administrators to include or exclude tax in product and shipping prices, or show two versions of the price; one with, and the other without tax.
If store administrators add tax in the product price, the tax displays only if there is a tax rule that matches the tax origin, or if a customer address matches the tax rule. Events that can activate a match include when a customer creates an account, logs in, or generates a tax and shipping estimate from the shopping cart.
Showing prices that include and exclude tax makes customers confused. To avoid warning messages, see the guidelines for your country, and recommended settings.
Price Display Settings
To configure Price Display Settings in Magento 2 admin backend, follow these steps:
On the admin sidebar click Stores, under Settings click Configuration. On the left of the panel under Sales, click Taxes. Open the Price Display Settings tab.
Set Display Product Prices in Catalog to one of these options:
Excluding Tax
Including Tax
Including and Excluding Tax
Set Display Shipping Prices to one of these options:
Excluding Tax
Including Tax
Including and Excluding Tax
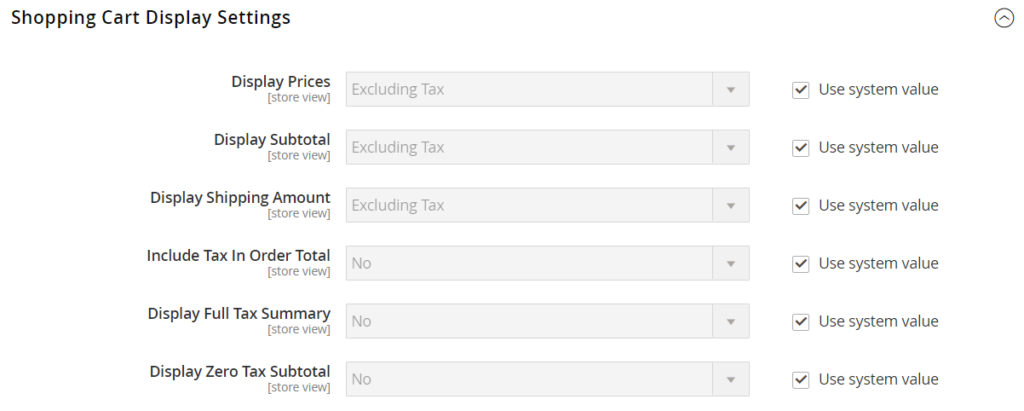
Shopping Cart Display Settings in Magento 2 admin panel
Shopping Cart Display Settings
Open the Shopping Cart Display Settings tab and follow these steps:
Set Display Prices to one of these options:
Excluding Tax
Including Tax
Including and Excluding Tax
Set Display Subtotal to one of these options:
Excluding Tax
Including Tax
Including and Excluding Tax
Set Display Shipping Amount to one of these options:
Excluding Tax
Including Tax
Including and Excluding Tax
Set the following to “Yes” or “No” according to your preference:
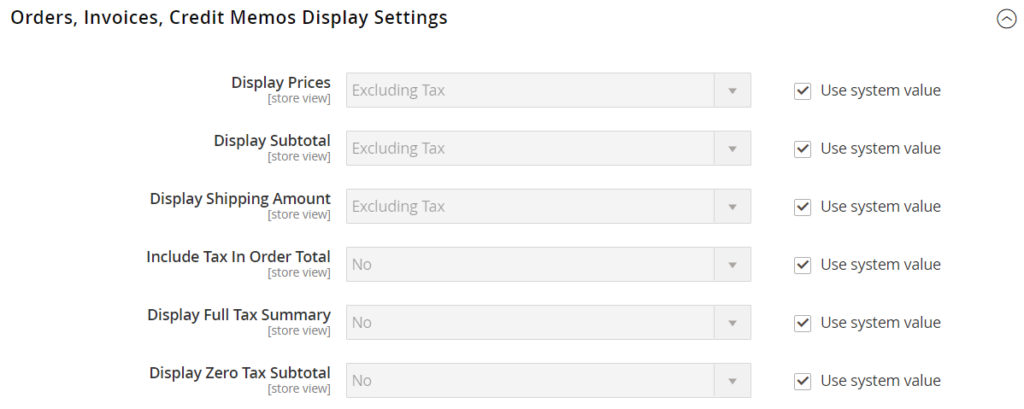
Open the Orders, Invoices, Credit Memos Display Settings tab and follow these steps:
Set Display Prices to one of these options:
Excluding Tax
Including Tax
Including and Excluding Tax
Set Display Subtotal to one of these options:
Excluding Tax
Including Tax
Including and Excluding Tax
Set Display Shipping Amount to one of these options:
Excluding Tax
Including Tax
Including and Excluding Tax
Set the following to “Yes” or “No” according to your preference:
Include Tax in Order Total
Display Full Tax Summary
Display Zero Tax Subtotal
Click Save after completed
Above is a complete guideline of display settings in Magento 2 admin backend. We hope that you can handle the display settings and tax control from admin panel. In the next article, we will describe Tax Zones and Rates. Like, share and subscribe Magestandard to read more Magento 2 guideline article.
The digital products sold from European Union (EU) merchants must be reported every quarter to each member country. Digital products are taxed based on the customer’s billing address. According to the law, merchants have to create a tax report and validate the relevant tax amounts for digital products, as opposed to physical products.
All digital products sold by EU member countries must be reported from merchants on a quarterly basis to a central tax administration, along with payment due for tax collected during the period.
Any merchants who have not reached the threshold yet (50000/100000 € of seasonal business) must continue to report physical products sold to the EU states where they have registered VAT numbers.
Any dealers who are examined for taxes paid for digital products must provide all required information to build up the customer place of residence.
The customer place of residence can be established using the customer’s billing address and a record of a successful payment transaction.
The Magento database tables can provide the information directly.
There are seven things you have to do to collect digital products tax information:
Load the tax rates for all EU countries.
Generate a digital products product tax class.
Assign digital products to the digital products product tax class.
Generate physical products tax rules, using physical product tax classes, and associate them with the appropriate tax rates.
Run the tax report for the appropriate period, and collect the required digital products information.
Export the tax sums that are related to the tax rates for the digital goods product tax class.
Above is an insight into EU place of Supply for Digital products on Magento 2. We hope that you can collect digital products tax information from your web store. If you have any question, feel free to leave a comment or contact us directly. In the next article of Magestandard, we will provide information on fixed product tax in Magento 2. Keep tracking our blog site to read more useful Magento 2 insight article.