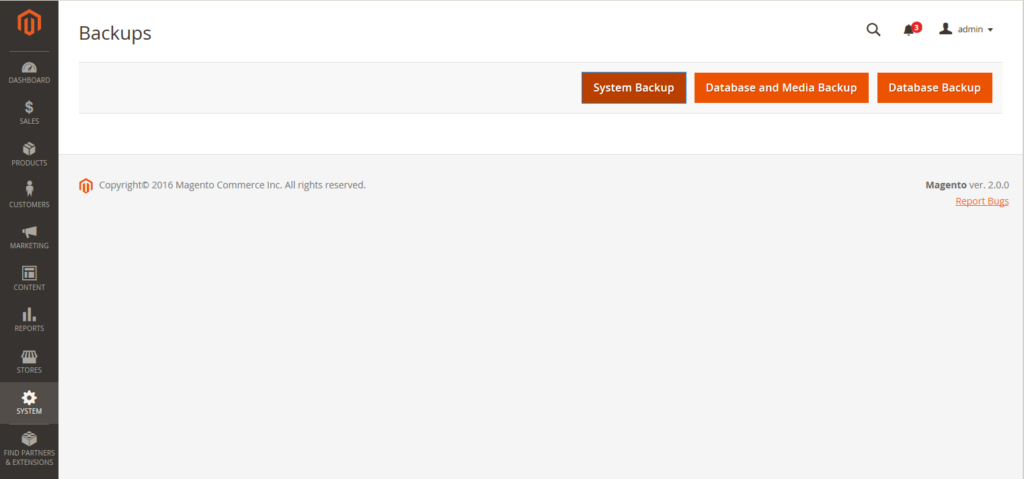
How To Configure Cron In Magento 2 Admin Panel

  • Email
  • Catalog Price Rules
  • Newsletters
  • XML Sitemap Generation
  • Currency Rate Updates

Besides, you can configure these things to run according to a cron schedule:

  • Order System Grid Updates and Reindexing
  • Pending Payment Lifetime

Remember that the base URLs for the store are set correctly, so the URLs that are generated during cron operations are correct. For further information, please read: Set up cron jobs.

Follow these steps to configure cron:

1. On the Admin sidebar, click Stores. Under Settings, click Configuration.
2. On the left of the panel under Advanced, click System.
3. Open the Cron tab.

Cron (Scheduled Tasks)

4. After that, edit settings for the Index and Default groups

  • Generate Schedules Every
  • Schedule Ahead for
  • Missed if not Run Within
  • History Cleanup Every
  • Success History Lifetime
  • Failure History Lifetime
  • Use Separate Process
Schedule Ahead for
Schedule Ahead for
  • Missed if not Run Within
  • History Cleanup Every
  • Success History Lifetime
  • Failure History Lifetime
  • Use Separate Process
Cron Configuration for Group: Index
Click Save after config.
Above is a tutorial on How To Configure Cron In Magento 2 Admin Panel. We hope that after reading this article, you can completely control and configure the cron. Please like and share if you think this article is beneficial. On the next article, we will describe some developer tools in Magento 2 default installation. Keep tracking Magestandard by subscribing button to read the new Magento 2 tutorial and guideline articles. See you in the next blog post

A Few Steps To Create A Backup In Magento 2 Admin Panel

In the previous Magento 2 article, we described a manual of index triggers event in Magento 2. In this article, we will describe how to create a back up in Magento 2 admin panel

Magento Open Source allows store administrators to back up different parts of the installation, for example, the file system, database, and media files, and to recover automatically. A record for each backup displays in the table grid of the Backups page. Deleting a record from the list removes the archived file as well. Database backup files are compressed using the .GZ format. and the .TGZ format is used for the system backups and database and media backups. As a best practice, you should restrict access to backup tools, and back up before installing extensions and updates.


Restrict access to backup tools. You can restrict access to the Backups and Rollback management tool by configuring user permissions for backup and rollback resources. To limit access, unselect the corresponding checkbox. If you need to grant access to recover resources, you must allow access to backup resources.

Back up before installing extensions and updates. Before you install an extension or update, always perform a backup. You can use the backup option in the Component Manager that you can use before upgrading to a new release or installing an extension.

Backups in magento 2
Backups

Follow these steps to create a backup:

1. On the Admin sidebar, click System. Under Tools, click Backups.
2. Select the backup type you want to create by clicking the button on the right:

System Backup

Creates a complete backup of the database and the file system. During the process, you can include the media folder in the backup.

Database and Media Backup

Creates a backup of the database and the media folder.

Database Backup

Creates a backup of the database.

3. To change to the maintenance mode during the backup, select the checkbox. After that, maintenance mode is turned off automatically.
4. For a system backup, mark the Include Media folder to System Backup checkbox if you want to include the media folder. Confirm the action.

To schedule backups

1. On the Admin sidebar, tap Stores. Then under Settings, click Configuration.
2. On the left of the panel under Advanced, click System.
3. Open the Scheduled Backup Settings tab, and do the following:
4. When complete, tap Save Config.

A Manual Of Index Trigger Events In Magento 2 Admin Panel

A Tutorial On Using A Content Delivery Network For Magento 2 Media Storage

As we said in previous articles, store administrators can use a Content Delivery Network (CDN) to store media files. Although the version of Magento that is installed “on-premise” does not include integration with any specific CDN, store administrators can choose and use their CDN. Magento Commerce (Cloud) consists of the Fastly CDN. To learn more, see Fastly in the Magento developer documentation.

After configuring the CDN, you must complete the configuration from the Admin. You can make the changes at either the global or website level. When a CDN is used for media storage, all paths to media on store pages are changed to the CDN paths that are specified in the configuration.

CDN Workflow

  1. Browser requests media: A page from the web store opens in the browser, and the browser requests the media that is specified in the HTML.
  2. Request sent to CDN; images found and served. First, the request is sent to the CDN. If the CDN has the images in storage, the media files will be served to the browser.
  3. Media not found, request sent to Magento web server. If the media files are not available in the CDN, the request is sent to the Magento web server. If the media files are available in the file system, the web server sends them to the browser.

For security reason, JavaScript may not work correctly if the CDN is placed outside of the subdomain when a CDN is used as media storage.

Follow these steps to configure a content delivery network for Magento 2 media storage:

On Admin sidebar click Stores > Under Settings click Configuration > Under General click Web. Set Store View as needed, open the Base URLs tab and follow these steps:

Content Delivery Network For Magento 2_1

Enter the URL of the location on the CDN where static view files are stored to the Base URL for Static View Files.

Enter the URL of the JS files on the CDN to the Base URL for User Media Files.

You can empty these field or can start with the placeholder: {{unsecure_base_url}}

Open the Base URLs (Secure) tab:

Base URLs (Secure)
Base URLs (Secure)

Do the same as above and click the Save Config

Tutorial On Using Database In Magento 2 Media Files Storage

In the default installation of Magento 2 Open Source, images, compiled CSS files, and JS files of the Magento instance are saved in the file system on the server. Store administrators can store these files in a database on a database server. This method allows you to select between auto-sync and reverse-sync between the web server file system and the database. You can use the default database to store media or create a new one. To use a newly created database as media storage, you must include information about it and its access credentials in the local .xml file.

The database workflow of using database In Magento 2 media files storage below:

  1. Browser requests media: The browser requests the media that is specified in the HTML while opening a page in the store on the browser.
  2. The system looks for media in the file system: The media files will be searched and found in the file system and send to the browser.
  3. The system locates media in database: If the file is not available in the system, a request is sent to the database that is specified in the configuration.
  4. The system locates media in database: A PHP script sends the files from the database to the file system and sent to the browser.

If the server is supported and web server rewrites are enabled for Magento, the PHP script runs only when the requested media files are not in the file system.

If the server is not supported or web server rewrites are disabled for Magento, the PHP script runs even if the requested media files exist in the file system.

To configure a database for media storage, please follow these steps:

On the admin sidebar click Stores, under Settings click Configuration, under Advanced, click System. To apply the configuration at the global level, set Store View to Default Config. Open the Storage Configuration for Media tab and follow these steps:

Storage Configuration for Media (Database)
  • Uncheck the Use system value checkbox
  • Set Media Storage to “Database.”
  • Set Select Media Database to the database you want to use.
  • Click Synchronize, enter the Environment Update Time and click Save Config.

In the next article, we will describe tutorial on using a CDN as a media storage for Magento 2 online store. Keep tracking Magestandard and see you in the next blog post.