On the previous article, we described what is Fixed Product Tax (FPT) in Magento 2. In this article, we will explain a tutorial on Configuring FPT On Magento 2 admin panel.
The tutorial on how to set up a fixed product tax for your store, using “eco-tax” as an example. After setting the tax scope and the countries and states, the input fields can change according to the local requirements and depend on the options you choose. Read an article about Creating Attributes to learn more.
Step 1: Enable Fixed Product Tax
On the Admin sidebar, click Store. Under Settings, click Configuration. On the left of the panel under Sales, click Tax. Open the Fixed Product Taxes tab and follow these steps:
- Set Enable FPT to “Yes.”
- Select the FPT setting for each of the following price display locations to decide how fixed product taxes are used in store prices. (The selections are the same for each location.)
- Product View Page
- Sales Modules
- Emails
| OPTIONS |
| Including FPT Only
Including FPT and FPT description Excluding FPT. Including FPT description and final price Excluding FPT |
- Set Apply Tax to FPT as needed.
- Set Include FPT in Subtotal as needed.
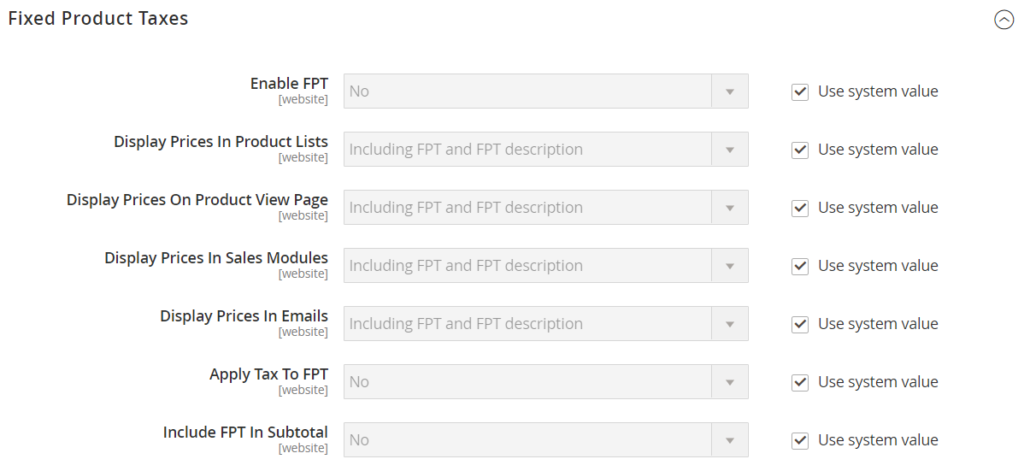
Click Save after completed.
Step 2: Create an FPT Attribute
On the Admin Sidebar click Stores. Under Attributes click Product. In the upper-right corner, click Add New Attribute and follow these steps:
- To identify an attribute, input Default Label
- Set Catalog Input for Store Owner to “Fixed Product Tax.”
Open the Advanced Attribute Properties and follow these steps:
- In the Attribute Code field, input a unique identifier in lowercase, spaces or special characters are not allowed. The maximum length is 30 characters. You can leave the area blank to the text from the Default Label field.
- Set Add to Column Options to “Yes” if you want the FPT field to appear in the Inventory grid.
- Set Use in Filter Options to “Yes” if you want to filter products in the grid based on the FPT field’s value.
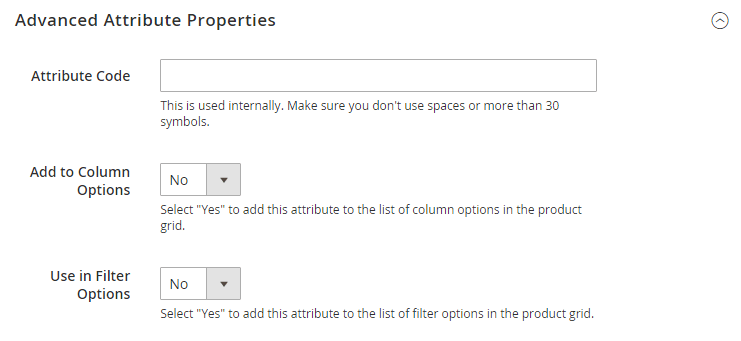
- On the left of the panel, select Manage Labels. Then, input a label to use instead of the default label for each store view. (Optional)

- Click Save Attribute after completed and clear the cache.
Step 3: Add the FPT Attribute to an Attribute Set
On the Admin Sidebar, click Stores. Under Attribute, click Attribute Set. Click the attribute set on the list to open the record in edit mode.

Move the FPT attribute from the Unassigned Attributes list to the Groups list. Each group folder compares to a section of product information. You can place the attribute wherever you want it to display when the product is open in edit mode.
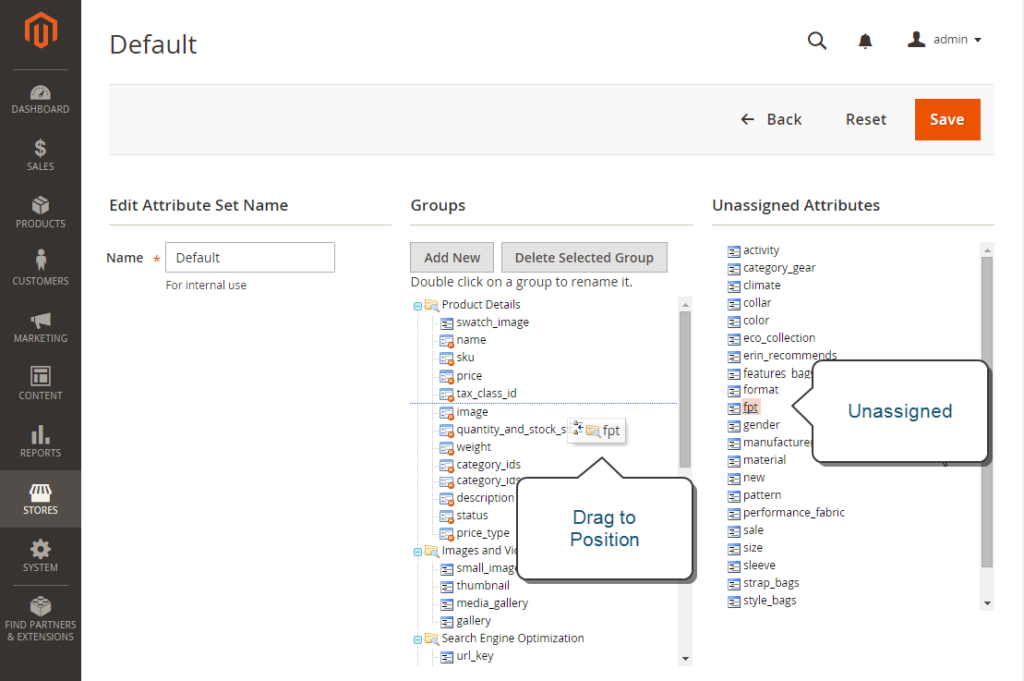
Click Save after completed.
For each attribute set that needs to include fixed product tax, do this step again.
Step 4: Apply FPT to Specific Products
On the Admin Sidebar click Products, Under Inventory, click Catalog. Open the product that needs a fixed product tax in edit mode. Find the FPT section of fields that you added to the attribute set. Click Add Tag and follow these steps:

- If your Magento installation has multiple websites, select the Website that you want to apply settings and base currency. In this example, the field is set by default to “All Websites [USD],”
- Set Country/State to the region where the fixed product tax applies.
- Enter the fixed product tax as a decimal amount in the Tax field.
- Click Add Tag and do the process again if you want to add more fixed product taxes
Save after completed