A Detailed Introduction of Actions Control in Magento 2

People use the actions control for the purpose of applying an operation to records in backend. In this article, we will give you a detailed introduction of Actions Control in Magento 2.

magento2 actions control

What is Actions Control?

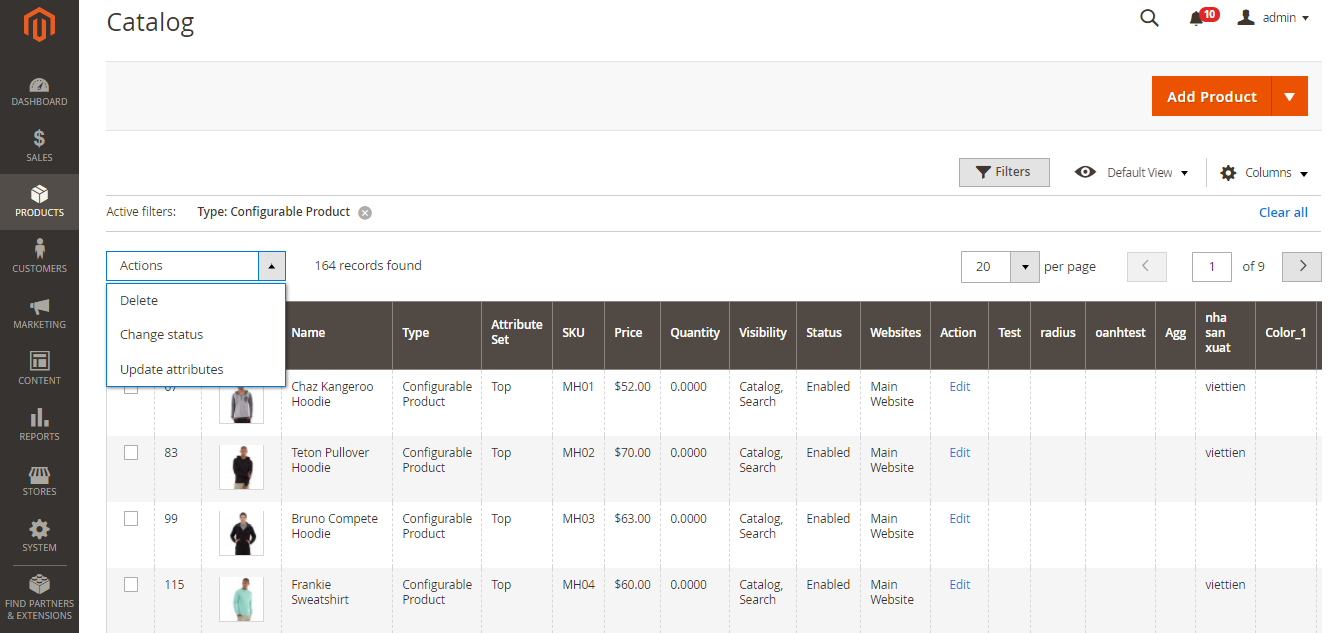
When handling a number of records in the grid, you can make use of actions control to assign an operation to one or more records. The actions control shows all operations you can apply to the individual type of data. For instance, with product records, actions control can be utilized to alter the status from “Disabled” to “Enabled”, update the attributes of chosen products or remove records from the database.

In addition, you are able to change as much as you want and then update the records in just one step. It is more effective than adjusting the settings of each product independently. The choice of existing actions varies by list and supplementary options might appear based on the chosen action. For example, when changing the status of a selection of records, a Status box shows up next to the Actions control with three extra options: Delete, Enable, Disable

How to Use Actions Control

Step 1: Choose Records

  1. Put a tick on the checkbox of each record that is a target for the action or use one of the following choices to select a group of records:
  • Select All / Unselect All
  • Select All on This Page/ Deselect All on This Page
  1. If you need to display only the records that you want to include, configure the filters at the top of each column.

Step 2: Assign an Action to Chosen Records

  1. Select an Actions control you want to apply

For example: Change Status

  1. Click Submit to finish all steps

Provided above is the specific explanation of Actions Control in Magento 2. If you have any query about Magento 2 topics, please feel free to send us.

How to Configure Grid Layout in Magento 2

The data in admin pages is usually shown in a grid so that store owner can manage it more effectively. In this article, we will show you an easy guide to configure grid layout in Magento 2.

magento2-grid-layout

About Grid Layout

It can be clearly seen that admin pages that control data present collected records in a grid. According to your reference, you can select which columns appear, determine their order in the grid or save them as a “view”. A key point is that only nine of twenty existing columns are displayed in the grid by default.

To Alter the Choice of Columns

  1. Select the Columns control in the upper-right corner. Then, do this instruction:
    – If you want to insert more columns to the grid layout, put the tick in the checkbox of any option
    – In case you need to remove columns from the grid layout, clear the marked checkbox
  2. You should scroll down to ensure that you view all available columns

To Change the Position of a Column

  1. Click the header of the column and hold
  2. Move the column to the new position and release

To Save a Grid View

  1. Choose the View control -> Click Save Current View
  2. Type a name for the view. Then, tap the arrow icon to save all changes

To Modify the Grid View

Select the View control. Then, do one of these options:

  • Tap the name of the view if you want to utilize another view
  • Choose the Edit icon to alter the name of a view -> Update the name you want

Conclusion

Provided above is the guide to customize the grid layout in Magento 2. We hope that this article is useful for anyone who is interested in searching about Magento and related topics. Please feel free to contact us if you have any query.


A Quick Introduction of Global Search in Magento 2

Search is a tool that plays an important role in most of websites on the Internet. What is global search? How to use global search? In this article, we will give you an overall view of global search in Magento 2.

What Is Global Search?

Any record in the database can be easily found by the magnifying glass (spy glass) in the header of the Admin. The results might consist of customers, products, orders or any related attribute. For instance, if you type a customer name in search area, you can acquire the results including the customer record as well as any orders related to the name.

For store owners, with the global search in Magento 2, finding necessary information and controlling the store become more convenient. After typing some keywords in search box, you will easily receive proper results matching with search terms in a few seconds. Then you can open records by choosing any item among search outcomes. Therefore, you are capable of conducting operating activities smoothly instead of wasting time seeking what you want in your own store.

magento2-global-search

Seek a Match

Follow this instruction to look for a match in backend

  1. To open the search box, click the magnifying glass in the header and do one of two options:
  • Insert the first few letters of what you want to search to get a close match
  • Type the word or multiple words that you need to look for to receive an exact match
  1. Tap any item to open the record in the search outcomes.

Conclusion

Provided above is the quick explanation about Magento 2 global search. We hope that you can get useful information and grasp the way to use global search in Magento 2. Please feel free to contact us if you have any question.

All The Things About Advanced Pricing Data in Magento 2

With Advanced Pricing Data in Magento 2, you can quickly update pricing data for product groups and tier prices as well. This advanced import/export price information process is not different with any other import/export process for any entity type. In the sample CSV file, you can see that it contains tier and group prices for each product type supporting advanced pricing. Admin can make changes to Advanced Pricing Data freely because it does not impact the rest of the product record.

Advanced Pricing Data Attributes in Magento 2

SKU: it means the Stock-Keeping Unit. Each SKU is only one and alphanumeric identifier that they use it to track inventory. Lenght of SKU can be up to 64 characters.

  • tier_price_website: The website code specifies websites which contain tier pricing.
  • tier_price_customer: That determines the customers groups which include tier pricing.
  • For instance: ALL GROUP, NOT LOGGED IN, General, wholesale, Retailer.
  • tier_price_quantity: Tier price quantity is the type of quantity of the product  that must be ordered to receive the tier price discount.
  • tier_price: It is the discounted tier price of the product. As for bundle products, tier price is calculated as a percentage.
  • group_price_website: The website code of each website where group pricing is available. If specifying multiple websites, separate each with a comma and without a space.
  • group_price_customer_group: Identifies the customers groups where group pricing is available.
  • For instance: NOT LOGGED IN, General, Wholesale, Retailer
  • group_price: The discounted group price of the product. For bundle products, group price is calculated as a percentage.

Conclusion

In short, here is all the information about Advanced Pricing Data in Magento 2 we want to share you. Hope that after reading this article, you will have a deep insight of these things. If you find it helpful for you, please Like, Share and Subscribe to keep updating for more upcoming blogs!