A Full Guide of Exporting Data in Magento 2

Magento 2 supports users to export data from system. When you successfully export data follow your requirements and open it in a spreadsheet in many time and become familiar with the process, you will realize that export process helps you a lot in managing large amounts of database. To back you clearly know about this process, we would like to show you a full guide of exporting data in Magento 2 below.

Exporting Data in Magento 2

  1. On the admin homepage, slide bar, click on System symbol. After that, choose Export under Data Transfer.
  2. When the Export Data Setting sector displays, do the following:
  1. In the Entity Type field, choose one of those options: Products, Customers Main File and Customer Address.
  2. Set the default of CSV file for Export File Format.Exporting Data in Magento 2
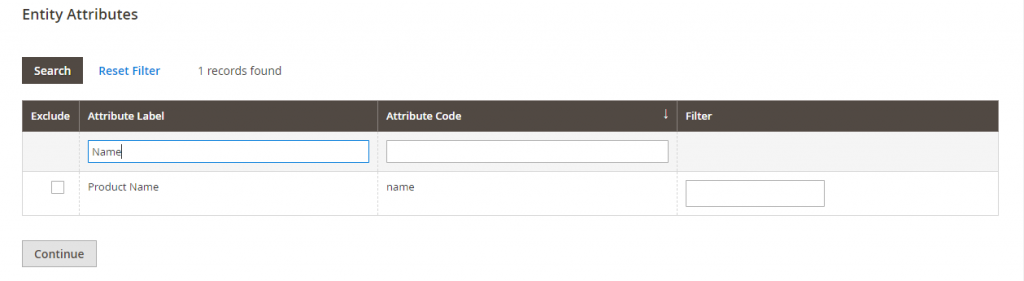
  1. In the Entity Attributes section, all the available attributes are listed alphabetically. If you want to search for specific attributes and sort the list, you can use the standard list control in Magento 2 to support. The Search and Reset Filter controls can control the appearance of the attributes list but cannot influence the selection of attributes to be contained in the export file.
  2. If you want to filter the exported data which is based on attribute value, do the following:
  • In order to export only data involving specific attribute values as wish, please enter the value you want in the Filter column.Exporting Data in Magento 2
  • If you intend to export data without some attributes, mark the attributes you want in the Exclude checkbox at the beginning of the row. For example, to exclude SKU and image columns, choose the checkbox of SKU and image as well. The column two normally appears in the export file with non-value.
  1. When finishing all of four steps above, scroll down and click Continue button in the lower-right corner of the page.

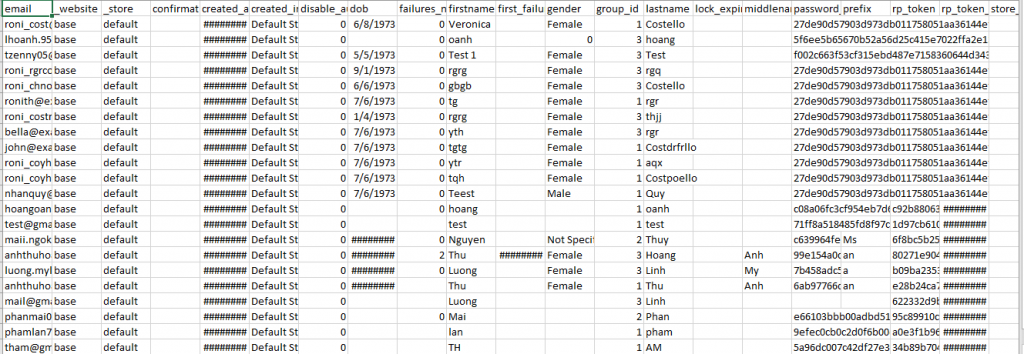
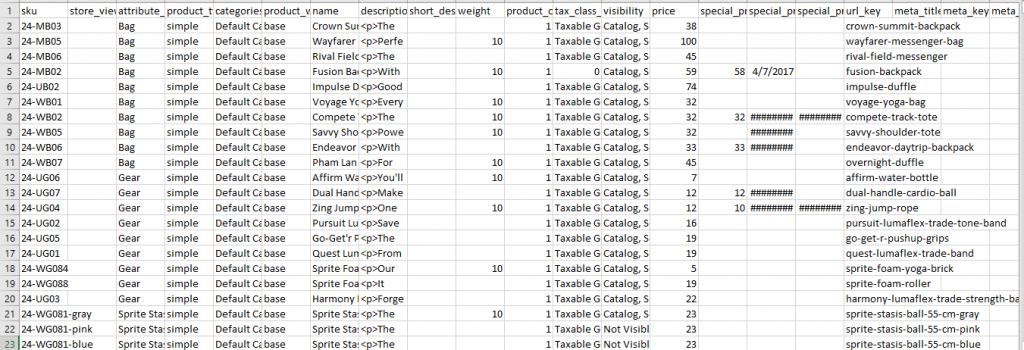
After all, find the download prompt in the lower-right corner of your browser. Click on it and wait for download success. The exported CSV file can be saved and opened under a spreadsheet shape. Moreover, you can freely edit the data as wish and import it back into your store.

In short, here are all the details about Exporting Data in Magento 2 we want to share with you. If you find it helpful for you, please Like, Share and Subscribe to keep updating for more upcoming blogs!


A Few Points to Note When Importing Data in Magento 2

When importing data in Magento 2, you will surely meet some mistakes and trouble to complete your work. To help you know more about the obstruction and find the way to deal with this issue, we are pleasant to list some specific notes when importing data in Magento 2 below. Hope that it will be useful for your work.

New entities

New entities are added with the attribute values which are designated in the CSV file.
A new entity cannot be imported if it has no value or the value is invalid or no default value is set for a required attribute.
If there is no value or there is an invalid value, as for a required attribute with the default value set, so the entity which is the corresponding row or rows is imported, and the default value is set for the attribute automatically.
The complicated data is invalid leading to the entity which is corresponding row or rows cannot be imported in Magento 2.

Existing Entities

Attributes replace the existing values if attributes are not one of these types: complex data, the values from the import file, attributes including the empty values for the non-required attributes.
If a required attribute is no value or invalid value, so the existing value cannot be replaced.
If the entity contains the complex data which is non-valid, the entity cannot be imported. But when Delete Entities was chosen in the Import Behavior drop-down menu, the entity still can be imported in Magento 2.

Complex Data

If an attribute that is designated in the import file already exists and its value is assumed from a defined set of values, there are two following cases:
The row can be imported and the default value is set for the attribute if the value is not already included in the defined set of values.
The corresponding row cannot be imported if the value is already included in the defined set.
If an attribute that is designated in the import file but it is not defined in the system yet, it is not created and its values are all not imported in Magento 2.

Invalid Files

A file cannot be imported if it contains invalid rows.
An invalid file is a file which contains a non-existing service data or complicated data name designated in the import file. For example: a column with a _ heading.

In short, here are all the details aboout Importing Data in Magento 2 we want to share with you. If you find it helpful for you, please Like, Share and Subscribe to keep updating for more upcoming blogs!

How to Configure Default Field Values in Magento 2

When creating new products for stores using Magento 2 platform, Product Workspace allows you to save time by providing a number of default field values. These values are referenced from some other fields such as product name, or product description. Magento 2 set the following fields automatically to default values:

  • SKU: Based on Product Name field.
  • Meta Title: Based on Product Name field.
  • Meta Keywords: Based on Product Name field.
  • Meta Description: Based on both Product Name and Product Description fields.

The text that is put in double-curly braces are placeholders and it refers to the value of the base field(s) (Product Name, for example). Any attribute code included in the product attribute set can also be used as a placeholder.

Admin can edit the value of placeholders by the following steps:

Step 1: In the backend mode, go to Admin Sidebar and click Stores.

Step 2: Next, select Configuration under Settings.

Step 3: Expand Catalog on the left panel then choose Catalog.

Step 4: Drop down the Product Fields Auto-Generation section. After that, enter the text that you want to replace the placeholder values. Remember to unmark the Use System Value checkboxes before filling the blanks.Default Field Values

For instance, you want to enclose the word “Magento 2” to the meta descriptions of all products, you just need to enter “Magento 2” in the Mask for Meta Description field. By doing this, the phrase “Magento 2” will be shown up to all of the descriptions.

Step 5: Click Save config on the upper-right corner to confirm your settings.

Below is a list of common placeholders used by many admin:

{{color}}

{{country_of_manufacture}}

{{description}}

{{gender}}

{{material}}

{{name}}

{{short_description}}

{{size}}

{{sku}}

Now you can log in the backend mode and try out setting new values for some placeholders.

In short, here are all the details about Configuring Default Field Values in Magento 2 we want to share with you. For the Magento developers, it’s our pleasure to receive your comment and recommendation on our FAQ extension list. If you want to add or erase any item in this FAQ list, feel free to contact us. Don’t forget to Like, Share, and Subscribe to Magestandard for more informative Magento extension review articles.

How to Work with CSV Files in Magento 2 ( Part 2 )

In the How to work with CSV Files in Magento 2 Part 1, we have mentioned about the definition of CSV, feature of CSV and Product CSV Structure in Magento 2. So, in this part, we would like to complete the topic by showing the details about Customer CSV Structure in Magento to make you have a full insight into the way to work with CSV files in Magento 2.

Customer CSV Structure

A Customer CSV file fully contains customer information that they have provided from the database as their email, name, address, phone number, customer group, etc. Furthermore, Customer CSV Structure has the following form.

Customer CSV Files Structure

By default, the first row of the table always contains the names of the column attributes representing for below information of each column. Look at the image below, you can see there are two types of column names with forms are like <attribute name> and _<name>. Column headers beginning with an underscore include service entity properties or complicated data. However, service columns are not attributes of customer.

Other rows provide information of attribute values, service data and complicated data. Each row can represent customer data in three situations: with data, without address data, or only the address data. If no more than address data is filled in a row, Customer CSV files will neglect or let the other information in different columns which contain the customer profile empty.

If you want to add or replace more than one address for a customer, you can open the import customer file, add row with the number match with the amount of empty and new customer data or updated address data which is in need to interact under the customer data row.

If you find it helpful for you, please Like, Share and Subscribe to keep updating for more upcoming blogs!


How to work with CSV Files in Magento 2 ( Part 1 )

What is CSV Files in Magento 2?

CSV Files is called as a short name of the comma-separated-value file format. It works like data transfer operation bases which is supported by all spreadsheet and database applications. Magento provides 2 file types of the comma-separated-value which are CSV and ZIP ( a compressed CSV file), therein, both CSV and ZIP are supported for import data, only CSV is supported for export data.

Feature of CSV Files in Magento 2

CSV Files have a particular construction that must absolutely match the database. Each column heading represents for a particular Attribute of the field. For example, name column show what the name of those products are, status column illustrates product’s current situation, etc. Moreover, we recommend you export the database from your store under a CSV Files’s construction to make sure that there is no column heading that Magento can read.

If you use a text editor to open an exported CSV file, you will see that values are isolated by commas, and multiple values are put inside double-quotes. During import, you can choose a custom separator character you want, thought a comma is the default.

To get more insight about CSV Files in Magento 2, please take attendance to the Product CSV Structure as well as Customer CSV Structure part right below.

Product CSV Files Structure in Magento 2

A full export of the product database gives you information about each product in the catalog, and the relationships between them. In that type of record, each column corresponds to the fixed attributes in the catalog.

Product CSV Files structure

The first row of the table which includes the names of each attribute is used as column headers. The remaining rows illustrate the particular product databases like store view code, product type, categories, description,…Any row that starts with a value in the SKU column is the beginning of a new product document. A individual product has to contain several rows that show data about multiple images or product options. The next row that has a value in the SKU column begins a new product.

The category column accommodates a path for each category which the product is selected. The path contains the root category, followed by a forward slash (/) between each level. By default, this “|” mark is used to isolate different category paths. For example: Default Category/Gear|Default Category/Gear/Watches which means that that product is putted in Watches Products Page in  Gear Category from Default Category.

If you want to import data, you only need to set the SKU and columns including changes. All of blank columns are neglected during the import process. You also can include only existing attributes as well.

To get more information about Customer CSV Files Structure, see Working with CSV Files part 2.