How To Add Users In Magento 2 Admin Panel

In the default installation of Magento 2, an Admin account is created that gives you full administrative access. First, you have to create another user account with full Administrator access, so you can use one account for your everyday Administrative activities, and reserve the other as a “Super Admin” account in case you lost access to your main account.

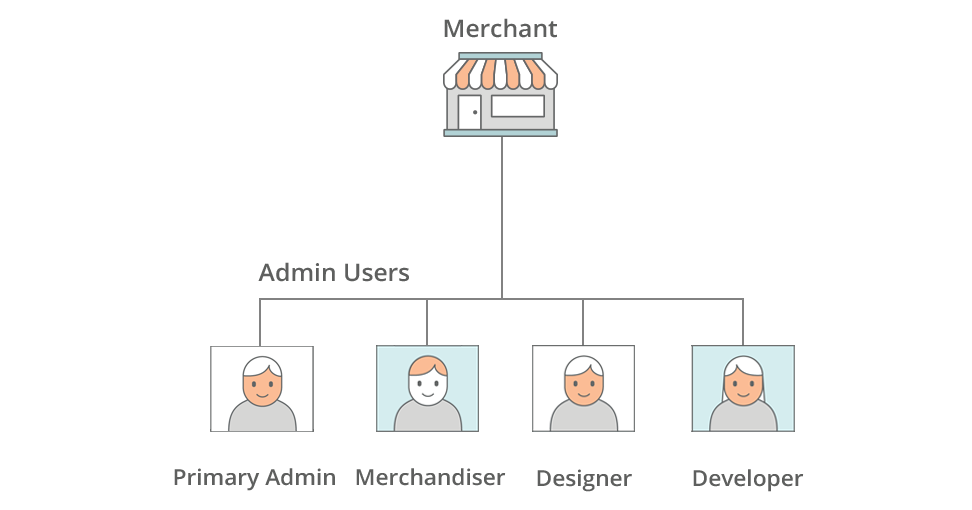
For a team of administrators, you can create a separate account for each, and set restrict access based on their business. To do that, you have to create a role with limited scope and access only to the necessary resources and assign the role to an admin account. After assigned to a restricted role, admin users can see and change data only for websites or stores that are associated with the role, but cannot make changes to any global settings or data.
Example Admin Users
Example Admin Users

Step 1: Create a New User

On the admin sidebar click System > All Users > Add New User. Follow these steps:
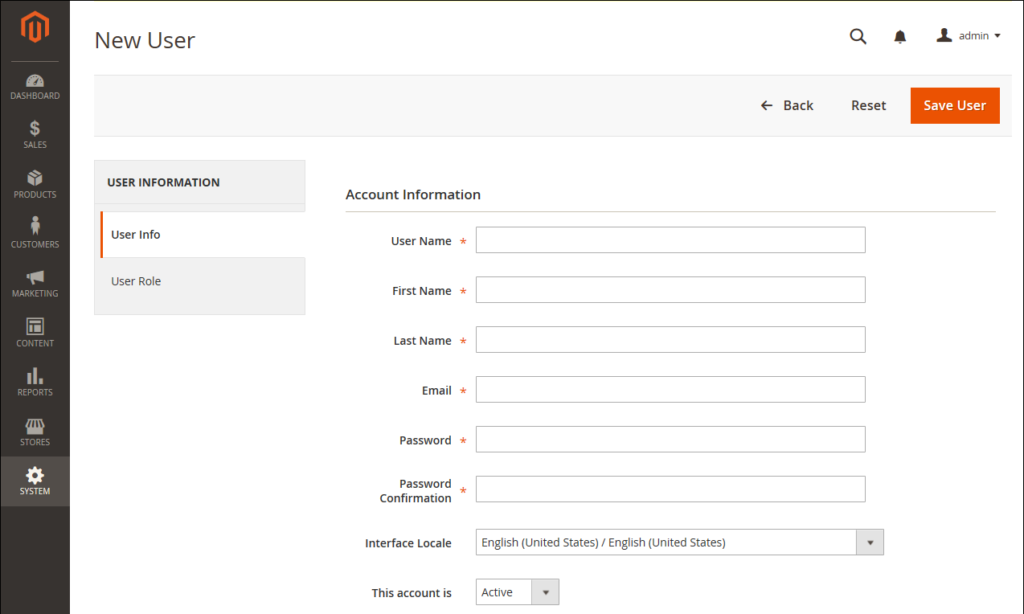
New User Account Information

Enter all required information and set “This account is” as Active, enter your password under Current User Identity Verification.

Step 2: Define the Role

On the left of the panel, click User Role. In the Assigned column, tick the Administrators selection and click Save User.
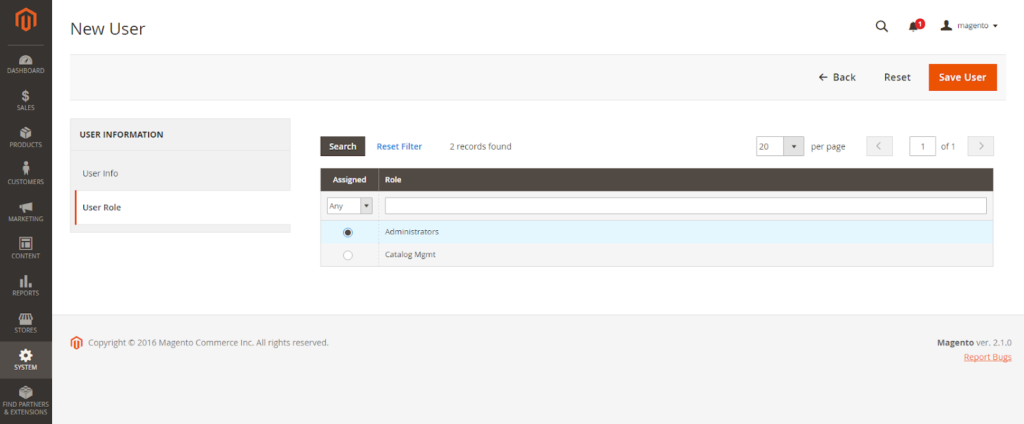
Add New User Role
Add New User Role

Admin Password Requirements

FIELD DESCRIPTION
Password Length of the password must be seven or more characters long, include both letters and numbers. For further information, please read this article: How To Configure Admin Security In Magento 2 Admin Panel.

Above is a tutorial on adding users in Magento 2 admin panel. We hope that you can manage the Administrators function in Magento 2 installation, and run your online store smoothly. In the next article, we will describe one of the most security function of Magento 2 platform: Lock Admin Account. Keep tracking Magestandard by subscribing to our site to read more Magento 2 tutorial blog post. See you in the next article.

How To Create A New Store View in Magento 2

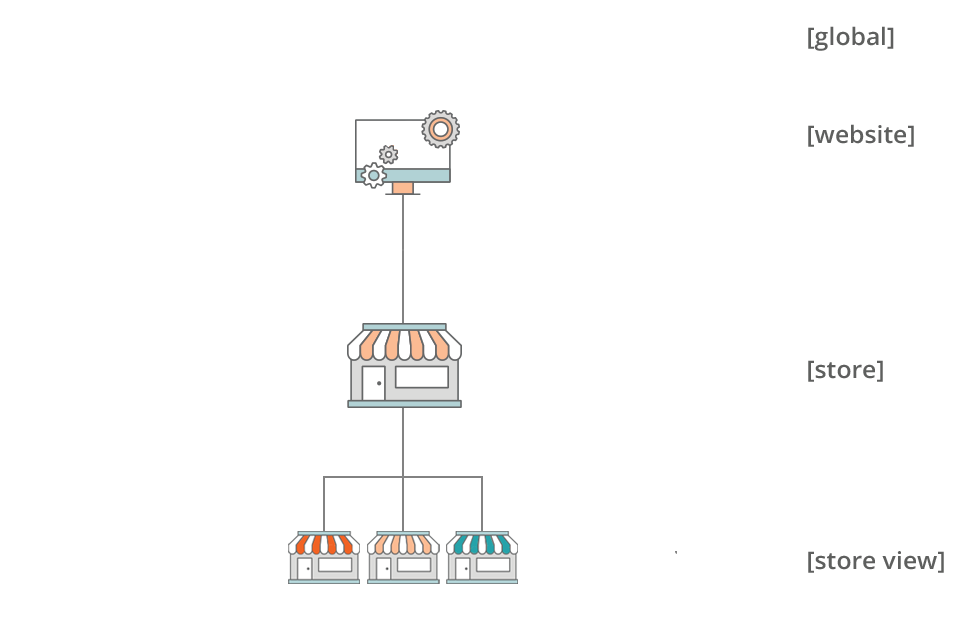
After Magento Open Source is installed, the installation creates a hierarchy that includes the main website, store, and store view. To add a multi-language store view for a Magento 2 store and make the store available in different locales, the first thing you have to do is create a new store view in Magento 2 backend. Commonly, store views are used to make the store accessible in others locales. Shoppers can use the language chooser in the header of the store to change the store view. To change a store view, shoppers can select a language in the header of the store. In this article, we will describe a tutorial on how to create a new store view in Magento 2.

multiple store views in magento 2
Multiple Store Views

To create a new store view in Magento 2, please follow these steps:

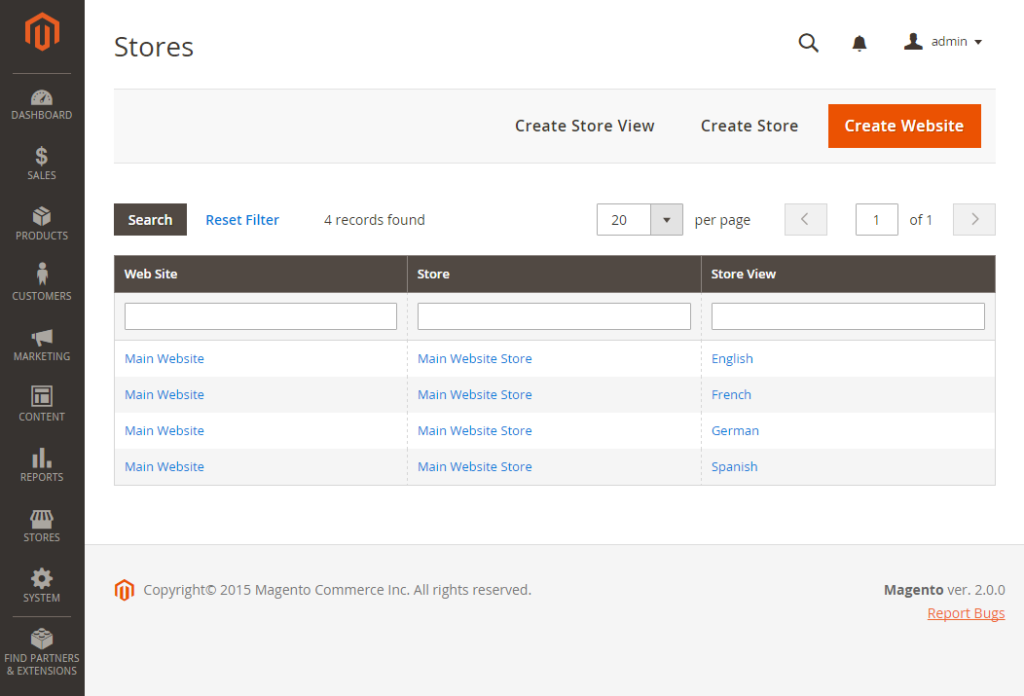
  1. On the Admin sidebar, click Stores. After that under Settings, choose All Stores.
all stores in magento 2
All Stores
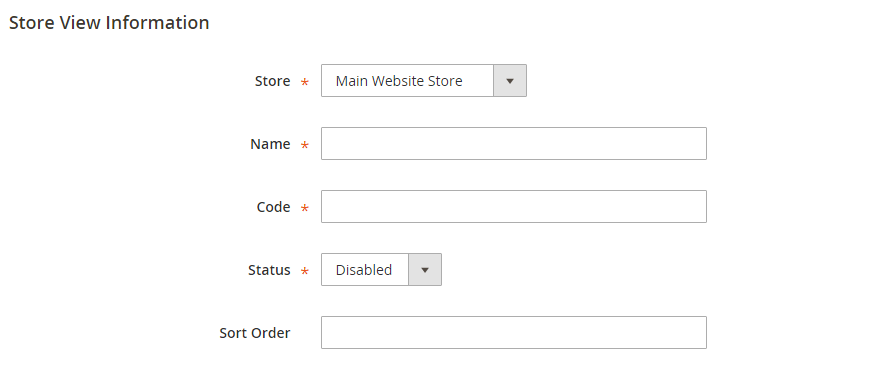
  1. Click Create Store View. After that, follow these tips:
store view information in magento 2
Store View Information

Configure Store to the parent store of this view.

  • Input a Name for this store view. The name displays in the language chooser in the store header. For example Spanish.
  • To identify the view, input a Code in lowercase characters. For example: spanish.
  • To activate the view, change Status to “Enabled.”
  • To decide the sequence in which this view is listed with other views, input a Sort Order number. (Optional)
  1. Click Save Store View after completed.

Above is a complete tutorial about adding store views in Magento 2 backend. We hope that you can manage to create multiple store views using this guideline. Feel free to leave a comment if you have any question, and remember to subscribe Magestandard to read more Magento 2 tutorial articles.

Complete Guideline About Stores Menu In Magento 2

  1. What is Stores menu in Magento 2?

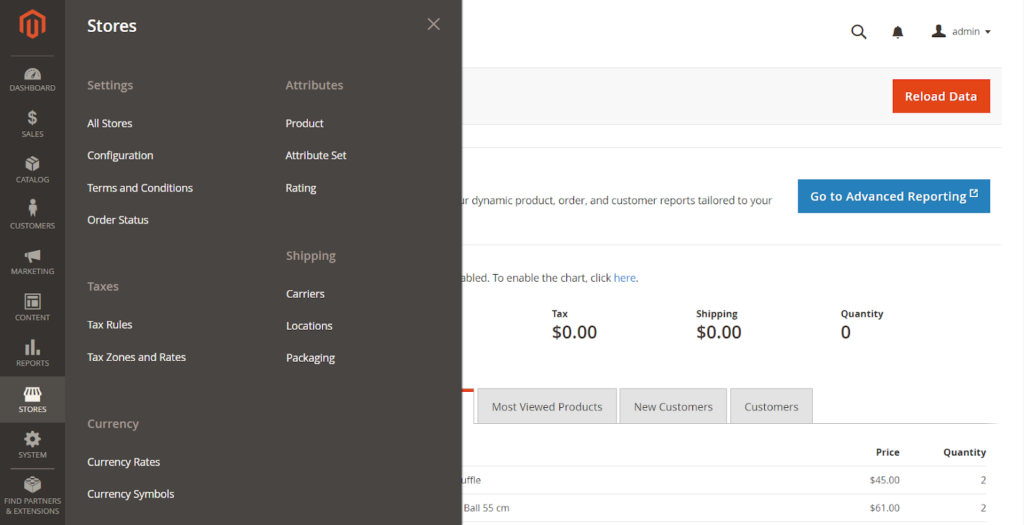
Stores menu in Magento 2 is a section in the admin sidebar, and this section lies near the bottom. Store administrators rarely have to do anything in Stores menu, but the settings of Stores menu affect your Magento installation, from setting up the store hierarchy, configuration, tax and currency, sales and order settings, product attributes, product review ratings, and customer groups. To open the Stores menu, click Stores in the admin sidebar. In this article, we will analyze all sections are included in Stores menu in Magento 2 Open Source

The menu options of Store contains Settings, Attributes, Taxes, Shipping and Currency

stores menu in magento 2
Stores Menu
  1. All Stores

All Stores section control the hierarchy of websites, stores, store views and all configuration settings. Store administrators can also set up Term and Condition, and manage order status settings.

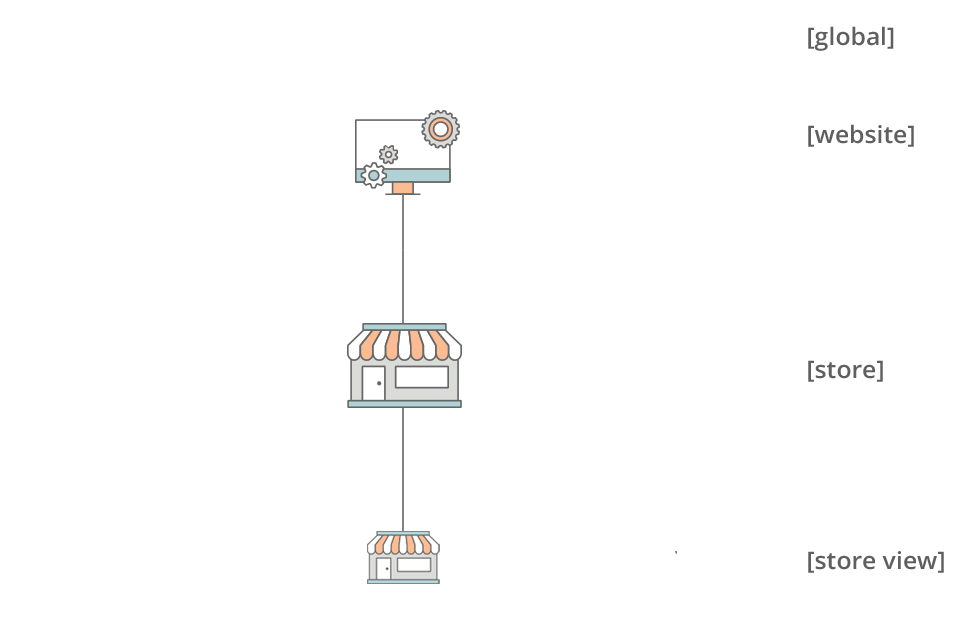
After installed Magento Open Source, the installation created a hierarchy that includes a main website, store, and store view. Additional websites, stores, and store views can be formed by store administrators as they needed. For example, you can have an additional websites with a different domain in addition to your main website. You can have multiple stores for each websites, and different store views for each store. To support different languages, many installations have one website, and one store includes multiple store views.

Because of the store hierarchy is referred to throughout the configuration, so you have to plan your store hierarchy before you begin. Every single store can have a different root category, which makes each store to have an entirely different set of main menu options.

Above is a guideline about Stores Menu and All Stores section in Stores Menu. If you have any question, feel free to leave a comment. Don’t forget to subscribe Magestandard to read more Magento 2 guideline articles.


Some Important Compliance You Must Remember In Magento 2 Basic Configuration

  1. Industry Compliance

In Magento Open Source, you have to follow a range of privacy security capabilities that satisfy legal requirements and industry guidelines for online merchants. Depending on your location, some are commanded by the Payment Card Industry (PCI), and other are restricted by law.

  • Legal Requirements
  • Industry Guidelines
  • Best Practices

In this article, we will provide you some information about PCI Compliance, and the importance of setting up techniques to secure payment data.

  1. PCI Compliance Guidelines

A checklist of prerequisites that allows payment by credit card online has been built up by The Payment Card Industry (PCI). Any merchants who can access customer credit card data must meet the following guidelines to maintaining a secure server environment:

PCI Requirements

  • Install and keep up a Firewall configuration to protect cardholder information.
  • For system passwords and other security parameters, don’t use vendor-supplied defaults.
  • Secure saved cardholder information.
  • Transmission of cardholder information across open, public networks must be encrypted.
  • Antivirus software must be install and regularly update .
  • Develop and keep up secure systems and applications.
  • Right to access to cardholder information must be restrict by business need to know.
  • Assign a unique ID to each person with computer access.
  • Physical access to cardholder data must be restricted.
  • All access to network resources and cardholder information must be tracked and monitored.
  • Security systems and processes must be tested regularly.
  • Maintain a policy that addresses information security.

When your business becomes larger, you may need to save an annual compliance report file. PCI reporting prerequisites increment in extent to merchant level. The annual compliance report is required for businesses that process more than 20000 credit card transactions per year.


How to Set Single Store Mode in Magento 2

What is Single Store Mode in Magento 2?

Single store mode in Magento 2 is the store mode that you can disable all store view options and scope indicators. If you add more store views, the single store mode is overridden. By turning off all the store view options and scope indicators, you can rearrange the display when there is only a single store and store view in your Magento 2 installation. Every screenshots in this article were taken while we disabled the Single Store Mode to display the scope indicator for every settings.You can override the Single Store Mode, if you add more store views later. The Single Store Mode makes store administrator’s work easier and more simple.

In this article, we will show you how to set single store mode in Magento 2 admin.

scope-single-view-magento-2
Single Website, Store, and View

Tutorial on set Single Store Mode in Magento 2

To set single store mode in Magento 2, follow these steps:

  1. On the Admin sidebar, click Stores. Under Settings tap, click Configuration.
  2. Under the General tab, scroll down to the bottom and open Single Store option.
  3. Change Single Store Mode to “Yes”.
config-general-general-single-store-mode-magento-2
Single Store Mode
  1. Click Save Config
  2. Follow these step if you need to flush cache:
  • In the system notification on the top of the page, click Cache Management link.
  • Click the Page Cache checkbox
  • Set Action to Refresh and click Submit.

Above is a guide to Single Store Mode and tutorial on set Single Store Mode in Magento 2. We hope that you can get some useful information about Single Store Mode in Magento 2 from this article. If you have some question, feel free to leave a comment. Don’t forget to like, share and subscribe Magestandard for more useful tutorial article.