A Quick Introduction of Merchant Location in Magento 2

In the previous articles, we gave you some explanation about configuration in store details section of Magento 2. To continue providing other details about basic configuration, this article today will show you a quick introduction of merchant location in Magento 2.

What is Merchant Location?

Merchants are known as the wholesalers or retailers who may purchase goods from other sources for the purpose of resale to anyone to make profit. In Magento 2, configuring the merchant locale is the first step for setting payment methods. After that, you can customize payment methods as wish by expanding provided selections. If no value is entered into the merchant location part, the default country setting from general configuration is utilized.

merchant location

Configure the Merchant Locale

You can easily set the merchant position by following this instruction:

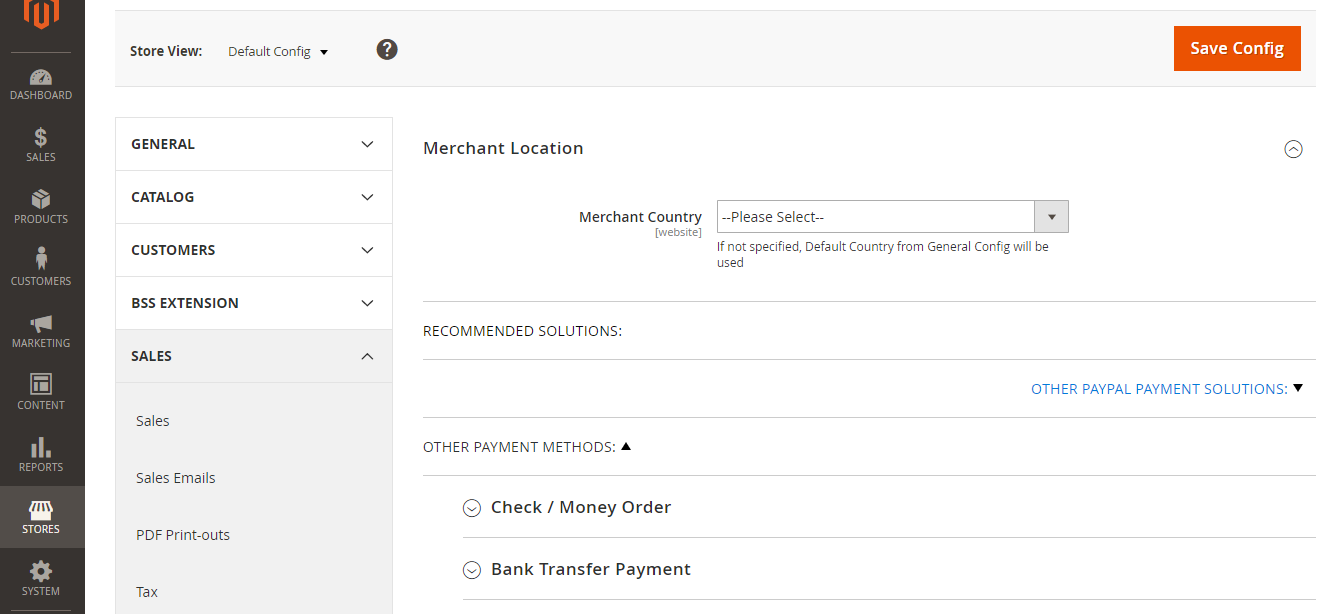
  1. Select Stores on the Admin sidebar -> Tap Configuration under Settings.
  2. Choose Sales in the left panel -> Scroll down and select Payment Methods section.
  3. Widen the Merchant Location area and then choose any country as your Merchant Country from the existing list.
  4. Click Save Config to finish all steps.

In Conclusion

Provided above is the quick introduction of merchant location in Magento 2. We hope that you can get useful information about the merchant locale section in this article. If you have any question about merchant location or any topics relating to Magento 2, please feel free to contact us. Lastly, don’t forget to share and follow our site to receive more interesting articles.

How to Customize Country Options in Magento 2

In the previous articles, we gave you detailed information about locale options, state options and how to configure them in Magento 2. This article today will show you how to customize country options in Magento 2.

magento2-country-options

Introduction of Country Options

The country options determine the country where you locate your business and the countries from which you accept orders. With the country options section, you can set default country, allow countries that doesn’t require ZIP/Postal code, European Union countries and top destinations list.

To Configure the Country Options for your store

  1. Choose Stores on the Admin sidebar -> Tap Configuration under Settings.
  2. In the left panel, select General under General.
  3. Widen the Country Options and do the following:

a. Determine the Default Country where your business is located from the existing list.
b. In the Allow Countries list, decide each country from which you accept payment. All countries in the list are marked by default. You can hold down the Ctrl (PC) or Command (Mac) key to select many countries at a single time.
c. In the Zip/Postal Code is Optional for section, select each country where you do business that doesn’t need a ZIP or Postal code entered as a part of the street address.
d. In the European Union Countries part, choose each country from the EU countries list where your business is conducted. By default, all EU countries are selected.
e. In the Top Destinations field, you can target the primary countries for sales by choosing the adequate countries from the list.

  1. Click Save Config to finish all steps.

In Conclusion

Provided above is the instruction of configuring the country options in Magento 2. If you have any question, please feel free to ask us and keep following our site to receive other useful Magento 2 guides.

Magento 2 Configurations, Product Reviews, and Images & Videos

When creating a Magento 2 productConfigurations, Product Reviews, and Images & Videos are the first three sections that contain more detailed information.

Configurations

From the Configurations section, you can see all the variations of a product that are created based on different colors, sizes, etc. You can also create new variations for later use with the Configurable Product type.

product-configurations

Product Reviews

The Product Reviews part shows the whole reviews that customers have submitted. Detailed information like product name, SKU, review status, date created, customer’s name, and so on are displayed in a grid when you expand the section. It is very important to note that this section only appears for an existing product, which has been available in your online store.

Magento-product-reviews

Images and Videos

The Images and Videos section allows you to do the very fundamental tasks related to product visual images and any audio files. You can upload more than just one image for each product, then set the order for them, and manage how each of them is used. For more complicated settings, you can open the image in detail view by clicking the “Base”/ ”Thumbnail” / ”Small” button and set to your preferences. The Magento default uses temporary images as placeholders until the permanent product images become available.

product-images-videos

To upload an image or video, do the following:

  1.  Open the product in the backend mode
  2.  Move downward and expand the Images and Videos section.
  3.  There are two methods to add a product image/ or video:
  • Select an image from your computer, then drop it on the camera symbol.
  • Tap the camera icon, then navigate to the image file on your computer. After that, select the image, and tap Open to upload it.
  1.   When you finish all the settings, tap Save to confirm all the changes.

In short, here are all the details about Magento 2 Configurations, Product Reviews, and Images & Videos we want to share with you. If you want to add or erase any item in this FAQ list, feel free to contact us. Don’t forget to Like, Share, and Subscribe to Magestandard for more informative Magento extension review articles.

An Easy Guide to Set Up State Options in Magento 2

The state, province or region is considered as a necessary part of a postal address in many countries in the world. In this article, we will show you how to set up state options in Magento 2.

magento2-state-options
magento 2 state options

Details about State Options

The state or province is the information used for shipping and billing information, to calculate tax rates and so on. However, there are some countries where the state is not required. With these countries, the field can be totally ignored from the address or added as an arbitrary field.

In addition, there are differences between typical address formats of countries. Hence, you can also customize the template that is utilized to form the address for invoices, packing slips, and shipping labels.

How to Configure the State Options

  1. Choose Stores on the Admin sidebar -> Tap Configuration under Settings.
  2. Select General under General part in the left panel.
  3. Widen the State Options field and do this instruction:

a. In the State is Required for section, choose each country where region/state is a compulsory entry from the existing list.

b. Set the Allow to Choose State if It is Optional for Country part to one of the following options:

  • “Yes”: Adding the State section as an optional entry for countries where the state part is not obligatory.
  • “No”: Eliminating the State section in countries where the state part is not needed.
  1. Select Save Config to finish.

In Conclusion

We have shown you an easy guide to customize the Magento 2 state options . Please feel free to contact us if you have any query and don’t forget to follow our other articles to get more information about Magento 2.