A Few Points to Note When Importing Data in Magento 2

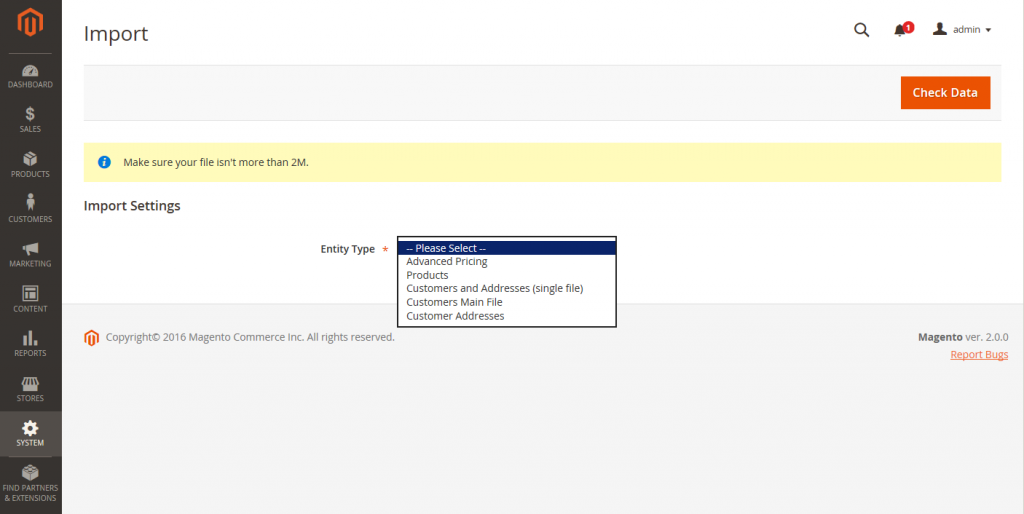
When importing data in Magento 2, you will surely meet some mistakes and trouble to complete your work. To help you know more about the obstruction and find the way to deal with this issue, we are pleasant to list some specific notes when importing data in Magento 2 below. Hope that it will be useful for your work.

New entities

New entities are added with the attribute values which are designated in the CSV file.
A new entity cannot be imported if it has no value or the value is invalid or no default value is set for a required attribute.
If there is no value or there is an invalid value, as for a required attribute with the default value set, so the entity which is the corresponding row or rows is imported, and the default value is set for the attribute automatically.
The complicated data is invalid leading to the entity which is corresponding row or rows cannot be imported in Magento 2.

Existing Entities

Attributes replace the existing values if attributes are not one of these types: complex data, the values from the import file, attributes including the empty values for the non-required attributes.
If a required attribute is no value or invalid value, so the existing value cannot be replaced.
If the entity contains the complex data which is non-valid, the entity cannot be imported. But when Delete Entities was chosen in the Import Behavior drop-down menu, the entity still can be imported in Magento 2.

Complex Data

If an attribute that is designated in the import file already exists and its value is assumed from a defined set of values, there are two following cases:
The row can be imported and the default value is set for the attribute if the value is not already included in the defined set of values.
The corresponding row cannot be imported if the value is already included in the defined set.
If an attribute that is designated in the import file but it is not defined in the system yet, it is not created and its values are all not imported in Magento 2.

Invalid Files

A file cannot be imported if it contains invalid rows.
An invalid file is a file which contains a non-existing service data or complicated data name designated in the import file. For example: a column with a _ heading.

In short, here are all the details aboout Importing Data in Magento 2 we want to share with you. If you find it helpful for you, please Like, Share and Subscribe to keep updating for more upcoming blogs!

Four Simple Steps to Complete Import Data in Magento 2

Import Data in Magento 2 allows users to add the data of product, customer, customer address, and product image into the store under three supports of import in Magento 2: Add/Update, Replace Existing Complex Data and Delete Objects. To learn exactly the way to import a CSV file in Magento 2, please take attendance on fours simple steps that we show below.

Step 1: Arrange the Data

  1. Open the admin homepage, click System on slidebar. Then choose Import under Data Transfer field.
  2. After that,  Import Settings field firstly comes out , choose one of five options including Advanced  Pricing, Products, Customers and Address, Customers Main File and Customer Addresses for Entity Type.

  1. After that, click Download Sample File and open it. The Sample file recommends structure of a standard import file.
  2. Prepare your CSV import file, make sure that it meets requirements following the sample file and it’s size does not exceed the limit shown in the message.
  3. When you desire to add links to product into the import data, you might upload the image files to the correct location. By default, location on the Magento server is: pub/media/import.

If the image locate on an external server, ensure to give the full URL to the directory including the images.

Step 2: Set the Import Behavior

  1. Select Import Behavior you want with one of the following:
  • Add/Update
  • Replace Existing Complex Data
  • Delete Entities

  1. Fill number of errors to halt import process in Allow Errors Count field
  2. Accept the default value of a comma (,) for Field separation and Multiple value separator. Because, in a CSV file, a comma is fixed as a default separator. If you are in need of using another character, the data in the CSV file must match the character that you designate.

Step 3: Identify the Import File

  1. Click Choose File button to select the file to import.
  2. Select CSV file you want to import and tap Open
  3. If the import data contains links to product images, fill the link to the uploaded images on the Magento server or the full URL to the images on another server on Images file Dictionary field.

Step 4: Check the Import Data

  1. Click Check Data button in the upper right corner.
  2. The validation process takes a few minutes to complete. Then, you will see import success message if the import data is valid.
  3. Tap Import to continue if the file is valid or correct all errors with description in the messages and try to import file again.
  4. The import process works till the end of the data. If an error message comes out in the Validation Results, try to fix and import again.

Import Data

A message appears when the import is totally completed.

After finishing data import into the store, all of the information about import process will be fully maintained in Import History field with the start date and time, user, execution time and a link to the import file.

To view the import history, please open Admin homepage, click System on slide bar, then under Data Transfer, choose Import History and the record of data will display after that.

Import Data

If you find it helpful for you, please Like, Share and Subscribe to keep updating for more upcoming blogs!


An Overview of Data Validation in Magento 2

What is Data Validation in Magento 2?

Data validation which can be understood as the checking process for all data before importing into store is completed to assure that the values are appropriate with the system database. To start Data Validation, in the admin homepage, click System, choose Import under Data Transfer, after that, Import field appears with Check Data button in upper-right corner, tap on that button and Validation is begun. During the process, all objects in the import file have to undergo five following checking factors:

Attributes

The value of particular attribute have to be suitable with all of the requirements of the data type and column header match the equivalent attributes in the system database.

Complex Data

Verify values contained in a set, such as multiple select input or drop-down  type to ensure that all of them are defined.

Service Data

In service data columns, the values have to be persistent with standard in the system database.

Required Values

As for new objects, Data Validation does check the existence of required attribute values in the file but does not need to do with existing entities.

Separators

Data values in a CSV file are decided by comma, and text values are putted inside double-quotes. Verify separators and sets of quotes that insert character series to make sure that  all of them are correctly formatted .

Validation Result

After checking process, the result appears with three information below:

  • The number of objects verified
  • The number of invalid rows
  • The number of errors found

If the data is valid, you will see  “Import Success” message displays.

If the data is not valid, the description of each error comes out, please read and fix the problem in import file to reach a valid database.

Apperance of Data Validation Messages in Magento 2

Success Message

Success Import Message

Data Validation Data Validation Data Validation Data Validation

Some errors in import file 

In short, here are all the details and reviews about  Data Validation we want to share with you. If you find it helpful for you, please Like, Share and Subscribe to keep updating for more upcoming blogs!