A Detailed Explanation of Message Inbox in Magento 2

When you log in the Admin account, you sometimes receives messages from Magento on a regular basis. In this article, you will have an introduction of Message Inbox in Magento 2.

message-inbox-magento

What is Message Inbox?

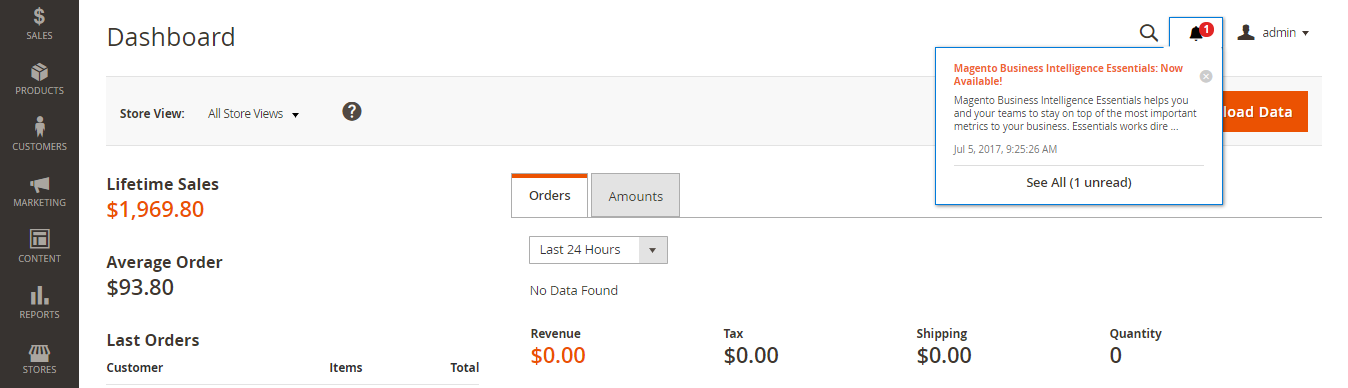
The bell icon in the header displays notifications of unread messages in your box. The content of messages includes patches, new releases, system update and forthcoming events.

Regarding messages of critical importance, they keep appearing in a pop-up window whenever you sign into your account. These notifications disappear only when you mark them as read or remove them.

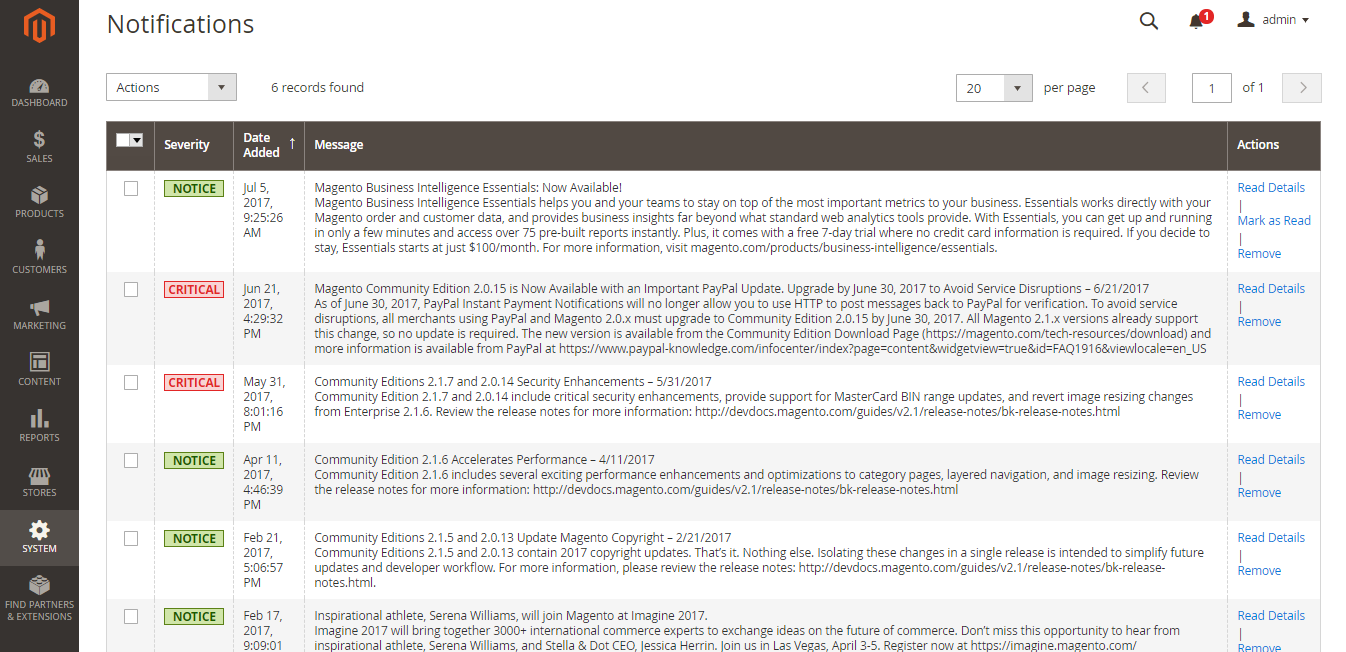
With the notice grid lists, you can see all messages and carry out actions such as viewing detailed information, marking messages as read and deleting them from the inbox. Moreover, notifications are rated by severity and shown with the most recent at the top.

Message Inbox In Magento 2

Explore Incoming Messages

  1. Click the bell icon in the header then read the summing-up and do any of these options:
  • Tap the message to view full content if needed
  • Choose the delete icon on the right of the message to remove the messsage
  • Select See All to show the Notifications grid
  1. In terms of urgently important messages, do one of the following:
  • Tap Read Details
  • Click Close to remove the popup but keep the message active

See All Notifications

  1. Do one of two choices:
  • Click the Notification icon in the header -> Choose See All in the footer of the summary
  • Select System on the Admin Sidebar -> Tap Notifications under Other Settings
  1. Do one of the following in the Action column
  • Click Read Details to view more information (a new window including the linked page exists)
  • Choose Mark As Read to hold the message in your inbox
  • Use Remove tab to erase the message
  1.  If you want to apply an action to many message, choose one of two options:
  • Mark the checkbox of each message you need in the first column
  • Set the Mass Actions control to choose multiple messages
  1. To set the Actions control, do any of the following:
  • Mark as Read
  • Remove
  1.  Click Submit to finish the process

Configure Notices

  1. Choose Stores on the Admin Sidebar -> Select Configuration under Settings
  2. Tap System under Advanced in the left panel
  3. Widen the Notifications part and do these steps:
  • Apply Yes to Use HTTPS to Get Feed if your store Admin runs over a secure URL
  • Set Update Frequency to choose how often your inbox is updated and the interval can be from one to twenty-four hours
  1. Select Save Config to complete

We have presented about Message Inbox in Magento 2.  We hope that you have had the details about message inbox in Magento 2. If you need any help, please feel free to contact us.

A Full Guide of Exporting Data in Magento 2

Magento 2 supports users to export data from system. When you successfully export data follow your requirements and open it in a spreadsheet in many time and become familiar with the process, you will realize that export process helps you a lot in managing large amounts of database. To back you clearly know about this process, we would like to show you a full guide of exporting data in Magento 2 below.

Exporting Data in Magento 2

  1. On the admin homepage, slide bar, click on System symbol. After that, choose Export under Data Transfer.
  2. When the Export Data Setting sector displays, do the following:
  1. In the Entity Type field, choose one of those options: Products, Customers Main File and Customer Address.
  2. Set the default of CSV file for Export File Format.Exporting Data in Magento 2
  1. In the Entity Attributes section, all the available attributes are listed alphabetically. If you want to search for specific attributes and sort the list, you can use the standard list control in Magento 2 to support. The Search and Reset Filter controls can control the appearance of the attributes list but cannot influence the selection of attributes to be contained in the export file.
  2. If you want to filter the exported data which is based on attribute value, do the following:
  • In order to export only data involving specific attribute values as wish, please enter the value you want in the Filter column.Exporting Data in Magento 2
  • If you intend to export data without some attributes, mark the attributes you want in the Exclude checkbox at the beginning of the row. For example, to exclude SKU and image columns, choose the checkbox of SKU and image as well. The column two normally appears in the export file with non-value.
  1. When finishing all of four steps above, scroll down and click Continue button in the lower-right corner of the page.

After all, find the download prompt in the lower-right corner of your browser. Click on it and wait for download success. The exported CSV file can be saved and opened under a spreadsheet shape. Moreover, you can freely edit the data as wish and import it back into your store.

In short, here are all the details about Exporting Data in Magento 2 we want to share with you. If you find it helpful for you, please Like, Share and Subscribe to keep updating for more upcoming blogs!


A Few Points to Note When Importing Data in Magento 2

When importing data in Magento 2, you will surely meet some mistakes and trouble to complete your work. To help you know more about the obstruction and find the way to deal with this issue, we are pleasant to list some specific notes when importing data in Magento 2 below. Hope that it will be useful for your work.

New entities

New entities are added with the attribute values which are designated in the CSV file.
A new entity cannot be imported if it has no value or the value is invalid or no default value is set for a required attribute.
If there is no value or there is an invalid value, as for a required attribute with the default value set, so the entity which is the corresponding row or rows is imported, and the default value is set for the attribute automatically.
The complicated data is invalid leading to the entity which is corresponding row or rows cannot be imported in Magento 2.

Existing Entities

Attributes replace the existing values if attributes are not one of these types: complex data, the values from the import file, attributes including the empty values for the non-required attributes.
If a required attribute is no value or invalid value, so the existing value cannot be replaced.
If the entity contains the complex data which is non-valid, the entity cannot be imported. But when Delete Entities was chosen in the Import Behavior drop-down menu, the entity still can be imported in Magento 2.

Complex Data

If an attribute that is designated in the import file already exists and its value is assumed from a defined set of values, there are two following cases:
The row can be imported and the default value is set for the attribute if the value is not already included in the defined set of values.
The corresponding row cannot be imported if the value is already included in the defined set.
If an attribute that is designated in the import file but it is not defined in the system yet, it is not created and its values are all not imported in Magento 2.

Invalid Files

A file cannot be imported if it contains invalid rows.
An invalid file is a file which contains a non-existing service data or complicated data name designated in the import file. For example: a column with a _ heading.

In short, here are all the details aboout Importing Data in Magento 2 we want to share with you. If you find it helpful for you, please Like, Share and Subscribe to keep updating for more upcoming blogs!

How to Work with CSV Files in Magento 2 ( Part 2 )

In the How to work with CSV Files in Magento 2 Part 1, we have mentioned about the definition of CSV, feature of CSV and Product CSV Structure in Magento 2. So, in this part, we would like to complete the topic by showing the details about Customer CSV Structure in Magento to make you have a full insight into the way to work with CSV files in Magento 2.

Customer CSV Structure

A Customer CSV file fully contains customer information that they have provided from the database as their email, name, address, phone number, customer group, etc. Furthermore, Customer CSV Structure has the following form.

Customer CSV Files Structure

By default, the first row of the table always contains the names of the column attributes representing for below information of each column. Look at the image below, you can see there are two types of column names with forms are like <attribute name> and _<name>. Column headers beginning with an underscore include service entity properties or complicated data. However, service columns are not attributes of customer.

Other rows provide information of attribute values, service data and complicated data. Each row can represent customer data in three situations: with data, without address data, or only the address data. If no more than address data is filled in a row, Customer CSV files will neglect or let the other information in different columns which contain the customer profile empty.

If you want to add or replace more than one address for a customer, you can open the import customer file, add row with the number match with the amount of empty and new customer data or updated address data which is in need to interact under the customer data row.

If you find it helpful for you, please Like, Share and Subscribe to keep updating for more upcoming blogs!


How to work with CSV Files in Magento 2 ( Part 1 )

What is CSV Files in Magento 2?

CSV Files is called as a short name of the comma-separated-value file format. It works like data transfer operation bases which is supported by all spreadsheet and database applications. Magento provides 2 file types of the comma-separated-value which are CSV and ZIP ( a compressed CSV file), therein, both CSV and ZIP are supported for import data, only CSV is supported for export data.

Feature of CSV Files in Magento 2

CSV Files have a particular construction that must absolutely match the database. Each column heading represents for a particular Attribute of the field. For example, name column show what the name of those products are, status column illustrates product’s current situation, etc. Moreover, we recommend you export the database from your store under a CSV Files’s construction to make sure that there is no column heading that Magento can read.

If you use a text editor to open an exported CSV file, you will see that values are isolated by commas, and multiple values are put inside double-quotes. During import, you can choose a custom separator character you want, thought a comma is the default.

To get more insight about CSV Files in Magento 2, please take attendance to the Product CSV Structure as well as Customer CSV Structure part right below.

Product CSV Files Structure in Magento 2

A full export of the product database gives you information about each product in the catalog, and the relationships between them. In that type of record, each column corresponds to the fixed attributes in the catalog.

Product CSV Files structure

The first row of the table which includes the names of each attribute is used as column headers. The remaining rows illustrate the particular product databases like store view code, product type, categories, description,…Any row that starts with a value in the SKU column is the beginning of a new product document. A individual product has to contain several rows that show data about multiple images or product options. The next row that has a value in the SKU column begins a new product.

The category column accommodates a path for each category which the product is selected. The path contains the root category, followed by a forward slash (/) between each level. By default, this “|” mark is used to isolate different category paths. For example: Default Category/Gear|Default Category/Gear/Watches which means that that product is putted in Watches Products Page in  Gear Category from Default Category.

If you want to import data, you only need to set the SKU and columns including changes. All of blank columns are neglected during the import process. You also can include only existing attributes as well.

To get more information about Customer CSV Files Structure, see Working with CSV Files part 2.