4 Steps To Control Cache Management In Magento 2 Admin Panel

In this chapter, we will describe performing routine index and cache management operations, back-up the system, and use tools that help Support team troubleshoots and fix problems.

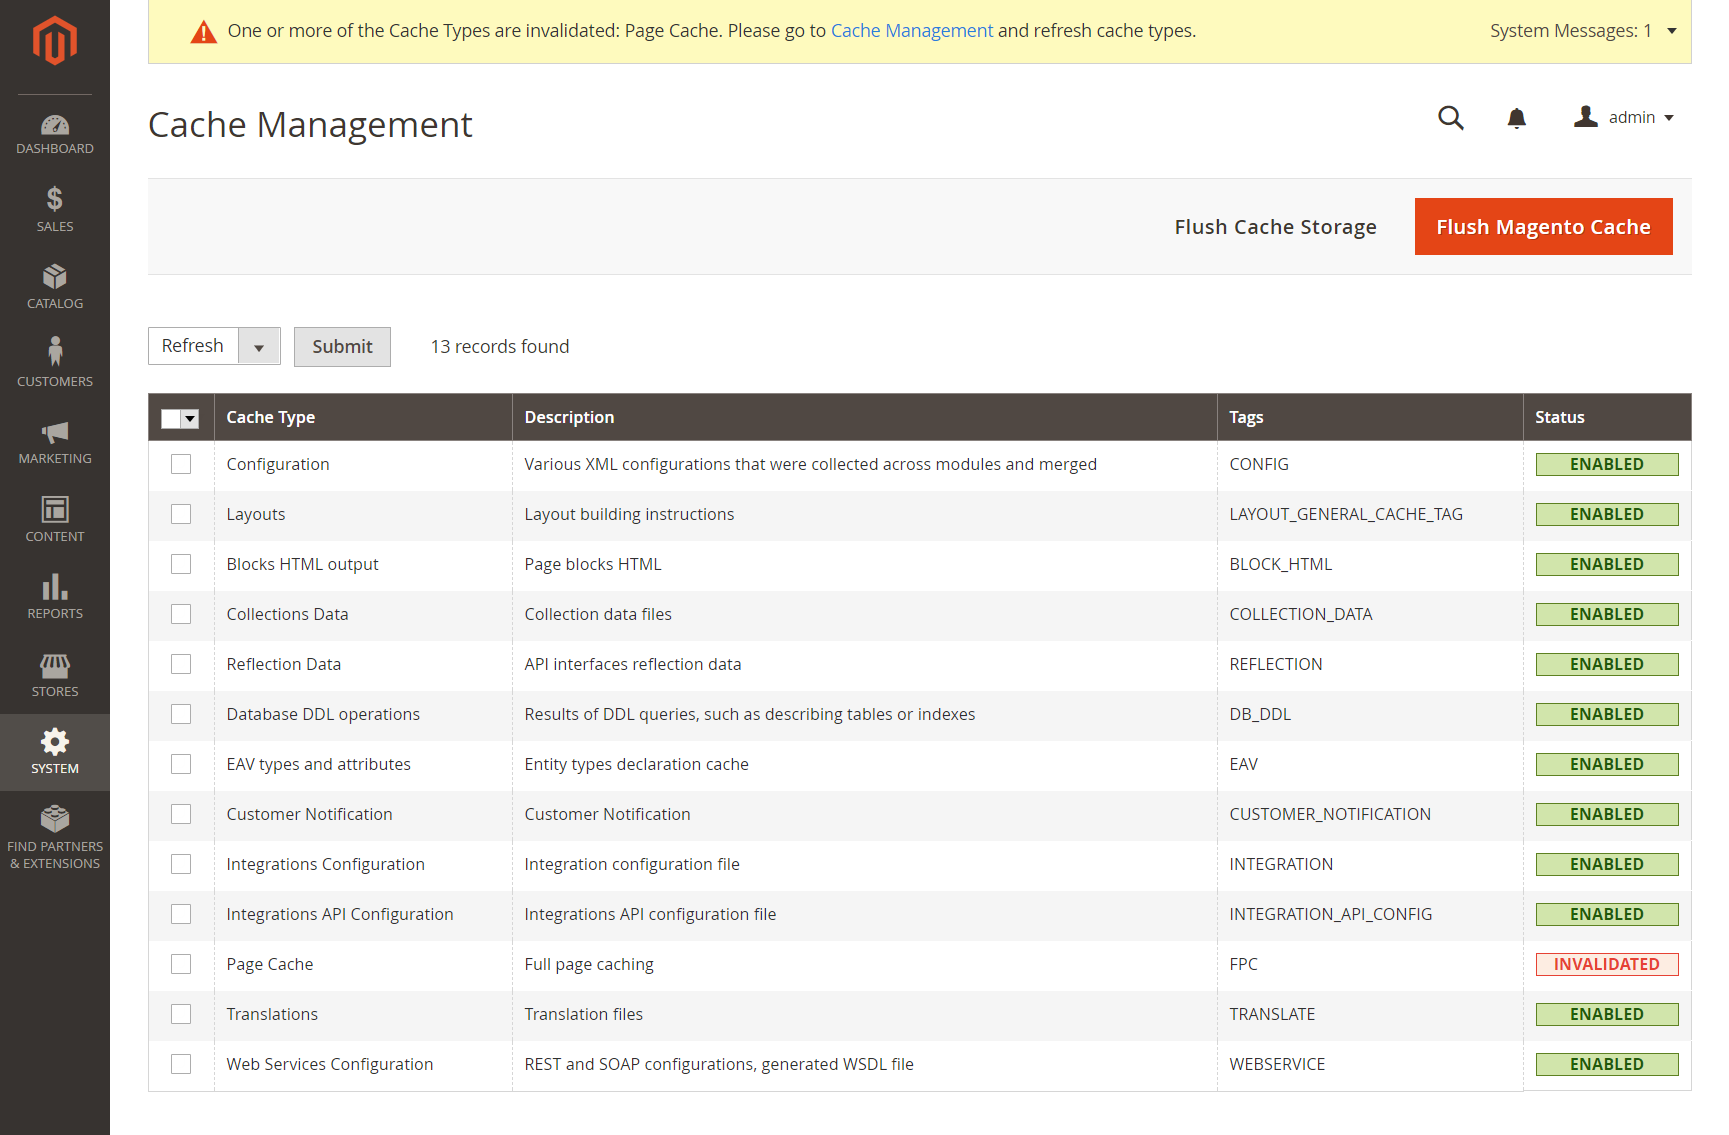
In Magento 2 default installation, the cache management system is an easy way to enhance the performance of your website. You can click the link to cache management and refresh the invalid caches instead of using the command code.

product-attribute-save-msg-update-cache

The status of each primary cache and its associated tag displayed in the Cache Management page. Refresh your browser after clearing cache to see the most recent files.

Cache Management Role Resources allows store administrators to assign access to specific cache maintenance actions to users.

system-permissions-role-resources-cache-management

  • Follow these steps to refresh specific caches:system-cache-management-invalid
  1. Click the Cache Management link
  2. On the Admin sidebar click System > Cache Management

Mark the checkbox to select the cache you want to refresh, set the action to Refresh and click Submit.

  • Follow these steps to mass action:

Set Mass Action to Select All or Select Visible, tick the checkbox of each cache to be targeted by the action, set action to refresh and click Submit.

  • Follow these steps to flush the product image cache:

In the Cache Management page, click Flush Catalog Images Cache to delete pre-generated product image files. You will see the message “Image cache was cleaned”

Remember to also clear browser cache.

  • Follow these steps to flush the JavaScript/CSS cache:

In the Cache Storage Management page, under Additional Cache Management, click Flush JavaScript/CSS Cache to clear JavaScript and CSS files that have been merged into a single file. Don’t forget to clear your browser cache.

  • Control Descriptions
CONTROL DESCRIPTION
Mass Actions Tick the checkbox of multiple caches. Options include

Select All Tick the checkbox of all caches.
Unselect All Clears the checkbox of all caches.
Select Visible Tick the checkbox of all visible caches.
Unselect Visible Clears the checkbox of all visible caches


Actions Decide the action to be applied to all selected caches. Options include:

Enable Enables all selected caches.
Disable Disables all selected caches.
Refresh Refreshes all selected caches.


Submit Applies the action to all selected caches.
  • Cache Description

BUTTON DESCRIPTION
Flush Magento Cache Deletes all items in the default Magento cache (var/cache), according to their associated Magento tags.
Flush Cache Storage Deletes all items from the cache, regardless of Magento tag. If your system uses an alternate cache location, any cached files used by other applications are removed in the process.
Flush Catalog Images Cache Deletes all automatically resized and watermarked catalog images that are stored at media/catalog/product/cache. If recently uploaded images aren’t reflected in the catalog, try flushing the catalog and refreshing your browser.
Flush JavaScript/CSS Cache Deletes the merged copy of JavaScript and CSS files in the cache. If recent changes to the CSS or JS aren’t displayed in your online store, try flushing the JavaScript/CSS cache and refreshing your browser.
Flush Static Files Cache Deletes preprocessed view files and static files.
  • Cache Management Role Resources

CACHE DESCRIPTION
Configuration Various XML configurations that were collected across modules and merged. Associated Tag: CONFIG

System: config.xml

local.xml

Module: config.xml


Layouts Layout building instructions.

Associated Tag: LAYOUT_GENERAL_CACHE_TAG

Blocks HTML output Page blocks HTML. Associated Tag: BLOCK_HTML
Collections Data Collection data files. Associated Tag: COLLECTION_DATA
Reflection Data Clears API interface reflection data, that is typically generated during runtime.
Database DDL operations Results of DDL queries, such as describing tables or indexes.

Associated Tag: DB_DDL

EAV types and attributes Entity types declaration cache. Associated Tag: EAV
Customer Notification Temporary notifications that display in the user interface.
Integrations Configuration Integration configuration file. Associated Tag: INTEGRATION
Integrations API Configuration Integrations API configuration file.

Associated Tag: INTEGRATION_API_CONFIG

Page Cache Full page caching. Associated Tag: FPC
Translations Translation files. Associated Tag: TRANSLATE
Web Services Configuration REST and SOAP configurations generated WSDL file.

Associated Tag: WEBSERVICE

RESOURCE
Cache Management
Clean Cache Actions

Flush Cache Storage

Fluch Magento Cache

Cache Type Management

Toggle Cache Type

Refresh Cache Type

Additional Cache Management

Catalog Images Cache

Flush Js/Css

Flush Static Files


How To Configure Action Log In Magento 2 Admin Panel

In the previous article, we describe tutorial on configuring Browser Capabilities Protection. In this article, we will describe how to configure Action Log in Magento 2 admin panel.

The Action Log allows store administrators to track activities of other administrators in your stores. For most events, the action, the user who performed action, the result of the action, and the ID of the object on which the action was performed are included in the available information. Action Log is very important for your Magento 2 online store because you can track activities of administrators effectively and manage their actions. Furthermore, you can detect if hackers are hijacking right to control your website or not, and remove them out of your admin roles as fast as you can. So you have to configure action log and tracking every single action of other store administrators carefully.

To configure the Action Log, you have to follow these steps:

On the admin sidebar, click Stores. Under Settings, click Configuration.

On the left of the panel under Advanced, click Admin.

Open the Admin Actions Logging, select and mark any checkbox to enable actions logging as you want. There are 17 actions logs to choose in the global scope, so you have to choose wisely and do not miss anything.

Click Save Config after completed.

Above is a tutorial on how to configure action log in Magento 2 admin panel. We hope that you will know how to select action logs, oversee the action of other administrators carefully, manage other store administrators under your command and run your online store smoothly. If you have any question or have any edit request, feel free to leave a comment or contact us directly. In the next article, we will describe tools and cache management in Magento 2. See you in the next blog post.


How To Configure Browser Capabilities Detection In Magento 2 Admin Panel

Similar to other websites and applications, Magento requires that customers allow cookies and JavaScript. However, sometimes users set the browser to the highest privacy setting that cookies and JavaScript are not allowed. You can configure your store to check the capabilities of each visitor’s browser, and send a notification to browsers if settings need to be changed.

  • Cookies disallowed: Store administrators can configure the system to redirect customers to Enable Cookies page automatically, which describes how to make the recommended settings with most browsers.
  • JavaScript disallowed: Store administrators can configure the system to display the message on the header of every page.

To configure browser capabilities detection, follow these steps:

On the admin sidebar click Stores, under Settings click Configurations.

On the left of the panel under General, click Web.

Open the Browser Capabilities Detection tab and do these steps:

  • Set Redirect to CMS-page if Cookies are Disabled to “Yes” to display guidelines that describe how to configure the browser to allow cookies.
  • Set Show Notice if JavaScript is Disabled to “Yes” to display an alert notification banner on the header when JavaScript is disabled in the browser.

config-general-web-browser-capabilities-detection

  • Click Save Config after completed.Above is a tutorial on configuring browser capabilities detection in Magento 2 admin panel. We hope that you can display the most recommended settings and provide the best experience for your customers. If you have any question or have any request, please leave a comment or contact us directly. On the next article, we will describe a complete guideline of action log for store administrators using Magento 2 platform. So like and share if you think this article is useful, and don’t forget to subscribe Magestandard to tracking our Magento 2 tutorial article. See you in the next blog post.

How To Configure Session Validation In Magento 2

In Magento Open Source default installation, you can validate session variables to avoid session fixation attacks, or attempts to infect or sniff user sessions. The Session Validation Settings decide how to validate session variables during each store visit, and if the session ID is added to the URL of your online store.

config-general-web-session-validation-settings

The validation checks to see that visitors are who they say they are by comparing the value in the validation variables with the session data that is saved in $_SESSION data for the user. If the information is not transferred as expected, and the corresponding variable is null, that means validation fails. Depending on the session validation settings, if a session variable fails the validation step, the client session immediately terminates.

Enabling all of the validation variables can help prevent attacks, but might also decrease the performance of the server. In the default installation, all session variable validation is disabled. We recommend that you test with the settings to find the best combination for your Magento installation. Activating all of the validation variables might prove to be unduly restrictive, and prevent access to customers who have Internet connections that pass through a proxy server, or that originate from behind a firewall. To learn more about session variables and their use, see the system administration documentation for your Linux system.

To configure the Session Validation Settings:

On the Admin sidebar, tap Stores > Under Settings, click Configuration > On the left of the panel under General, click Web. > Open the Session Validation Settings tab. Then, follow these steps:

  • Set Validate REMOTE_ADDR to “Yes” to verify that the IP address of a request matches what is stored in the $_SESSION variable.
  • Set Validate HTTP_VIA to “Yes” to verify that the proxy address of an incoming request matches what is saved in the $_SESSION variable.
  • Set Validate HTTP_X_FORWARDED_FOR to “Yes” to verify that the forwarded-for address of a request matches what is saved in the $_SESSION variable.
  • Set Validate HTTP_USER_AGENT to “Yes” to verify that the browser or device that is used to access the store during a session matches what is saved in the $_SESSION variable.
    • Set Use SID on Frontend to “Yes” if you want a user to stay logged in while switching between stores, set Use SID on Frontend to “Yes.”

    If including SID with analytics, you must configure your analytics software to filter the SID from URLs, so the page visit counts are correct.

  • Click Save Config.

How To Use The Encryption Key In Magento 2

To protect passwords and other important data, Magento uses an encryption key. An industry-standard Advanced Encryption Standard (AES-256) algorithm is used to encrypt all data that requires decryption. This includes credit card data and integration (payment and shipping module) passwords. Besides, this algorithm is used to hash all data that does not require decryption.

During the process of installation, you are allowed to either let Magento generate an encryption key itself, or you can create one of your own. The Encryption Key tool allows you to change the key as needed. The encryption key should be turned on to improve security, as well as at any time the original key might be compromised. Whenever the key is changed, all legacy data is re-encoded using the new key.

For technical information, see Install the Magento software in the developer documentation.

system-encryption-key

In this article, we will describe how to make a file writable and how to change the encryption key in Magento 2 admin panel.

Step 1: Make the File Writable

Make sure that the file in

[your store]/app/etc/env.php is writable to change the encryption key

Step 2: Change the Encryption Key

  1. On the Admin sidebar, tap System. Then under Other Settings, choose Manage Encryption Key.
  2. Do one of these steps: To generate a new key, set Auto-generate Key to “Yes.” To use a different key, set Auto-generate Key to “No.” Then in the New Key field, enter or paste the key that you want to use
  3. Tap Change Encryption Key.
  4. Save a record of the new key in a safe place. It will be required to decrypt the data if any problems occur with your files.Above is a tutorial on how to use the encryption key in Magento 2 admin panel. We hope that you can make your web store secure. See you in the next post.