An Useful Information about Scope in Magento 2

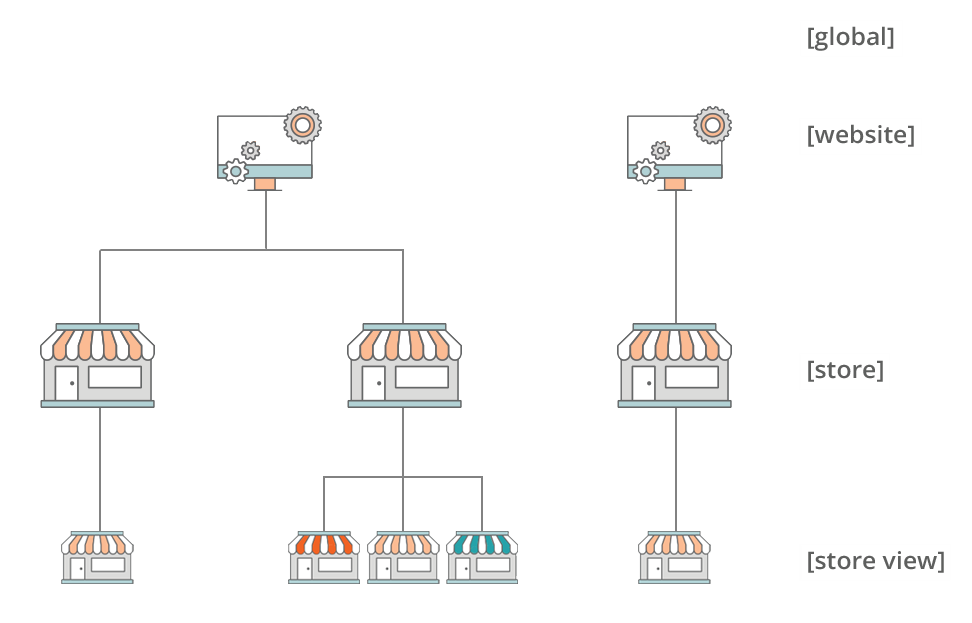
In this article, we will describe information about “scope” in Magento 2 hierarchy. If your Magento 2 installation has a system of websites, store or views, you can configure the setting, or “scope” of the configuration setting to apply to a specific part of the installation. You can also assign a specific scope using a system of many database entities to decide how it is used in the store system.

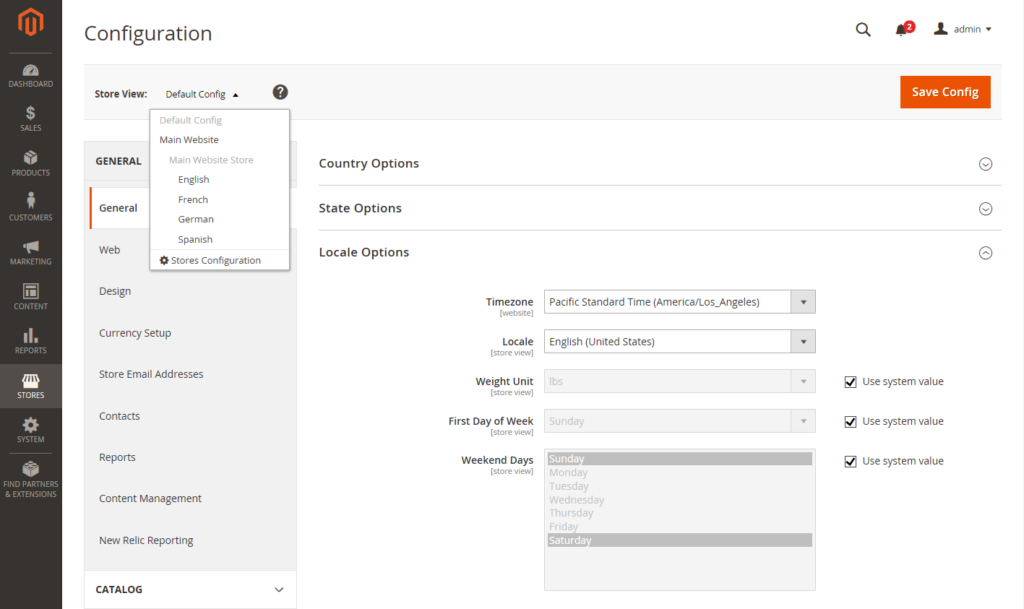
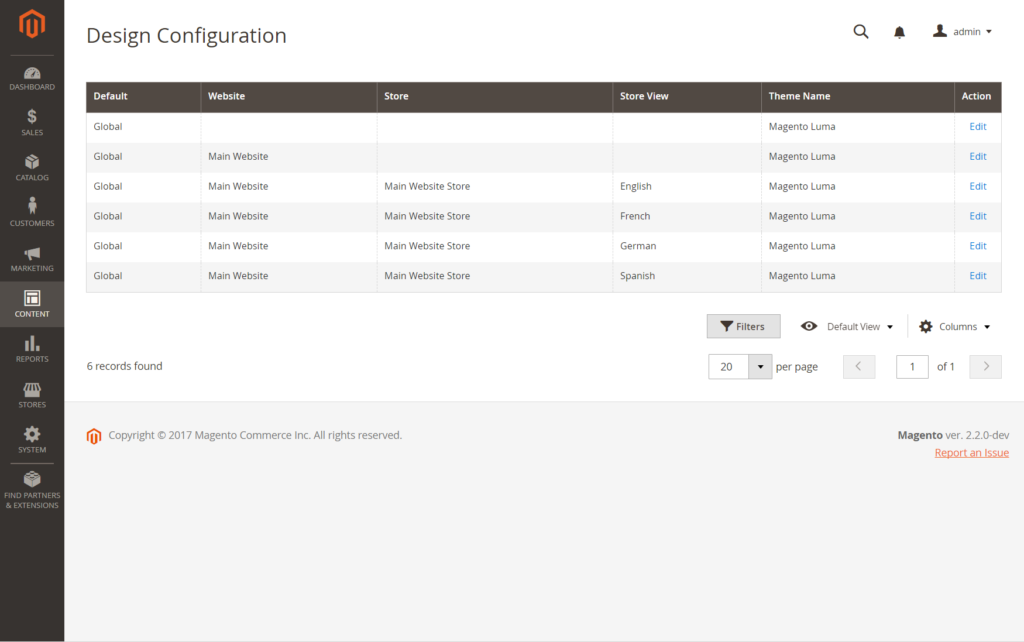
Because the same value is used throughout the system, this is the reason why some configuration settings such as postal code have a [global] scope.  Any lower stores than that level in the Magento system is applied to the [website] scope. You can set any item with the scope of [store view] differently for each store view that is typically used to support multiple languages.

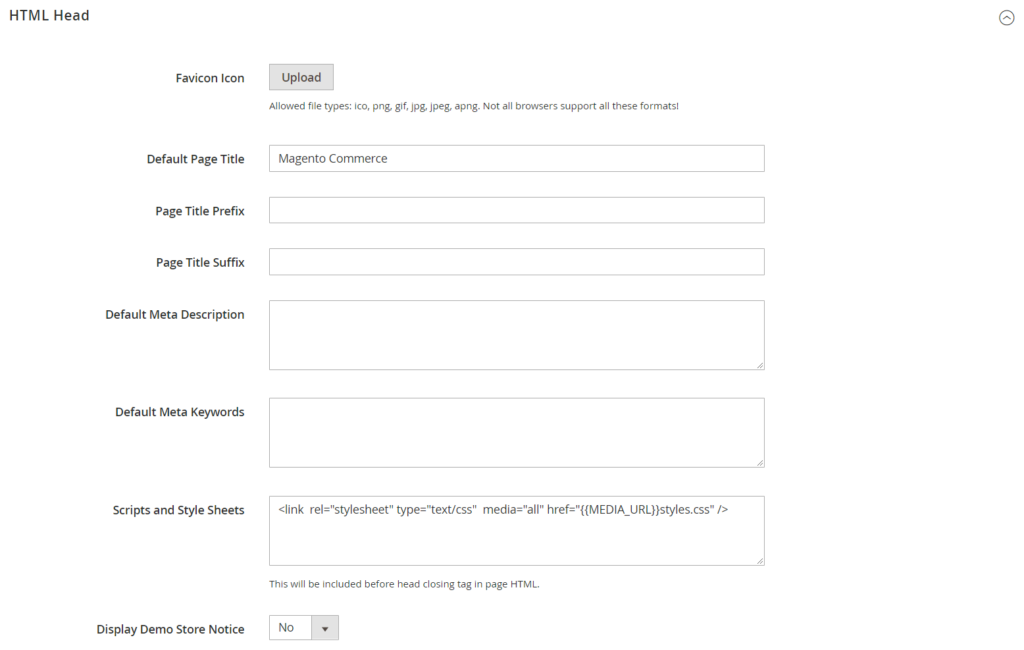
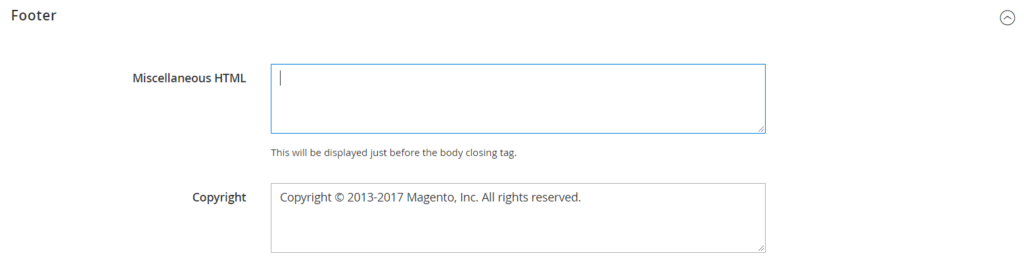
Below the field label, the scope of each configuration setting will display as small text, unless the store is running Single Store Mode. You should always select the Store View where the settings apply before making any changes if multiple websites are included in your installation.

scope-multisite_thumb_0_0
Hierarchy of Websites, Stores, and Store Views

Scope Settings

Scope Description
Global Throughout the Magento installation, settings and assets that are available
Website Only in a current website that settings and assets are limited. Each website has a default store.
Store Only in a current store that settings and assets are limited. Each store has a default root category (main menu) and default store view.
Store View Only in a current store view that setting and resources  are limited

Above is an article about scope in Magento 2 hierarchy. We hope that you will find useful information. If you have any question, feel free to leave a comment. The next article will describe how to changing scope. Don’t forget to subscribe Magestandard to read the new Magento 2 article.

How to Changing Scope in Magento 2 Basic Configuration

The location of the Store View selection is in the upper-left corner of Admin pages that filters the view of the page for a specific scope, and also sets the value of some entities that are used by Magento. Each level of the hierarchy is listed by name and is used to change scope to another level. Any settings that do not represent the current scope will be grey out by the system, and only represents the current scope setting. The scope is firstly set to “Default Config”. For restricted access Admin Users, the list of available store views includes only those to which the user has permission to access. According to the current scope, the default setting can be either applied or overridden by using the checkbox on the right of many configuration settings. When you mark the checkbox, the field value cannot be changed. To change the current value, first, you have to clear the checkbox, and then enter the new value. Whenever you change the scope, you must confirm. The checkbox label changes as indicated by the current range, and always alludes to the parent level which is one stage up in the order. The parent level is the holder for all items which are lower than that level, and this is the reason why the value from the parent level is inherited unless it is overridden.

store-view-control_thumb_0_0
Default Config with “Use System Value” Checkboxes

To set the configuration scope:

Follow these steps before making any changes to configuration settings that control only to a specific website, store or store view:

  1. On the Admin sidebar, follow one of these steps:

With almost configuration settings, click Stores. After that, under Settings, select Configuration.

For settings that relate to design, click Content. Under Design, select Configuration. Then in the grid, choose the applicable store view.

  1. Scroll to the configuration setting to be changed. After that, follow these steps:

In the upper-left corner, shift Store View to the specific view where the configuration applies. After confirmed scope switching, click OK.

There is a checkbox next to each field, and additional areas might become available.

Uncheck the Use system value checkbox after any field that you want to edit. After that, change the value of the view.

For each field that requires being an update on the page, repeat this process

  1. After complete, click Save Config

Store Hierarchy

LEVEL DESCRIPTION
Default Config The default system configuration.
Main Website The name of the site at the highest point of the hierarchy.
Main Website Store The name of the default store that is related to the parent site.
Default Store View The name of the default store sees that is related to the parent store.
Stores Configuration Goes to the Stores grid, and is the same as selecting Stores > All Stores from the Admin sidebar.
  • Default Value Options

CHECKBOX DESCRIPTION
Use system value When the configuration scope is changed to “Default Config.”, the “Use system value” checkbox displays
Use Default When the configuration scope is changed to “Main Website,” and refers to the default store that is assigned to the website, the “Use Default” check box displays.
Use Website When the configuration scope set to a specific store view, the “Use Website” check box displays. After marked, it uses the setting from the parent website which is related to the store view. For this situation, the store level is skipped because it is understood to apply to the default store that is related to the site.


How to Configure Store Demo Notice in Magento 2

After installing successful Magento 2, the Store Demo Notice will display on the top header of your frontend store view. If your store is online, but still under maintenance, you can display a store demo notice at the top of the page to let people know that the store is not yet open for business, so purchase functions will be disable. When you are ready to “go live,” simply remove the message. It’s like flipping the sign hanging in the window from “Closed” to “Open.” An effective way to announce customers that the store can’t serve them now and they can come back later. The format of the demo notice is determined by the theme of your store. This article will show you how to configure Store Demo Notice in Magento 2

storefront-demo-notice_thumb_0_0
Store Demo Notice

To configure the store demo notice, you have to follow these steps:

  1. On the Admin sidebar, click Content. After that, under Design, select Configuration.
  2. In the grid, find the store view that you want to configure. After that, in the Action column, click Edit.
  3. Under Other Settings, expand the HTML Head section.
  4. Scroll down to the bottom, and change the Display Demo Store Notice to your preference.
design-configuration-html-head_thumb_0_0
HTML Head
  1. After complete, click Save Configuration.

Remember to clear the cache by Magento command or using Cache Management in Admin backend otherwise the old cache will prevent the command from Administrator and the store demo notice will not follow store owner wish. When the cache has cleared, press ctrl + f5 and look at the frontend store. Now the store demo notice should appear or hide as your command.

Above is the way to configure Store Demo Notice in Magento 2 web store, if you have any question, feel free to leave a comment or contact us through email.

How to Configure Copyright Notice in Magento 2

Your Magento 2 store has a copyright notice in the footer of every page. As a best practice, the copyright notice should note the current year, and identify your company as the legal owner of all content on the site, and you have the right to manage it. Normally, your Magento 2 site will have a line of copyright notice in the footer when you finish all of basic installation, and of course you can change this line to your reference. This article will show you how to edit Copyright Notice in your Magento 2 site store.

storefront-footer-copyright_thumb_0_0
Copyright Notice

The &Copy; character code is utilized to include the copyright image, as appeared in the following example:

Long Format Example

Copyright &Copy; 2013-2017 Magento, Inc. All rights reserved.

Short Format Example

&Copy; 2017 Magento, Inc. All rights reserved.

To change the content in the copyright notice, you can follow these steps:

  1. On the Admin sidebar, Click Content. After that, below Design, choose Configuration.
  2. In the grid, find the store view that you want to configure. After that, in the Action column, click Edit, and follow these tips:
  3. Below Other Settings, open the HTML Head option.
  4. Look down to the below, and change the Display Demo Store Notice following your inclination.
design-configuration_thumb_0_0
Design Configuration
  • Below Other Settings, open the Footer option.
design-configuration-footer_thumb_0_0
Footer
  • In the Copyright box, enter the copyright notice that you want to appear in the footer of each page. Use the &Copy; character code to insert a copyright symbol.
  1. After complete, click Save Configuration.

Remember to clear the cache (in Admin backend or use Magento clear cache command), then press ctrl + f5 to refresh your site, then check the change in the frontend. The new Copyright Notice should displayed in the footer of every page in your web store.

Set up Welcome Message in Magento 2

In Magento 2 Basics Configuration of Storefront Branding, beside Logo, Favicon Copyright notice and Store demo notice, the Welcome Message is very important part. The Welcome Message is on the top right of the header, that extends to include the name of the customer who is signed in. However, with guest customer who do not log in the web store, a message “Default welcome msg” will appear automatically by default Magento 2. Before you launch your store, to make your online store become more friendly and attractive, you must make sure to change the default Welcome content for each store view. This article will show you how to customize your welcome message in Magento 2 webstore.

storefront-welcome-message
Welcome Message

To change the welcome message, you need to follow these steps:

  1. If you are using Magento 2.1 or above, on the Admin sidebar, click Content. After that under Design, choose Configuration.
    If you are using Magento 2.0.x, on the Admin sidebar, click Stores, on Settings option, click Configuration.
  2. In the Design Configuration table, find the store view which you want to configure. After that in the Action column, click Edit. After that, follow these tips:
design-configuration
Design Configuration

a. Under Other Settings, expand the Header section.

b. Enter the Welcome Text that you want to display in the header of your store.

design-configuration-header_thumb_0_0
Header
  1. When everything is complete, click Save Configuration.
  2. After prompted to update the Page Cache, click the Cache Management link at the top of the workspace. After that, follow the instructions to refresh the cache.

Above is an easy tutorial to customize the Welcome Message in your web store. We hove that your online store will have a friendly message to welcome your customers. Thank you for your attention to this article, if you have a question, do not hesistate to ask magexts authors in the comment section or contact directly with email.