An Introduction on Sales Menu in Magento 2

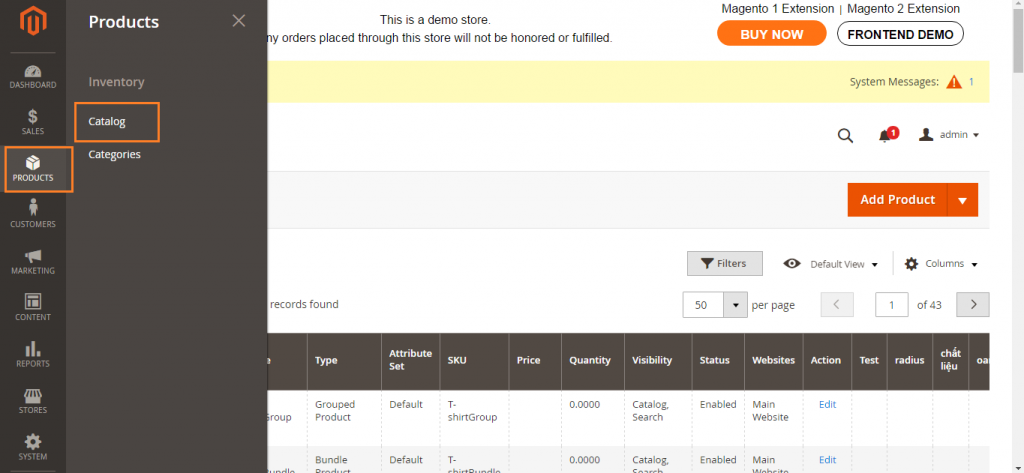
The Sales menu of Magento 2 provides a workflow of how a customer order is operated. The Sales menu includes six parts: Orders, Invoices, Shipments, Credit Memos, Billing Agreements, and Transactions. This blog will provide a brief introduction on each part of the Sales menu.

To find the Sales menu, please navigate to AdminSidebarSales.

magento-2-sales-menu
Here are the six options of Sales menu:

1. Orders

magento-2-sales-orders

When customers place orders in the frontend, the sales order will be created on the Orders grid. This is regarded as a record of the transaction that the customer makes. The order status is pending and the order can still be canceled because no payment is made yet.

2. Invoices

magento-2-sales-invoices
The invoice shows the receipt of payment for the order. Admin can generate multiple invoices for an order, depending on the product that admin specify.

3. Shipments

magento-2-sales-shipmentsWhen products of the order have been shipped to customer, shipment document is generated. Just like invoice, admin can also create multiple shipments responding to the products of that order.

4. Credit Memos

magento-2-sales-credit-memos
If customers receive a refund for the order, the credit memo will be created. Therefore, in general, the credit memo understood as is the amount owed to customer. Admin can generate the credit memo for an order or multiple orders.

5. Billing Agreements

Billing agreement allows customers to sign an agreement with the payment system so that whenever they check out, they don’t have to fill in the payment information again. On checkout process, customers can choose the billing agreement as the payment method, and then customer’s account will be charged by the payment system.

6. Transactions

Transaction provides the list of all payment activities between the store and the payment systems. Admin can check detailed information of any transaction here.
We have presented about 6 Options of Sales Menu for Magento 2. We hope that this article can show you useful information to select the appropriate extension for your online shop. If you find it helpful for you, please Like, Share and Subscribe to keep updating for more upcoming blogs!

How to Master Catalog Workspace in Magento 2?

Are you using Magento 2? And you find it difficult to manage your online products? Don’t worry!! This article will provide you detail information about Product Catalog in Magento 2. After reading this, you will absolutely get the key to Catalog Workspace in Magento 2.

Where can you find Product Catalog?

From the backend mode in Magento 2, you can easily manage the Catalog as you want to. Firstly, you need to sign up with the admin account. Then click on Product category. There you can see three sub-categories: Inventory, Catalog and Categories. Pick up Catalog and you are in Magento 2 Catalog Workspace.

Where-to-find-Product-Catalog

What do you have in Catalog Workspace?

Once you are in the Catalog Workspace, you can see all of products listed on The Catalog grid. It allows you to control over every single products on the list: either edit the existing product or add a new one.

Workspace Control Tools

Workspace-Control-Tools

  • Add product: If you want to create a new product, click on the button. The down arrow provide you with 6 types of product: Simple, Configurable, Group, Virtual, Bundle, and Downloadable Product. You can choose one of them for your new product.
  • Filters: Provide catalog search with multiple attributes
  • [Default] View: Show the current layout. You can simply choose another grid column view (if any is available) or make up a new one.
  • Columns: You can choose different attributes to show on the Catalog grid columns by marking the checkbox in the first column of each. The most important ones are ID, Name, Price, SKU,…
  • Actions: Product list actions offers three options: Delete, Change Status, and Update Attributes.

Columns control

  • Checkbox : You can choose the product one by one or choose all of them by selecting “Select All” option. There also is “Select all on this page” choice, which help you choose all products on the current page.
  • ID: A unique number for a single product.
  • Thumbnail: Show a small picture of product.
  • Name: Name of the product.
  • Type: Type of the product.
  • Attribute Set: Show which categories the product belongs to.
  • SKU: A unique code of product in inventory.
  • Quantity: Indicate the current number of product in stock.
  • Visibility: Show the place that a product can be seen in the catalog: Not Visible Individually/Catalog/Search/or Catalog, Search.
  • Price: Unit price of one product.
  • Action: Click “edit” to come to edit mode.

Now you definitely can master the Product Catalog on our Magento 2!

A Helpful Guide to Basic Configuration in Magento 2

Mastering the basic configuration is a must-have thing for any store owner. This blog will guide you through the basic setting in Magento 2 admin panel. To be more specifically, there are five main sections that will be introduced in this article, including store admin, store details, storefront branding, website – store – view and industry compliance.

1.Store Admin in Basic Configuration


The store admin is your back office that you can conduct all the actions here, from creating product, managing order, setting promotion to configuring tax and checking customer data. All the administrative tasks are executed in store admin.

The store admin is protected by a password that is set up when you install Magento 2. In case you forget the password, you can request a temporary password sent by the system to the email you use when creating your account.

2. Store Details in Basic Configuration

Please navigate to Admin => Sidebar => Stores => Configuration => General => Store Information.

magento-2-store-details-in-basic-configuration
Magento 2 store details

This part allows admin to enter detailed information about your store, including store name, store phone number, store hours of operation, country, region, postal code, city, street address, and VAT number.

The store’s detailed information such as name, address, email and phone number will be included in your document like invoice and email sent to customers.

3. Storefront Branding in Basic Configuration

magento-2-storefront-branding-in-basic-configuration
Magento 2 storefront branding

When first setting up for your frontend store, here are a few quick thing you can do: add logo in the header, use the favicon for the browser, a demo notice on the header such as “This is a demo store. Any orders placed through this store will not be honored or fulfilled” and a copyright note on the footer of the page.

4. Websites, Stores, and Views

During Magento 2 installation, admin can create multiple websites, each website can have multiple stores and each store can hold multiple store views. Admin is capable of managing all websites, stores and store views from admin panel.

5. Industry Compliance

It is merchant’s responsibility to oblige the legal requirements, industry guidelines and best practices which are set by law, payment card industry and depended on the location.

In short, here is all the details for Magento 2 Basic Configuration we want to share with you. If you find it helpful for you, please Like, Share and Subscribe to keep updating for more upcoming blogs!

An Explanation For Structure Of Magento 2 System Menu

The system menu is an important part of Magento 2 admin panel that admin needs to know it like the back of their hands. This blog will give you a full explanation of the Magento 2 System Menu, its structure and benefits of each part.

The system menu is composed of five options: data transfer, extensions, tools, permissions, and other settings.

Please navigate to Admin => Sidebar => System.

magento-2-system-menu

1. Data Transfer

magento-2-system-menu-import
Magento 2 system menu import

This part of Magento 2 system provides tool for exporting and importing data. Admin can make use of this tool to easily import new items, delete or update data. For example, when first creating the catalog with lots of products, admin can import the product using CSV file. This will make the process of adding new products faster and easier than doing this manually.

Updating information on existing products or replacing products in your large catalog won’t take much time because admin can export the data, edit it and then import back to the store.

2. Extensions

magento-2-system-menu-extension
Magento 2 system menu extension

Using extension is the solution to store owner’s request that wasn’t available in Magento default. Many store owners purchase extension as a way to equip their stores with the advanced function that Magento didn’t support without interfering with the core codes.

3. Tools

magento-2-system-menu-cache-management
Magento 2 system menu cache management

This is the basic information that all admin need to acquire: executing routine index, flushing cache, backing up the system and other tools that will be benefit for troubleshooting and issue detecting for the support team.

4. Permissions

magento-2-system-menu-user-role
Magento 2 system menu user role

Magento allows admin to create roles and permission to limit the information that account can have when working on site. With permission, admin can restrict the access of different accounts to the admin panel.

5. Other Settings

magento-2-system-menu-notification
Magento 2 system menu notification

With this part, admin can execute other settings in System, such as managing notification, encryption key and adding custom variables.

In short, here is all the details and reviews for structure of Magento 2 System Menu we want to share with you. If you find it helpful for you, please Like, Share and Subscribe to keep updating for more upcoming blogs!

A Quick Overview of Products in Magento 2 Admin Panel (Part 1)

Magento 2 provides a great system to manage catalog, create catalog, category and other functions that directly relates to product management. This blog will provide a quick overview on product section of Magento 2 admin panel.

1.Products

magento-2-product-section
Please navigate to Admin => Sidebar => Products => Catalog.

Products section contains Catalog and Categories.

magento-2-product-catalog

The catalog presents a list of products on your store. You can create all product types here: simple product, configurable product, bundle product, grouped product, virtual product, and downloadable product.

2. Media

In each product edit page, admin can easily make a media gallery for the products, including both images and videos.
Here is an example of the media gallery on the product page:

magento-2-media-gallery
The media gallery shows multiple images, video and the swatches of that product. This part is placed under the main image and each thumbnail will display a variation of the product.

3. Categories

magento-2-categories

Please navigate to Admin => Sidebar => Products => Categories.

The category is a good way to categorize the product catalog into a logic and suitable structure to navigate your store. The categories also make it easier for customers to shop and find items in your store.

For example, a fashion store that sells clothes for both men and women can be categorized into the following category: women, men and gear. In category women, there can be sub-categories: jackets, tees, hoodies, pants, shorts…

4. Attributes

magento-2-product-attributes-grid

Attributes describe characteristics of product and decide the input control for the product. Basically, the product attributes define products, such as price, color, image, name, size, SKU, status, weight, feature… These attributes contribute to providing additional information on the product page.
Please navigate to Admin => sidebar => Stores => Attributes => Product.

Admin can easily create new attributes or add new attribute set for products in Magento 2.

If you find it helpful for you, please Like, Share and Subscribe to keep updating for more upcoming blogs!