How to Work with CSV Files in Magento 2 ( Part 2 )

In the How to work with CSV Files in Magento 2 Part 1, we have mentioned about the definition of CSV, feature of CSV and Product CSV Structure in Magento 2. So, in this part, we would like to complete the topic by showing the details about Customer CSV Structure in Magento to make you have a full insight into the way to work with CSV files in Magento 2.

Customer CSV Structure

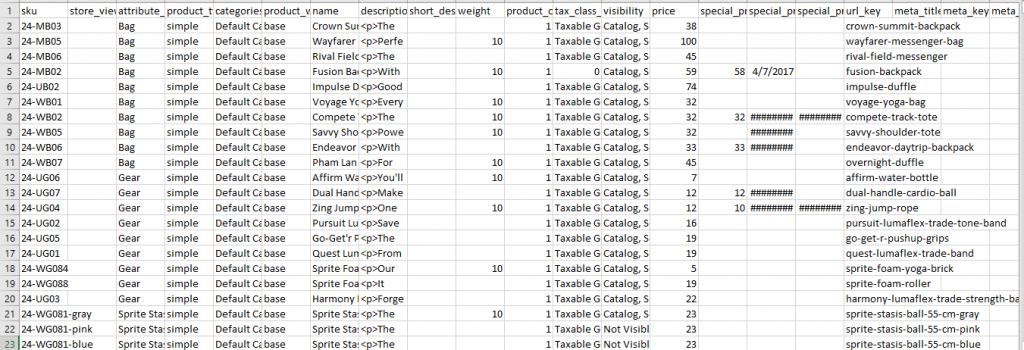
A Customer CSV file fully contains customer information that they have provided from the database as their email, name, address, phone number, customer group, etc. Furthermore, Customer CSV Structure has the following form.

Customer CSV Files Structure

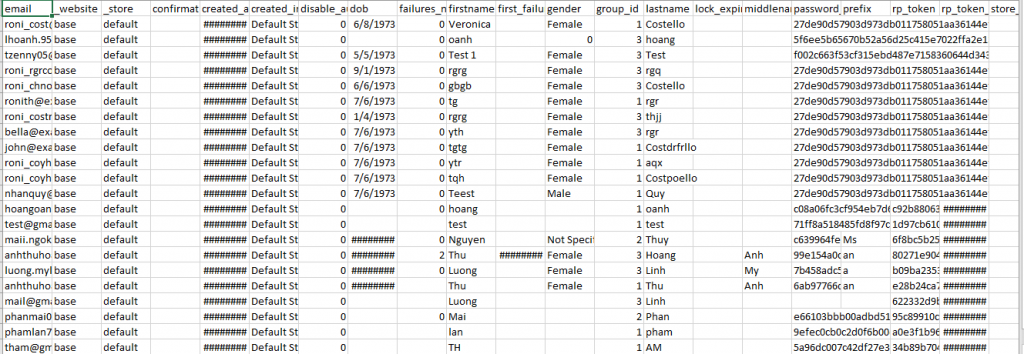
By default, the first row of the table always contains the names of the column attributes representing for below information of each column. Look at the image below, you can see there are two types of column names with forms are like <attribute name> and _<name>. Column headers beginning with an underscore include service entity properties or complicated data. However, service columns are not attributes of customer.

Other rows provide information of attribute values, service data and complicated data. Each row can represent customer data in three situations: with data, without address data, or only the address data. If no more than address data is filled in a row, Customer CSV files will neglect or let the other information in different columns which contain the customer profile empty.

If you want to add or replace more than one address for a customer, you can open the import customer file, add row with the number match with the amount of empty and new customer data or updated address data which is in need to interact under the customer data row.

If you find it helpful for you, please Like, Share and Subscribe to keep updating for more upcoming blogs!


How to work with CSV Files in Magento 2 ( Part 1 )

What is CSV Files in Magento 2?

CSV Files is called as a short name of the comma-separated-value file format. It works like data transfer operation bases which is supported by all spreadsheet and database applications. Magento provides 2 file types of the comma-separated-value which are CSV and ZIP ( a compressed CSV file), therein, both CSV and ZIP are supported for import data, only CSV is supported for export data.

Feature of CSV Files in Magento 2

CSV Files have a particular construction that must absolutely match the database. Each column heading represents for a particular Attribute of the field. For example, name column show what the name of those products are, status column illustrates product’s current situation, etc. Moreover, we recommend you export the database from your store under a CSV Files’s construction to make sure that there is no column heading that Magento can read.

If you use a text editor to open an exported CSV file, you will see that values are isolated by commas, and multiple values are put inside double-quotes. During import, you can choose a custom separator character you want, thought a comma is the default.

To get more insight about CSV Files in Magento 2, please take attendance to the Product CSV Structure as well as Customer CSV Structure part right below.

Product CSV Files Structure in Magento 2

A full export of the product database gives you information about each product in the catalog, and the relationships between them. In that type of record, each column corresponds to the fixed attributes in the catalog.

Product CSV Files structure

The first row of the table which includes the names of each attribute is used as column headers. The remaining rows illustrate the particular product databases like store view code, product type, categories, description,…Any row that starts with a value in the SKU column is the beginning of a new product document. A individual product has to contain several rows that show data about multiple images or product options. The next row that has a value in the SKU column begins a new product.

The category column accommodates a path for each category which the product is selected. The path contains the root category, followed by a forward slash (/) between each level. By default, this “|” mark is used to isolate different category paths. For example: Default Category/Gear|Default Category/Gear/Watches which means that that product is putted in Watches Products Page in  Gear Category from Default Category.

If you want to import data, you only need to set the SKU and columns including changes. All of blank columns are neglected during the import process. You also can include only existing attributes as well.

To get more information about Customer CSV Files Structure, see Working with CSV Files part 2.


Four Simple Steps to Complete Import Data in Magento 2

Import Data in Magento 2 allows users to add the data of product, customer, customer address, and product image into the store under three supports of import in Magento 2: Add/Update, Replace Existing Complex Data and Delete Objects. To learn exactly the way to import a CSV file in Magento 2, please take attendance on fours simple steps that we show below.

Step 1: Arrange the Data

  1. Open the admin homepage, click System on slidebar. Then choose Import under Data Transfer field.
  2. After that,  Import Settings field firstly comes out , choose one of five options including Advanced  Pricing, Products, Customers and Address, Customers Main File and Customer Addresses for Entity Type.

  1. After that, click Download Sample File and open it. The Sample file recommends structure of a standard import file.
  2. Prepare your CSV import file, make sure that it meets requirements following the sample file and it’s size does not exceed the limit shown in the message.
  3. When you desire to add links to product into the import data, you might upload the image files to the correct location. By default, location on the Magento server is: pub/media/import.

If the image locate on an external server, ensure to give the full URL to the directory including the images.

Step 2: Set the Import Behavior

  1. Select Import Behavior you want with one of the following:
  • Add/Update
  • Replace Existing Complex Data
  • Delete Entities

  1. Fill number of errors to halt import process in Allow Errors Count field
  2. Accept the default value of a comma (,) for Field separation and Multiple value separator. Because, in a CSV file, a comma is fixed as a default separator. If you are in need of using another character, the data in the CSV file must match the character that you designate.

Step 3: Identify the Import File

  1. Click Choose File button to select the file to import.
  2. Select CSV file you want to import and tap Open
  3. If the import data contains links to product images, fill the link to the uploaded images on the Magento server or the full URL to the images on another server on Images file Dictionary field.

Step 4: Check the Import Data

  1. Click Check Data button in the upper right corner.
  2. The validation process takes a few minutes to complete. Then, you will see import success message if the import data is valid.
  3. Tap Import to continue if the file is valid or correct all errors with description in the messages and try to import file again.
  4. The import process works till the end of the data. If an error message comes out in the Validation Results, try to fix and import again.

Import Data

A message appears when the import is totally completed.

After finishing data import into the store, all of the information about import process will be fully maintained in Import History field with the start date and time, user, execution time and a link to the import file.

To view the import history, please open Admin homepage, click System on slide bar, then under Data Transfer, choose Import History and the record of data will display after that.

Import Data

If you find it helpful for you, please Like, Share and Subscribe to keep updating for more upcoming blogs!


An Overview of Data Validation in Magento 2

What is Data Validation in Magento 2?

Data validation which can be understood as the checking process for all data before importing into store is completed to assure that the values are appropriate with the system database. To start Data Validation, in the admin homepage, click System, choose Import under Data Transfer, after that, Import field appears with Check Data button in upper-right corner, tap on that button and Validation is begun. During the process, all objects in the import file have to undergo five following checking factors:

Attributes

The value of particular attribute have to be suitable with all of the requirements of the data type and column header match the equivalent attributes in the system database.

Complex Data

Verify values contained in a set, such as multiple select input or drop-down  type to ensure that all of them are defined.

Service Data

In service data columns, the values have to be persistent with standard in the system database.

Required Values

As for new objects, Data Validation does check the existence of required attribute values in the file but does not need to do with existing entities.

Separators

Data values in a CSV file are decided by comma, and text values are putted inside double-quotes. Verify separators and sets of quotes that insert character series to make sure that  all of them are correctly formatted .

Validation Result

After checking process, the result appears with three information below:

  • The number of objects verified
  • The number of invalid rows
  • The number of errors found

If the data is valid, you will see  “Import Success” message displays.

If the data is not valid, the description of each error comes out, please read and fix the problem in import file to reach a valid database.

Apperance of Data Validation Messages in Magento 2

Success Message

Success Import Message

Data Validation Data Validation Data Validation Data Validation

Some errors in import file 

In short, here are all the details and reviews about  Data Validation we want to share with you. If you find it helpful for you, please Like, Share and Subscribe to keep updating for more upcoming blogs!

A Basic Guide to Importing Product Images in Magento 2

An introduction of Importing Product Images

In Magento 2, users can upload a large amount of product images which are associated with specific product as know as Importing Product Images.  Each product image owns particular link and file name to easy to be entered in the CSV file and the image files are uploaded to the equivalent link on the Magento server or external server.

The directory structure of product images is created and arranged alphabetically. When you export product data including images that already exist in the system to a CSV file, you can see the file name of each image comes out with alphabetized link. Nevertheless, if you import new images into CSV files, Magento will create the directory structure automatically so you do not need to designate a link for each image yourself.

In order to  upload images, firstly, you have to login confirmations and right authorizations to connect to the Magento folder on the server. Moreover, you can use any SFTP service to upload the files from your computer to the server as long as the attestations are all accurate.

Before trying to import a large quantity of images, you should check all the steps in the import way that you intend to use and run through the process with some sample products . After you check and confirm that everything is fine, continue to import a large amount of images.

Below there are two methods to import image into Magento 2: import images from the Local Server and import images from External Server.

Method 1: Importing Product Images from the Local Server

  1. Firstly,  upload the image files to the default folder for importing product images on the Magento server: /pub/media/import.

Furthermore, you also can use another folder to upload images on the Magento server with warranty that during the import process, the link to the folder is totally specified.

  1. In the CSV data, enter the name of each image file which is designed to be imported on the right row by SKU and in the right column according to image type such as base_image. small_image, thumbnail_image and additional_images.

Remember that do not insert the link before the filename in the CSV data for images in the default import folder (/pub/media/import) and the CSV file compulsorily contains the SKU column and the related image column.

Importing Product Images

  1. Select the file to import and enter the relative link following Image File Directory: /pub/media/import

Importing Product Images

If you want to import more than one image for an individual SKU, you need to add an empty row under the SKU and enter the additional image file’s names in the suitable columns. The additional rows are considered to belong to the parent SKU.

Method 2: Importing Product Images from External Server

  1. On the external server, upload the images which are chosen to be imported to the specified folder
  2. In the CSV data, fully input each image file’s URL in the exact column by image type including base_image, small_image, thumbnail_image and additional_images.

For example: http://example.com/images/image.jpg

  1. Follow the guidance to finish importing data.

So, that is all the knowledge of Importing Product Images we want to share. If you find it helpful for you, please Like, Share and Subscribe to keep updating for more upcoming blogs!