How To Configure Action Log In Magento 2 Admin Panel

In the previous article, we describe tutorial on configuring Browser Capabilities Protection. In this article, we will describe how to configure Action Log in Magento 2 admin panel.

The Action Log allows store administrators to track activities of other administrators in your stores. For most events, the action, the user who performed action, the result of the action, and the ID of the object on which the action was performed are included in the available information. Action Log is very important for your Magento 2 online store because you can track activities of administrators effectively and manage their actions. Furthermore, you can detect if hackers are hijacking right to control your website or not, and remove them out of your admin roles as fast as you can. So you have to configure action log and tracking every single action of other store administrators carefully.

To configure the Action Log, you have to follow these steps:

On the admin sidebar, click Stores. Under Settings, click Configuration.

On the left of the panel under Advanced, click Admin.

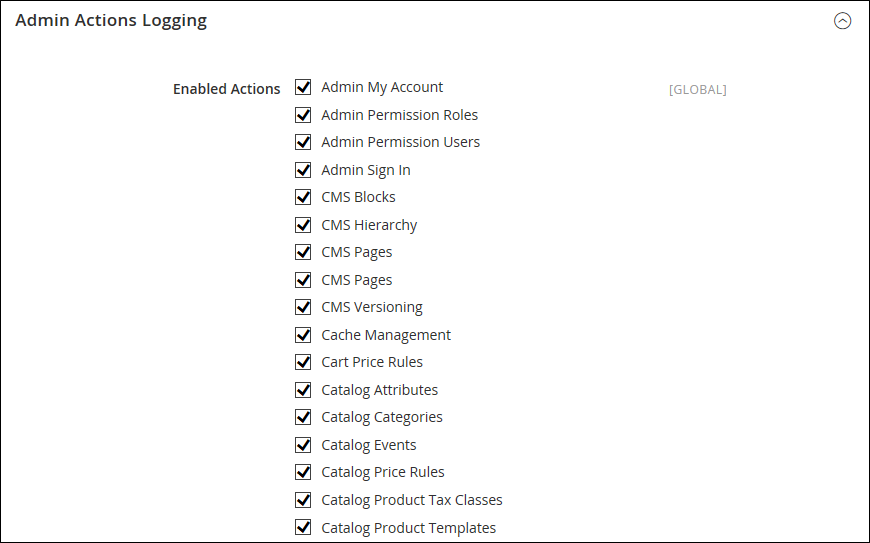
Open the Admin Actions Logging, select and mark any checkbox to enable actions logging as you want. There are 17 actions logs to choose in the global scope, so you have to choose wisely and do not miss anything.

Click Save Config after completed.

Above is a tutorial on how to configure action log in Magento 2 admin panel. We hope that you will know how to select action logs, oversee the action of other administrators carefully, manage other store administrators under your command and run your online store smoothly. If you have any question or have any edit request, feel free to leave a comment or contact us directly. In the next article, we will describe tools and cache management in Magento 2. See you in the next blog post.


How To Configure Browser Capabilities Detection In Magento 2 Admin Panel

Similar to other websites and applications, Magento requires that customers allow cookies and JavaScript. However, sometimes users set the browser to the highest privacy setting that cookies and JavaScript are not allowed. You can configure your store to check the capabilities of each visitor’s browser, and send a notification to browsers if settings need to be changed.

  • Cookies disallowed: Store administrators can configure the system to redirect customers to Enable Cookies page automatically, which describes how to make the recommended settings with most browsers.
  • JavaScript disallowed: Store administrators can configure the system to display the message on the header of every page.

To configure browser capabilities detection, follow these steps:

On the admin sidebar click Stores, under Settings click Configurations.

On the left of the panel under General, click Web.

Open the Browser Capabilities Detection tab and do these steps:

  • Set Redirect to CMS-page if Cookies are Disabled to “Yes” to display guidelines that describe how to configure the browser to allow cookies.
  • Set Show Notice if JavaScript is Disabled to “Yes” to display an alert notification banner on the header when JavaScript is disabled in the browser.

config-general-web-browser-capabilities-detection

  • Click Save Config after completed.Above is a tutorial on configuring browser capabilities detection in Magento 2 admin panel. We hope that you can display the most recommended settings and provide the best experience for your customers. If you have any question or have any request, please leave a comment or contact us directly. On the next article, we will describe a complete guideline of action log for store administrators using Magento 2 platform. So like and share if you think this article is useful, and don’t forget to subscribe Magestandard to tracking our Magento 2 tutorial article. See you in the next blog post.

How To Configure Session Validation In Magento 2

In Magento Open Source default installation, you can validate session variables to avoid session fixation attacks, or attempts to infect or sniff user sessions. The Session Validation Settings decide how to validate session variables during each store visit, and if the session ID is added to the URL of your online store.

config-general-web-session-validation-settings

The validation checks to see that visitors are who they say they are by comparing the value in the validation variables with the session data that is saved in $_SESSION data for the user. If the information is not transferred as expected, and the corresponding variable is null, that means validation fails. Depending on the session validation settings, if a session variable fails the validation step, the client session immediately terminates.

Enabling all of the validation variables can help prevent attacks, but might also decrease the performance of the server. In the default installation, all session variable validation is disabled. We recommend that you test with the settings to find the best combination for your Magento installation. Activating all of the validation variables might prove to be unduly restrictive, and prevent access to customers who have Internet connections that pass through a proxy server, or that originate from behind a firewall. To learn more about session variables and their use, see the system administration documentation for your Linux system.

To configure the Session Validation Settings:

On the Admin sidebar, tap Stores > Under Settings, click Configuration > On the left of the panel under General, click Web. > Open the Session Validation Settings tab. Then, follow these steps:

  • Set Validate REMOTE_ADDR to “Yes” to verify that the IP address of a request matches what is stored in the $_SESSION variable.
  • Set Validate HTTP_VIA to “Yes” to verify that the proxy address of an incoming request matches what is saved in the $_SESSION variable.
  • Set Validate HTTP_X_FORWARDED_FOR to “Yes” to verify that the forwarded-for address of a request matches what is saved in the $_SESSION variable.
  • Set Validate HTTP_USER_AGENT to “Yes” to verify that the browser or device that is used to access the store during a session matches what is saved in the $_SESSION variable.
    • Set Use SID on Frontend to “Yes” if you want a user to stay logged in while switching between stores, set Use SID on Frontend to “Yes.”

    If including SID with analytics, you must configure your analytics software to filter the SID from URLs, so the page visit counts are correct.

  • Click Save Config.

How To Use The Encryption Key In Magento 2

To protect passwords and other important data, Magento uses an encryption key. An industry-standard Advanced Encryption Standard (AES-256) algorithm is used to encrypt all data that requires decryption. This includes credit card data and integration (payment and shipping module) passwords. Besides, this algorithm is used to hash all data that does not require decryption.

During the process of installation, you are allowed to either let Magento generate an encryption key itself, or you can create one of your own. The Encryption Key tool allows you to change the key as needed. The encryption key should be turned on to improve security, as well as at any time the original key might be compromised. Whenever the key is changed, all legacy data is re-encoded using the new key.

For technical information, see Install the Magento software in the developer documentation.

system-encryption-key

In this article, we will describe how to make a file writable and how to change the encryption key in Magento 2 admin panel.

Step 1: Make the File Writable

Make sure that the file in

[your store]/app/etc/env.php is writable to change the encryption key

Step 2: Change the Encryption Key

  1. On the Admin sidebar, tap System. Then under Other Settings, choose Manage Encryption Key.
  2. Do one of these steps: To generate a new key, set Auto-generate Key to “Yes.” To use a different key, set Auto-generate Key to “No.” Then in the New Key field, enter or paste the key that you want to use
  3. Tap Change Encryption Key.
  4. Save a record of the new key in a safe place. It will be required to decrypt the data if any problems occur with your files.Above is a tutorial on how to use the encryption key in Magento 2 admin panel. We hope that you can make your web store secure. See you in the next post.


How To Configure An Admin CAPTCHA In Magento 2 Admin Panel

CAPTCHA (Completely Automated Public Turing test to tell Computers and Humans Apart) is a verification method that makes sure that a human being is interacting with websites. It can be used for admin login and customer logins.

You can click the Reload button to reload the CAPTCHA. The CAPTCHA is configurable and can be set to display every time or only after some failed login attempts.

Admin CAPTCHA

CAPTCHA can be added to the admin login box. Administrators can reload CAPTCHA by clicking the Reload icon

To configure an admin captcha, follow these steps:

Stores > Configuration > On the left of the panel, under Advanced, click Admin > Set Store View to “Default.” > Open the CAPTCHA tab and follow these steps:

  • Set Enable CAPTCHA in Admin to “Yes.”
  • Enter the Font for the CAPTCHA symbols. Default font: LinLibertine.
  • You can add your font by putting the font file in the same directory as your Magento instance, declare in the config.xml file of the Captcha module at app/code/Magento/Captcha/etc.
  • Select the Forms where the CAPTCHA is to be used:

Admin Login

Admin Forgot Password

  • Set Displaying Mode to one of these options:
Always CAPTCHA is always required to log in the Admin.
After a number of attempts to login In the field Number of Unsuccessful Attempts to Login, enter the number of login attempts allowed. Input 0 to Displaying Mode to Always. This option does not cover the Forgot Password form. If CAPTCHA is enabled and configured to display on this form, then it is always included on the form.
  • Enter the Number of Unsuccessful Attempts to Login before the CAPTCHA displays. If enter 0, the CAPTCHA is always used.
  • In the CAPTCHA Timeout (minutes) field, enter the number of minutes before the CAPTCHA expires. When the CAPTCHA expires, the user must reload the page.
  • Enter the Number of Symbols used in the CAPTCHA, the maximum number is eight.
  • In the Symbols Used in the CAPTCHA field, specify the symbols that can be used in the CAPTCHA.
  • Set Case Sensitive to “Yes” to require that users enter the characters exactly as shown
  • Click Save Config.

Customer CAPTCHA

You can configure to force the customer to enter the CAPTCHA each time to login or after a certain time of login failed.

Follow these steps to configure a Storefront CAPTCHA:

Stores > Configuration > Configuration > Customer Configuration > Open the CAPTCHA tab and do these steps:

  • Set Enable CAPTCHA on Frontend to “Yes.”
  • Enter the name of the font for CAPTCHA symbols.
  • Choose the Forms
  • Set Displaying Mode
  • Enter the Number of Unsuccessful Attempts to Login
  • CAPTCHA Timeout (minutes): Enter the minutes before the CAPTCHA expires
  • Enter the Number of Symbols in the CAPTCHA, the maximum number is eight.
  • Specify the symbols that can be used in the CAPTCHA in the Symbols Used in the CAPTCHA
  • Set Case Sensitive to “Yes” to include uppercase and lowercase in your CAPTCHA.
  • Click Save Config