
Catalog data in Magento 2 is often stored in numerous rows and columns, supported by the Entity-Attribute-Value (EAV) model. As product attributes are put in multiple tables, SQL queries are sometimes long and complicated to use. Fortunately, Magento 2 does provide setup tool to cope with that problem. It is called Flat Catalog.
A flat catalog helps admin to create brand new tables in a very short time. All the necessary information about a product or category are included in the table’s rows, which is very convenient for users. Moreover, a flat catalog can also be updated automatically: either in every minute or at a time that synchronized to your Cron schedule.
To Set Up A Fflat Catalog for Your Online Store:
- Go to the backend gate, press Stores on the left panel.
- Choose Configuration under Settings.
- Click on the dropdown icon of Catalog, select Catalog after that.
- Expand the Storefront element, pay attention to Use Flat Catalog Category and Use Flat Catalog Product sections. Clear the Use system value checkbox (if necessary) and set “Yes” for the section that you want to apply flat catalog.

- Once finished, tap Save config to save the changes.
- An additional step is needed to be conducted to refresh the cache: Click on the Cache Management link and follow the guided steps to update the moderation.
Verify the actions in Flat Catalog
Having enabled the flat catalog, you may want to test whether it works in your online store. Do the following steps to verify the action:
For a single product in Flat Catalog
- In the backend mode, tap Products on the Admin sidebar.
- Under Inventories click Products.
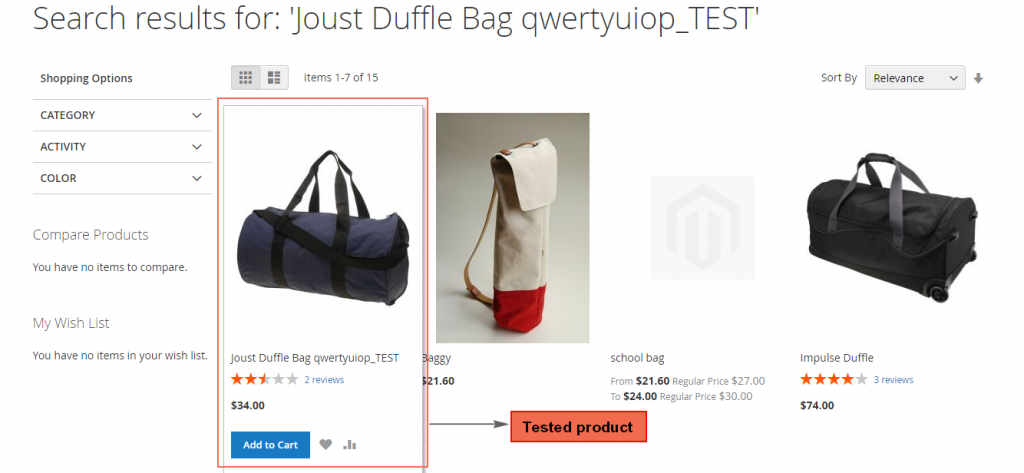
- Go to edit option of an arbitrary product, retype its name by adding “_TEST” to its origin in the Product Name field.
- Press Save.
- Now go to the homepage of your store and search for the product that you’ve changed. Or you can navigate to the edited product by category it belongs to. The results will show up as bellow:
For a category:
- Sign in with an admin account. On the Admin sidebar, click Products, then tap Categories under Inventory.
- Make sure that the Store View field is set to “All store view”. Now press Add Subcategory button.
- Fill “TEST Subcategory” to the Category Name field, then tap Save config.
- The next step is to add products to your new category. Expand the Products in Categories sector, click Reset filter to refresh your products list. Add some of the products to the testing category by marking the checkbox on the left side of each item.
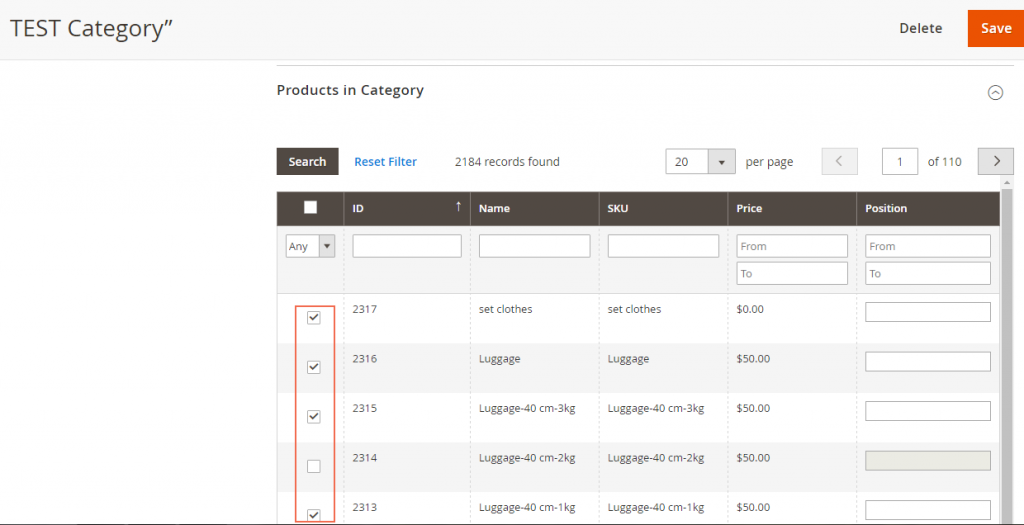
- Click Save to confirm the actions.
- Next, go to your homepage to browse to the new category that you created. The change will appear soon.
Reset to the default setting
You’ve learned how to enable flat catalog for your online store in Magento 2. Now, if you want to reset to the default setting, consider the following guide:
Modify the tested product to its original form:
- On the Admin sidebar, click Products.
- Select Catalog below Inventory.
- Look at the edited product. Click “edit” option under the Action column. Remove “_TEST” from its name.
- Click Save to confirm the change.
Remove the subcategory added:
- On the Admin sidebar, choose Products.
- Pick up Categories under Inventory.
- Find the new category that you created on the left side, then click it.
- Press the delete button on the upper-right corner. There will be a System Notice box to ask for your decision to delete the category. Choose OK for that.
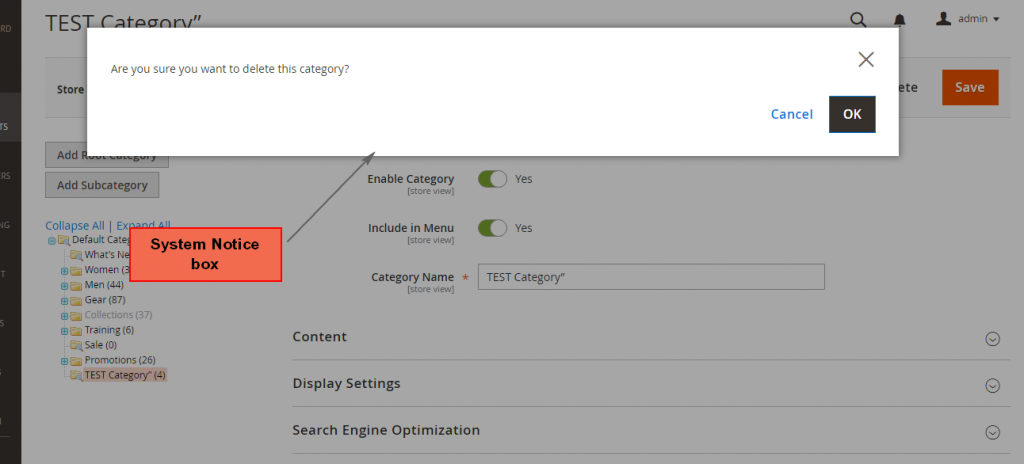
System Notice Box Fflat Catalog - When complete, tap Save.
Restore the original catalog setting:
- In the backend mode, select Stores in the Admin sidebar.
- Go to Configuration under Settings
- Expand Catalog sector, then click on Catalog element.
- In Storefront field, mark the Use system value checkbox for Use Flat Catalog Category. For Use Flat Catalog Product section, set “No”.
- Tap Save Config to verify your modification.
- Refresh the system cache through Cache Management link.
You’ve already had a full understanding about Flat Catalog in Magento 2. Now go to your online store and see what you can do with the new information.