How to Set Up A Fflat Catalog Flat Catalog in Magento 2

Catalog data in Magento 2 is often stored in numerous rows and columns, supported by the Entity-Attribute-Value (EAV) model. As product attributes are put in multiple tables, SQL queries are sometimes long and complicated to use. Fortunately, Magento 2 does provide setup tool to cope with that problem. It is called Flat Catalog.

A flat catalog helps admin to create brand new tables in a very short time. All the necessary information about a product or category are included in the table’s rows, which is very convenient for users. Moreover, a flat catalog can also be updated automatically: either in every minute or at a time that synchronized to your Cron schedule.

To Set Up A Fflat Catalog for Your Online Store:

  1. Go to the backend gate, press Stores on the left panel.
  2. Choose Configuration under Settings.
  3. Click on the dropdown icon of Catalog, select Catalog after that.
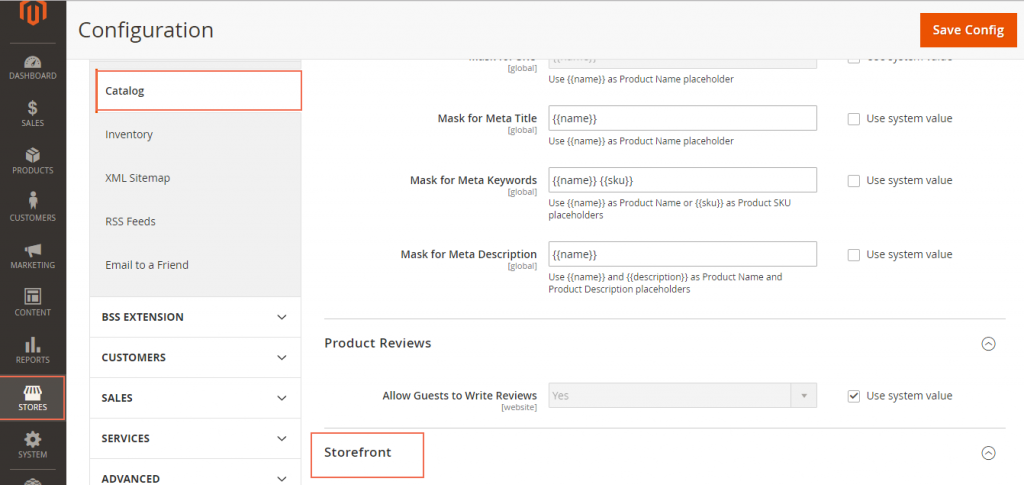
  4. Expand the Storefront element, pay attention to Use Flat Catalog Category and Use Flat Catalog Product sections. Clear the Use system value checkbox (if necessary) and set “Yes” for the section that you want to apply flat catalog.Flat-Catalog-Configuration
  5. Once finished, tap Save config to save the changes.
  6. An additional step is needed to be conducted to refresh the cache: Click on the Cache Management link and follow the guided steps to update the moderation.

Verify the actions in Flat Catalog

Having enabled the flat catalog, you may want to test whether it works in your online store. Do the following steps to verify the action:

For a single product in Flat Catalog

  1. In the backend mode, tap Products on the Admin sidebar.
  2. Under Inventories click Products.
  3. Go to edit option of an arbitrary product, retype its name by adding “_TEST” to its origin in the Product Name field.
  4. Press Save.
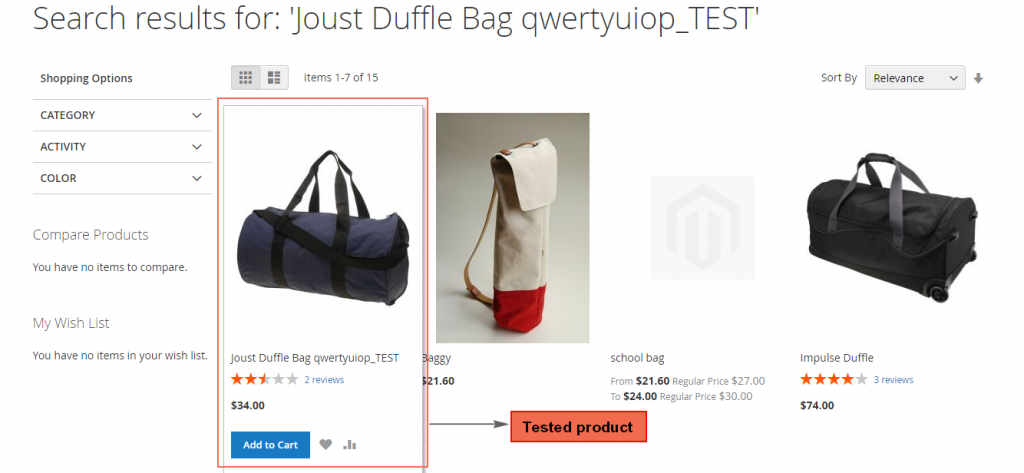
  5. Now go to the homepage of your store and search for the product that you’ve changed. Or you can navigate to the edited product by category it belongs to. The results will show up as bellow:Storefront-with-Flat-Catalog

For a category:

  1. Sign in with an admin account. On the Admin sidebar, click Products, then tap Categories under Inventory.
  2. Make sure that the Store View field is set to “All store view”. Now press Add Subcategory button.
  3. Fill “TEST Subcategory” to the Category Name field, then tap Save config.
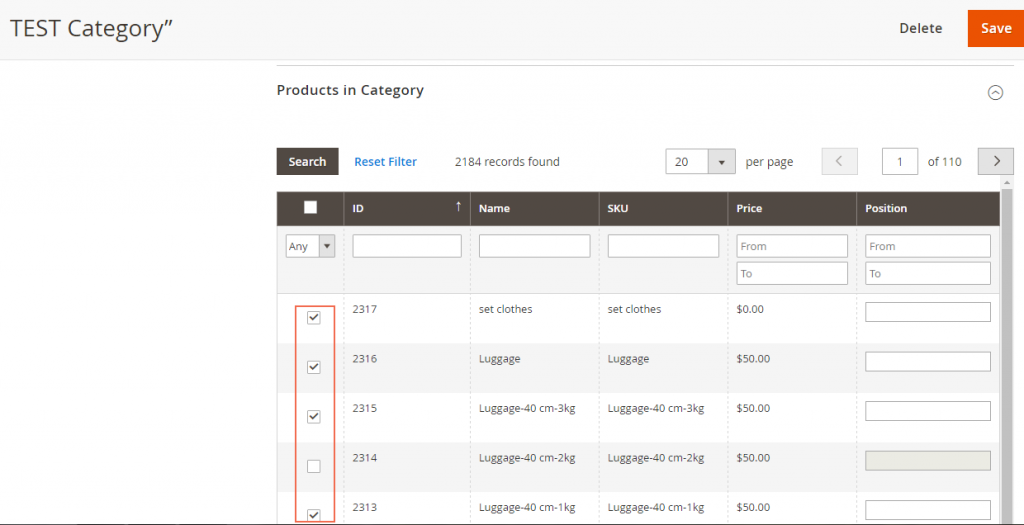
  4. The next step is to add products to your new category. Expand the Products in Categories sector, click Reset filter to refresh your products list. Add some of the products to the testing category by marking the checkbox on the left side of each item.Test-Subcategory
  5. Click Save to confirm the actions.
  6. Next, go to your homepage to browse to the new category that you created. The change will appear soon.

Reset to the default setting

You’ve learned how to enable flat catalog for your online store in Magento 2. Now, if you want to reset to the default setting, consider the following guide:

Modify the tested product to its original form:

  1. On the Admin sidebar, click Products.
  2. Select Catalog below Inventory.
  3. Look at the edited product. Click “edit” option under the Action column. Remove “_TEST” from its name.
  4. Click Save to confirm the change.

Remove the subcategory added:

  1. On the Admin sidebar, choose Products.
  2. Pick up Categories under Inventory.
  3. Find the new category that you created on the left side, then click it.
  4. Press the delete button on the upper-right corner. There will be a System Notice box to ask for your decision to delete the category. Choose OK for that.
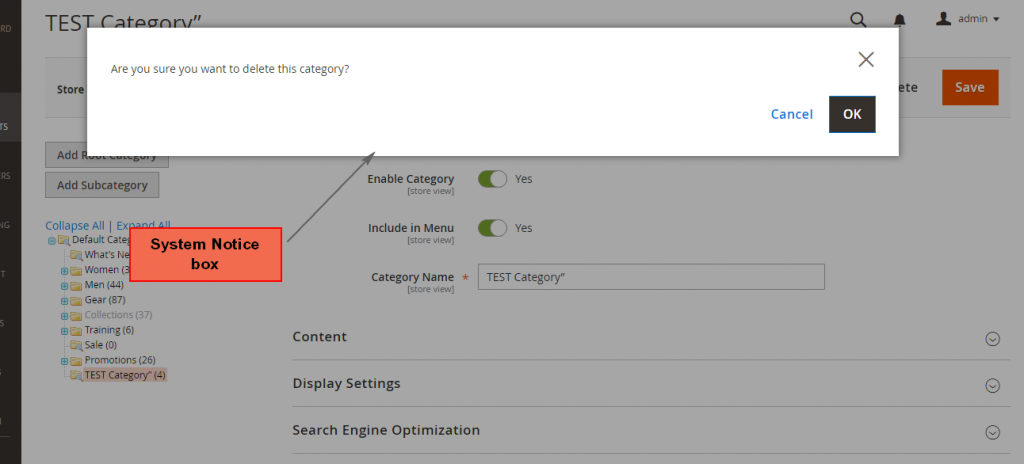
    System-Notice-box-Fflat-Catalog
    System Notice Box Fflat Catalog
  5. When complete, tap Save.

Restore the original catalog setting:

  1. In the backend mode, select Stores in the Admin sidebar.
  2. Go to Configuration under Settings
  3. Expand Catalog sector, then click on Catalog element.
  4. In Storefront field, mark the Use system value checkbox for  Use Flat Catalog Category. For Use Flat Catalog Product section, set “No”.
  5. Tap Save Config to verify your modification.
  6. Refresh the system cache through Cache Management link.

You’ve already had a full understanding about Flat Catalog in Magento 2. Now go to your online store and see what you can do with the new information.

An Overview of Product Workspace in Magento 2

Creating product(s) is the very primary step to build an online store. First of all, you need to determine which product type your new item belongs to. There are 6 types of products in Magento 2: Simple product, Configurable product, Grouped Product, Virtual Product, Bundle Product, and Downloadable Product. Each of those types has its own features that differentiate themselves from others. In this section, you will find information about how to create a product of each type in Product Workspace

The first part of studying how to create a new product for your online store is to learn about Product Workspace. Product Workspace is a section in which a set of basic information of a new product is performed. It is not exactly the same for all types of product, but configured by admin in the categories and attributes setup part.

Product Workspace
Product Workspace

It is crucial that every single product need to have a Name, a unique SKU for controlling activities and a unit price to sell. Other fields can be either optional or mandatory, it is up to attributes setting.

Enable Product: Indicates the online status of a product:

  • “Yes” : The product is currently online.
  • “No” : The product is currently offline.

Attribute Set: The attribute set of a new product will have effect on what kind of information you need to add to your product description. For example, if you choose Bottom for the Attribute Set, some kind of information like Color, Size, … might be required. But if you choose Gear the Category Gear field will show up.

Add Attribute: This button allows admin to add an attribute for a product. For example, you may want to add the Manufacturer Attribute to your new bag to provide more detailed information to customers in the homepage.

Save Menu: Magento 2 offer store owners three saving options after creating new products.

  • Save: Store up the current product, and continue working.
  • Save & New: Save and close the current product, then open a new product grid right right on click. This new product grid is base on the same product type and template. It is especially helpful when admin want to create a number of products in the same product type.
  • Save & Duplicate: Like the second option, its function is to save and close the current product. However, this selection will open a new duplicate copy.
  • Save & Close: Save the current product and come back to the Inventory workspace.

    Save Menu Product Workspace
    Save Menu

That is a brief information about how to create a new product and what the Product Workspace is. Follow our later blogs to get more information.

How to Manage Dynamic Media URLs in Magento 2?

4A Dynamic Media URLs is an address that direct user to an image or a media file. As a normal dynamic URL, a dynamic media URL may include a query string and is not very much friendly with SEO. If it is set as “enable” by admin, dynamic URL can bring the users directly to your data processor. It also can link them to files that are stored on a content delivery network. Dynamic Media URL in products and categories can help to improve catalog performance, resulting in a positive experience for your customers when they are shopping online.

Like other markup tags, a dynamic media URL code is covered in double curly braces. Here is a typical format of a dynamic media URL: {{media url=”path/to/image.jpg”}}

Configure Dynamic Media URLs

As mentioned, dynamic media URLs can be configured to be either “enable” or “disable” by an admin of the online store. Below are steps should be taken:

  1. Sign in with an admin account.
  2. Click Stores on the left panel, then choose Configuration under Settings.
  3. Expand Catalog and tap the Catalog element bellow it.
  4. Click the drop-down arrow on the right side of Storefront.

    Media URLs Storefront
    Media URLs Storefront
  5. Now set the Allow Dynamic Media URL in Products and Categories choice as your preference.Configure-Dynamic-media-URL
  1. Press Save Configuration to confirm your setting.

Configure Static Media URLs

Admin can also use static media URLs for catalog product and category descriptions.

  1. In the backend status, tap Stores.
  2. Choose Configuration under Settings.
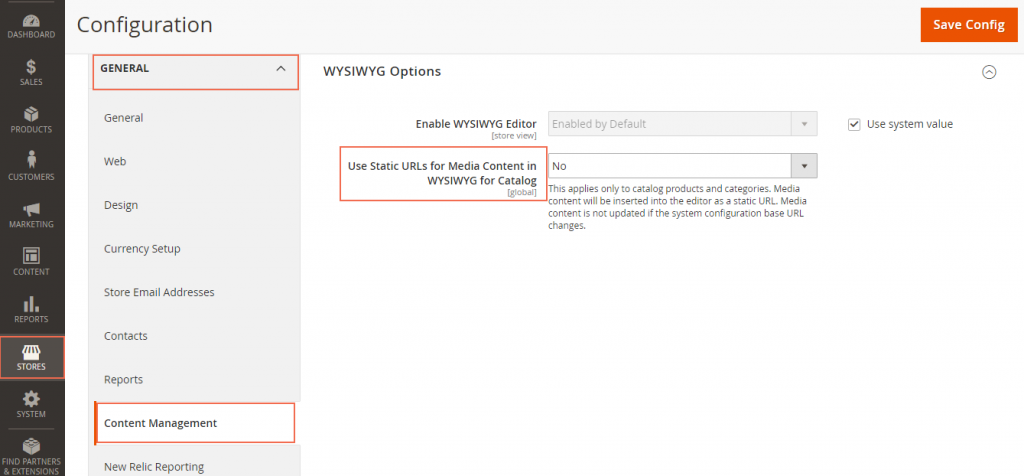
  3. Expand General factor, then select Content Management. Here you will see WYSIWYG Options.
  4. Set Use Static URL for Media Content in WYSIWYG for Catalog to “Yes” if you want to use static URLs by default for media files and “No” otherwise.
  5. Click Save Configuration to save changes.

    Static Media URLs
    Static Media URLs

In short, with only a little effort, you can easily configure dynamic media URLs for your online store. It not only helps to better control catalog products and categories but also bring your customers finer shopping time.

A Quick Comparison between Magento and WooCommerce

Due to the diversification of Ecommerce platforms, users may have difficulty in choosing the suitable solutions for their websites. Choices are aplenty, but only a few stands out such as Magento and WooCommerce.

Magento is an Ecommerce platform built as an open source solution owned by eBay whereas WooCommerce is a powerful Ecommerce toolkit developed to transform any WordPress website into a beautiful online store. Let’s take a closer look to see differences between these two platforms.

Setting up Magento and WooCommerce

WooCommerce can be a good choice for beginners whether they already have their existing WordPress website or build from the scratch. Even if you don’t have a WordPress site, it is quite easy to set up and install thanks to many tutorial videos on the internet. All you have to do is customizing your site through WordPress based on number of available plugins.

The interface of Magento is basic but Magento’s complexity is increased when you want to add more extentions to upgrade your site. In this case, you might want to hire a Magento specialist developer to create unique features for your own business.

Hosting

WooCommerce is known as a small plugin that uses little disk place and is light on your server place. Therefore, it runs smoothly and quickly on any server unless your products reaches thousands.

With Magento, it is more complicated because even modest-sized stores need several GBs of disk place. Moreover, complex operations also affect and put a strain on your server loads as time goes by. You need dedicated server to avoid slow running if you don’t want to lose customers.

Design & Features

Themes

Both Magento and WooCommerce provide thousands of free and premium themes ranging from 79$ to 139$ to meet different users’ demands. Each platform has various features, responsive layouts across all device sizes and demo content that you can simply download and import into your own site.

Shopping cart facility

You will need to have a shopping cart facility, upload products and categorize them  for any Ecommerce platform. However, Magento seems to win on this point with more features including cross-sell or up-sell products, products comparison, discount codes, and advanced filters for navigation.

WooCommerce is simpler because you can only rate products and feature best sellers or sale items through the available widgets. Anything else complex needs other extensions to change and apply to your website.

Analytics

For both Magento and WooCommerce, you can view Google Analytics to see the success and trend of your business as a whole. It is necessary because you can prepare future plans and strategy for your business.

Costs

WooCommerce is a free Ecommerce platform that anyone can download and use. To improve and diversify features for your website, you have to pay for premium extensions and they are not cheap at all. Besides, your web hosting cost will depend on your size of enterprise and offered packages.

Unlike WooCommerce, Magento is free only when you use Magento Community Edition. If you use Enterprise Edition, you have to pay annual fees for maintenance because this edition provides special functions designed for large companies.

The final verdict

Which is the better platform, Magento or WooCommerce? It depends on the requirements and funtions you want to apply to your website. WooCommerce through WordPress is perfect for small or medium enterprises whereas Magento will be an adequate platform for websites of larger companies requiring high flexibility and diversified features.

In short, here are all the details and reviews of Magento or WooCommerce we want to share with you. If you have any question, please feel free to contact us.

What Is Catalog URLs in Magento 2?

The URLs of your online products and categories are extremely important to SEO (Search Engine Optimization). The friendlier your URLs are, the higher possibility that your products will be shown on customers’ search results. Therefore, it is necessary to consider the URLs format and URLs components for your Catalog URLs.

Catalog URLs

URLs format: There are 2 types of format available here:

  • Dynamic URL: is the link comes out when a customer search for products by searching tools. This type of URL can contain a query string, or a product’s ID. An example can be: http://onlinestore.com/catalogsearch/result/?q=+Savvy+Shoulder+Tote
  • Static URLs: is a unique address of one specific page. It is friendlier with SEO than Dynamic URLs are. It haves cues that is helpful when a customer looks for a product. For example: http://onlinestore.com/overnight-duffle.html

URLs components:

  • URL Key: Describes the product or category, should consist of normal characters with hyphens to separate words.
  • HTML Suffix: The suffix is controlled by the system configuration and can be either include or exclude from the product. Normally, it is set as “html” or “htm”. 

URL with suffix: http://onlinestore.com/gear.html or  http://onlinestore.com/gear.htm

URL without suffix: http://onlinestore.com/gear

  • Category Path: Like HTML suffix, this component is optional. It can be excluded to stay clear from being indexed to multiple pages with the same content. Magento 2 does not include this path in product URLs at the default setting. For instance: http://onlinestore.com/women/tops-women/hoodies-and-sweatshirts-women/mona-pullover-hoodlie.html

Configure Catalog URLs

In order to set up Catalog URLs, you need to sign in with your admin account first. Then follow 6 steps below:

Step 1: Click Stores in the navigation column on the left.

Step 2: Under Setting, tap Configuration.

Step 3: Expand the Catalog by clicking on the dropdown sign, then choose Catalog.

Step 4: Move downward until you see Search Engine Optimization sidebar. Select and/or fill in three options including:

Product URL Suffix: You can set this as “htm” or “html”. Remember that the period is not needed here because it is filed automatically.

Category URL Suffix: Either “htm” or “html” is ok. No period is needed.

Use Categories Path for Product URLs: You have three options here: Use system value/ Yes/ or No.

Search-Engine-Optimization-in-Catalog-URLs

Step 5: Click on Save Configuration on the upper-right corner to save your set up.

Step 6: When complete, tap the Cache Management link on the notice box and flush Magento cache to finish your work.