What are Related Products, Up-Sells, and Cross-Sells in Magento 2?

Related Products, Up-Sells, and Cross-Sells

Being listed down in the Magento 2 product settings, the Related Products, Up-sells, and Cross-sells is the section that helps Magento store owners to build up basic promotional blocks to attract customers. From this section, merchants can present extra products that are relevant to the current product. It will effectively draw the customer’s attraction, thus raising more sales for their online stores.

storefront-product-related-products

Related Products in details

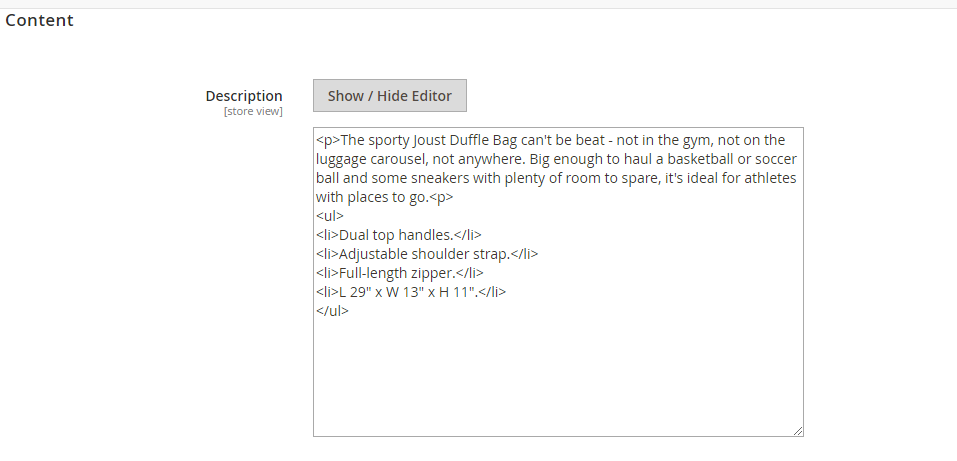
Related products are items that are most likely to be purchased together with the product that the customer is considering. For example, on a product page for mobile phones, you might list additional items such as USB Car Charger, Mobile Phone Case, Mobile Phone Car Mount, and so on.

With proper settings in the Magento 2 backend, customers are allowed to add these items to their shopping carts by simply marking the checkbox in the Related Products block. The position of the Related Products block displayed in store’s frontend is different among different themes and page layouts. For instance, it can appear at the bottom of the Product View page like the image below. In the meanwhile, these blocks often appear in the right sidebar of a 2 column layout.

To set up Related products in Magento 2, do the following:

    1. Log in to the store’s backend, then open the product in edit mode.
    2. Next, Move to the Related Products, Up-Sells, and Cross-Sells section. After that, click the Add related products button on the right side.

product-related-up-sell-cross-sell
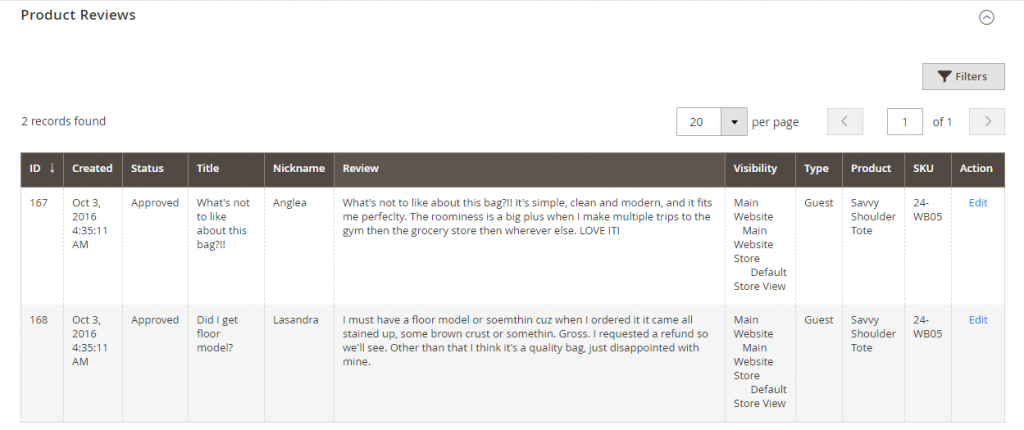
3. Now, a product grid is displayed on your screen. Select the product(s) that you want to feature as a related product by marking checkbox in the very first column. You can use the filters if necessary.

products-related-add

4. When you finish the selection, tap Add selected product to confirm the action.

That is all about Related products in Magento 2. Later blogs about Up-sells and Cross-sells are soon be released. So, don’t forget to follow us now.

Magento 2 Configurations, Product Reviews, and Images & Videos

When creating a Magento 2 productConfigurations, Product Reviews, and Images & Videos are the first three sections that contain more detailed information.

Configurations

From the Configurations section, you can see all the variations of a product that are created based on different colors, sizes, etc. You can also create new variations for later use with the Configurable Product type.

product-configurations

Product Reviews

The Product Reviews part shows the whole reviews that customers have submitted. Detailed information like product name, SKU, review status, date created, customer’s name, and so on are displayed in a grid when you expand the section. It is very important to note that this section only appears for an existing product, which has been available in your online store.

Magento-product-reviews

Images and Videos

The Images and Videos section allows you to do the very fundamental tasks related to product visual images and any audio files. You can upload more than just one image for each product, then set the order for them, and manage how each of them is used. For more complicated settings, you can open the image in detail view by clicking the “Base”/ ”Thumbnail” / ”Small” button and set to your preferences. The Magento default uses temporary images as placeholders until the permanent product images become available.

product-images-videos

To upload an image or video, do the following:

  1.  Open the product in the backend mode
  2.  Move downward and expand the Images and Videos section.
  3.  There are two methods to add a product image/ or video:
  • Select an image from your computer, then drop it on the camera symbol.
  • Tap the camera icon, then navigate to the image file on your computer. After that, select the image, and tap Open to upload it.
  1.   When you finish all the settings, tap Save to confirm all the changes.

In short, here are all the details about Magento 2 Configurations, Product Reviews, and Images & Videos we want to share with you. If you want to add or erase any item in this FAQ list, feel free to contact us. Don’t forget to Like, Share, and Subscribe to Magestandard for more informative Magento extension review articles.

How to Configure USPS in Magento 2 Stores?

Founded in 1775 as an independent agency of the United States government, the United States Postal Service has developed themselves to become one of the biggest freight companies all over the world. USPS offers both domestic and international shipping services by land and air to more than 220 countries. This article will guide you clearly how to set up this shipping carriers in the backend configuration.

STEP 1: Open a USPS Shipping Account

First of all, admin needs to already have a USPS Web Tools shipping account with User ID and a URL to the USPS Test server.

STEP 2: Enable USPS for Magento 2 Stores

  1. Look for Stores on the left-side bar of Admin homepage. Click on Configuration below
  2. In Sales section, choose Shipping Methods, scroll down and find
  3. Expand this section and complete the configuration as following instructions:

a. Choose “Yes” at Enabled for Checkout

b. In the Gateway URL field, a URL linked to USPS shipping rate calculation is required. Normally, this field is preset by default and does not need to be changed while using.

c. In the Title field, enter or paste the name which will appear on screen to choose when checkout.

d. Register your account credentials in the corresponding fields: Users ID, Password of USPS Shipping Account.

e. In the Mode field, choose “Development” to run USPS in a test environment. If everything goes well, you can transform to “Live”, which will allow to run USPS in real Magento 2 transactions.


USPS Account Settings

STEP 3: Complete the Container Description

  1. In the Packages Request Type filed, choose “Divide to Equal Weight” if products in Magento 2 stores have equal weight, therefore admin can submit multiple packages in one request. If not, choose “Use Origin Weight” to submit multiple separate requests.
  2. In the Container section, admin needs to choose their regular packaging type. There are 5 options for USPS Shipping: Variable, Flat-Rate Box, Flat-Rate Envelope, Rectangular, Non-Rectangular.
  3. In the Size section, admin chooses their typical packaging size. There are 3 options there: Regular, Large, Oversize.
  4. The Machinable field is to determine whether you want your package to be processed manually or by a machine. Choose your corresponding option there: “Yes” to use a machine and “No” to do it yourself.
  5. In the Maximum Package Weight section, enter the maximum number advised by USPS

USPS Packaging Settings

STEP 4: Set up Handling Fees

  1. The Calculate Handling Fee section is to determine calculation methods to control handling fees. There are 2 options for admin to choose:
  • Fixed
  • Percent
  1. In the Handling Applied section, admin decides to apply handling fee for each order or for each package. There are 2 options corresponding to them.
  2. In the Handling Fee section, admin needs to enter the rate based on chosen Calculate Handling Fee selection. If admin chooses “Percent”, enter the number without “%” symbol. For example: if the Handling Fee is 1%, enter “0.01”. If admin chooses “Fixed”, enter the number of fee there.


USPS Handling Fee

STEP 5: Modify Particular Shipping Methods and Applicable Countries

  1. In the Allowed Methods section, a list of USPS shipping methods will appear. Admin can choose to offer multiple options by holding the Ctrl button. These methods will be shown under USPS Shipping while checkout.
  2. In the Free Method section, choose “None” if you do not want to offer free shipping for any order in Magento 2 stores. If yes, set the list to the method you want to use. Then, in the Free Shipping Amount Threshold section, enter the minimum value for each free shipping order.
  3. The Display Error Message section is to create an alert message to notify your customer when USPS is unavailable when checkout. There is a default message by Magento. However, admin can modify by entering your own message there.

USPS
USPS Allowed Methods

  1. In the Ship to Applicable Countries section, choose “Specific Countries” and select from the list each country where USPS is available, or tap “All Allowed Countries” to offer worldwide shipping by USPS.
  2. In the Show Method if Not Applicable section, choose “Yes” to show USPS Shipping all the time (whether it is available or not). If not, choose “No” to show only when it can be used.
  3. In case you want to have a log file that contains information about all your shipments via USPS, choose “Yes” in the Debug
  4. In the Sort Order box, enter the number to arrange the order of USPS option in a list of available methods. For example: 0 for the first, 1 for the second, etc.
  5. In the Free Shipping Amount Threshold section, choose “Enable” to determine that free shipping order must meet a minimum amount.
  6. Click Save Config to complete.

USPS

USPS Applicable Countries

In short, here are all the details to Configure USPS in Magento 2 Stores we want to share with you. If you want to add or erase any item in this FAQ list, feel free to contact us. Don’t forget to Like, Share, and Subscribe to Magestandard for more informative Magento extension review articles.

How to Set Product Content in Magento 2

The Product Content settings in Magento 2 is used to write the product description that appears on each product page. There are two separate parts in this section: Description and Short Description.

Product Content

The former lists down full features and characteristics of a product while the latter shows a short version only. The Short Description might be used in most RSS feeds and catalog listings, depending on the theme.

With the editor toolbar, you can format the description as you want. When filling in the text box, you should notice that only plain ASCII characters are accepted. In case you paste text from a word processor, remember to save it first as a plain .TXT file to remove any invisible control characters.

plain-text-example

To enter the product description, do the followings:

  1. Sign in with your admin account. On the Admin sidebar, choose Product then select Catalog.
  2. On the product grid, click the Edit link of the product you want to edit.
  3. Now scroll down to the Product Content section and tap the Expand icon next to it.
  4. Enter/edit the main product Description to the first box. You can use the toolbar at the top of the box to format the text to your preference.
  5. Enter a Short Description of the product to the second blank field. Format the text as needed.

There is an interesting fact here that you can reshape the text boxes to as you want. In order to change the height of the text box, move the mouse to the lower-right corner and pull it to the position that applies to you. Don’t forget to use plain ASCII characters when you write in the boxes.

That is the detail information about How to Set Product Content in Magento 2. If you want to add or erase any item in this FAQ list, feel free to contact us. Don’t forget to Like, Share, and Subscribe to Magestandard for more informative Magento extension review articles.

An Overview of Product Settings in Magento 2

Product settings are the completion of necessary information needed to create a new product for your Magento store. While the settings are different among six types of products in a Magento store, the structure of setting fields is the same for all of them. The most familiar product settings and attributes are located at the top of the page whereas other product settings lie at the bottom of the page, and they can be expanded or hidden from the page.

There also are advanced settings for the product price and its inventory status in the very first section. You can access these settings by clicking the Advanced link below the Price and Quantity fields. In the Advanced Pricing section, you can set a special price for your product with a specific time range, set the store view limitation, etc… For the Advanced Inventory, you can set the minimum or maximum number of product quantity allowed in a shopping cart and many other special settings.

Product settings

The additional settings are found at the bottom of the product settings page. These settings might appear when the product is saved for the first time. To uncover or hide the settings, you need to tap the expanded or collapsed button next to your intended section. Some of the settings are available for all types of products, and others are just available for a specific type of product. The general settings include Content; Product Reviews; Images and Videos; Search Engine Optimization; Related Product, Up-sells, Cross-sells; Products in Websites; Designs; Scheduled Design Updates; and Gift options. The specific settings for different types of a Magento product are Configurations; Customizable Options; Downloadable Information; Grouped Product; and Bundle Items.

product-settings-other

Provided above are general information about product settings for online stores using  Magento platform. You can learn more about advanced settings and other settings in our upcoming articles.